

Analyze with AI
Get AI-powered insights from this Mad Devs article:
Hello everyone! In this article, we will consider common errors in the design of electronic devices and how to solve them. We will see how to calculate the cost of rolling back a batch of devices, get familiar with the main prototyping cycle.
Introduction
You have probably heard that various manufacturers recall batches of electronic devices from time to time. Smartphones hanging up, cameras turning off suddenly, electronic cigarettes exploding — these are the results of an incorrect approach to prototyping devices and savings on-device testing.
For users, such cases look like routine and can only undermine their trust in the device manufacturer. For a company that has released insufficiently tested devices in a series, defects can lead to the recall of the entire batch of devices, paying compensation, and even bankruptcy.
Real-world cases
Nowadays, almost all portable or stationary devices have intelligent control. They use the computing capabilities of microcontrollers, microprocessors, and processors for their work. This means that to change complex electronic logic, one will need to make changes in the software. This approach simplifies debugging, development, and error fixes, also reducing the cost of devices. Besides, manufacturers try to protect themselves by preferring software solutions to hardware solutions for flexibility of the manufacturing process. As technologies develop, technical requirements for devices become more and more complex. Due to their complexity, modern devices should be properly designed and tested.
Software errors are resolved by updating the device software, normally it doesn’t cause serious damage. Below you can find some examples of errors made by well-known companies:
- 2019 — a login error on a Samsung smartwatch:
- 2018 — an error causing the Apple iPhone restart when receiving messages with certain characters:
- 2016 — a vulnerability in Android enabling attackers to access a number o smartphone models:
- 2016 — an issue with the shutter being stuck in Nikon D750 cameras.
Errors in the software are common for any device manufacturer. They only indicate that the device circuit was properly designed, so the device didn't stop working, and the error resulted in zero hardware damage.
The errors in circuitry, layout of electronic components or mechanical parts, or insufficient protection of the device from external influence lead to more serious consequences. Unlike software issues, they cannot be resolved remotely and result in higher costs as the manufacturer needs to pay for repair or even release another series of devices. Moreover, hardware errors often mean that the device won't work properly.

However, errors in the firmware of the devices, especially those performing simple tasks without the possibility of remote firmware upgrade, should not be treated irresponsibly either. Even if such errors do not make their manufacturer rework the circuitry, they can still lead to reflashing. When designing devices on simple microcontrollers with peripherals used for outer world communication, it is possible to add the function of remote firmware updates and protect yourself from device recalls. We will cover remote firmware upgrades in more detail in one of our upcoming publications.
Here are some examples of hardware issues:
- 2017 — Spectre, Meltdown — major hardware vulnerabilities at the core level of most Intel, AMD, ARM processors were detected. The command execution optimization mechanism could be used to access the arbitrary memory allocated for specific applications:
- 2016 — The discovery of a known problem with Samsung Galaxy Note 7 batteries causing smartphones to burn. Due to possible fires, some countries banned this model from air transportation:
- 2013 — nowadays — numerous incidents involving the ignition of electronic cigarette batteries resulting in severe burns and injuries to users (WARNING! Explicit content):
These examples show that hardware errors in devices can be fatal to the device itself or to the manufacturer. This is why hardware development and testing must be more delicate.
A simple example of a disruptive design error in a device
The consequences of hardware errors are clear, but why they occur? What is the reason behind them?
Errors in the circuitry and mechanics of the device often occur due to the lack of load, crash tests, and tests in an aggressive environment. The approach to developing hardware may be incorrect, too.
Let's say we designed a simple device — a component of the meteorological data collection system.
The device is installed on a hill (a lamppost, a tree trunk, a roof of some building).
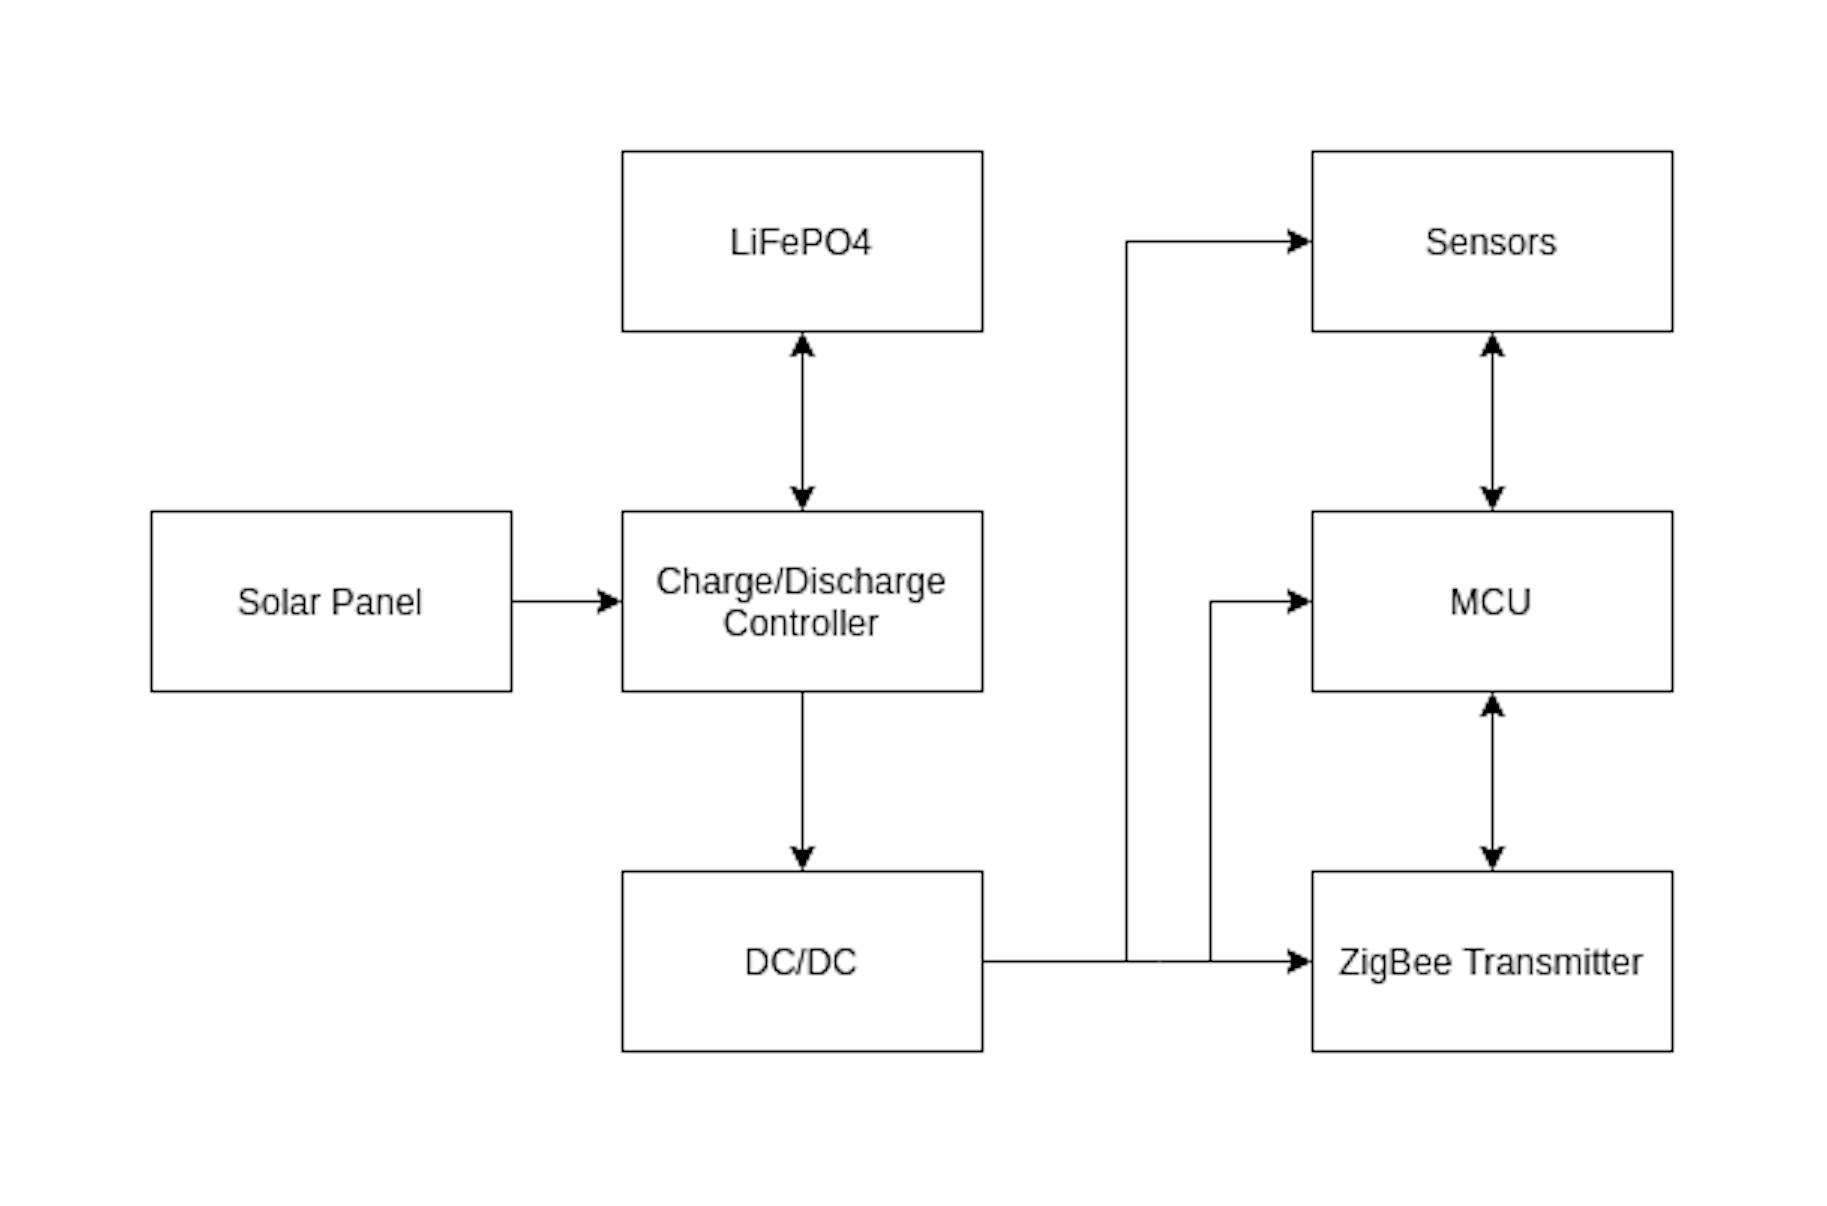
The device consists of the following parts:
- a series of sensors.
- a microcontroller unit.
- a ZigBee transmitter.
- a LiFePO4 battery with 2000mАh capacity.
- a DC/DC converter.
- a charge/discharge controller.
- a solar panel for autonomous working.
The device is sealed in the IP67 housing (description in Wiki).
The block diagram of the device is as follows:
Let's suppose that during the development phase, some tests were carried out to check:
- Stand-alone operation using solar battery charging.
- Transmitting of actual sensor data at the required distance.
- Current consumption of the device is within the permitted limits.
- Hull tightness.
It looks like the device passed all the necessary tests, and it is possible to start serial production.
Next, the following scenario is possible:
- The device documentation for mass production is written.
- A trial batch of 100 products is produced.
- The product is launched officially.
- After a long and successful use for several months, the company produces a larger batch of several thousand units.
- The ambient temperature gets higher as summer comes.
- Due to high tightness of the device and the lack of active cooling, the devices gradually heat up to temperatures at which their batteries become unusable.
- The battery capacity drops rapidly, making it harder to keep the supply voltage at the necessary level.
- The DC/DC converter starts to operate at its power limit and loses conversion efficiency over time, dissipating more and more power.
- The increased temperature of the device's active elements causes a fire.
In this scenario, at best, the devices will simply fail; at worst, they will cause a fire.
In this example, the error is made at the initial stages of the construction of circuitry, as the device should have been load tested in aggressive conditions. To prevent the error in the remaining devices, it is necessary to completely change the approach to power supply and sealing.
This means that producing hotfixes for devices with problems in circuitry and sealing mechanics is simply pointless. It is much cheaper and faster to reissue the entire batch of devices.
Price calculation of a simple error in a hardware project
If the errors from our example are detected in a real hardware project, the manufacturer will suffer colossal losses, and their reputation will also be affected, which may lead to bankruptcy.
If that hardware company from our example decides to re-design and reissue their simple devices, it will need to spend huge amounts of money on the redevelopment of problem parts and additional testing.
Let's make a simple calculation on how much it will have to spend on re-issuing the series of devices:
Cost of parts: The price of parts for one device from the example ranges between $70 and $90.
Development: fixing power supply and sealing problems, plus preliminary test, will take an Embedded Systems Engineer about 15 hours.
Simulation, testing under aggressive environment: simulation of the device's behavior in real-world conditions, calculation of power consumption and dissipation, and tests in aggressive conditions can take up to 50 hours.
The average cost of the Senior Embedded Systems Engineer work is 70$/h.
Thus, to correct the error from our example, the company will need about $2,000, and reissuing the trial 100-device batch will cost it about $8,000.

The cost of lost time and customer confidence should also be added to the resulting amount. If the worst-case scenario unfolds, the damage compensations paid to the users will increase it even more.
How to avoid such mistakes? Which tests should be given more attention? What are the main design problems when it comes to hardware? That's what we'll talk about later.
Step-by-step planning for prototype device development
To issue a test batch of devices successfully, you need to have a fully tested prototype device and complete technical documentation describing the production technology.
The keyword here is "prototype" — a device that fully implements the required functionality and is ready for modification and optimization for the consequent serial production. More information about prototyping can be found here.
When you discuss the statement of work and possible deadlines with the customer, it is vital to take into account the following facts:
- If all your hardware modules are stable as separate parts, it does not guarantee that they will work together in any way.
- Successful prototyping does not mean that a product can be launched into a series — it is just one of the achievements on the way to mass production.
- Each significant correction of the circuitry or mechanics requires the production of a new prototype. It also means another series of tests (no matter how long it takes; otherwise, the production of prototypes does not make sense at all).
- You need to allocate some extra time for prototyping as production depends on many off-project factors.
- While simulation and testing on debug stands speed up the development at early design stages, they only add errors to the prototype at late stages.
- One should avoid producing a large series of devices once the production technology is ready. It's better to go with a small batch of devices to collect feedback and conduct tests in an aggressive environment.
- At the design stage, it is necessary to allocate additional budget for purchasing the device analogues. You will also need to allocate time for initial research and reverse-engineering once you have purchased them.
- All measurements of the device characteristics must be carried out with the “max” mode turned on.
- Load tests and tests under aggressive conditions should be performed for long periods of time in a prepared environment.
Let's consider the approximate plan of development of a device prototype and preparation for batch production:
- Device ideation.
Each device is here to solve some problem, and the optimal way to do it will not always coincide with the customer's vision. It is necessary to review the idea and make proposals of your own. - Specification.
A detailed initial specification will help to stay focused on your actual goals while development and diminish conflicts. - Roadmap for a prototype device.
To allocate enough time, it is necessary to split the development of the device into several stages, taking into account the delays due to issues with component supplies. - Search for ready-made implementations.
The development of a new device often implies that such a device is not yet available on the market, or its characteristics exceed those of its analogues. That's why one shouldn't focus on ready-made implementations and general-purpose components. The use of such components (ready-made peripheral modules, development boards) will allow speeding up at the early stages of the device development, but will result in restrictions while prototyping and introducing changes. - Device components search.
When choosing a component base of the device, one should not put costs first. The cost of circuits, microcontrollers, and boards is incomparable to the cost of potential instability (you may actually spend more on making cheap components work). It's best to order parts from reputable manufacturers, for example, Microsemi, STMicroelectronics, ON Semiconductor, Honeywell, Panasonic, Vishay, Texas Instruments, and Analog Devices. When selecting components, you should examine their documentation in detail. If you don't do this, you may find out that the purchased components do not fit the stated requirements.
This approach is relevant for special-purpose solutions where the device is supposed to perform only the functions required, no more than that. When using general-purpose modules, you have to save money as modular solutions are expensive. This affects the quality of components. Functionality can also be cut down. Such modules set limits on how they can be used. The high cost of development on ready modules should motivate you to use discrete components. - Schematic development.
To develop the schematic part of your device, you need to understand how each of your discrete components works. You will need to have good documentation for all your components. Splitting all modules into simple parts will also help to avoid the "black box" effect. If your schematic is clear, it will enable you to avoid pitfalls at the subsequent stages. - Schematic simulation.
The simulation of the schematic part is very helpful at the early stages of design when it is necessary to check the low-level interaction of components. At the subsequent design stages, it becomes very difficult to simulate as the preparation of the simulator takes a longer time. The results may differ from the real behavior of devices due to many external factors that are hard to reproduce. This is due to the complexity of the circuitry and a large number of components. Also, a detailed simulation of large circuits in real-time requires huge computing power, which is not always available. - Tracing board, trace verification.
Numerous CAD (Computer-Aided Design Systems) like Altium Design, KiCAD, EAGLE CAD, and EasyEDA can assist you with tracing and trace checking.
When developing a trace, it is necessary to make calculations for the length and width of conductors (based on the frequency of the transmitted signal, the value of passing currents), calculations for the location of elements, and calculations of power dispersion of active elements. - Order boards for a test batch.
For rapid hardware testing and development acceleration at early stages, it is possible to produce prototype boards at home. At the subsequent stages of development, it is best to outsource board production (JLCPCB, PCBWAY are examples of services for professional and low-cost board production). - Prototype assembly without firmware.
For the manufacturing of the first prototype, it is better to order or produce a small batch of boards (5–10 pcs.). You should also prepare an extensive element base for component replacement. - Schematic testing.
Device circuitry tests are performed as new parts are added to the board. Below are a few examples:
1) Installation of the feed elements.
2) Checking connections.
3) Starting the supply part, collecting output characteristics in idle and limit modes.
4) The assembly of the next part if the requirements of the first part being met.
5) In the case of failure, discover the error and return to item "6" of the main list. (Yes, it's a lot of time between the start of development and the first tests, but it's the only way to make progress — more changes mean more prototypes.)
Board manufacturers provide an option to automatically test all tracks and conductors according to the GERBER file. This service is inexpensive and saves you time and money at the subsequent stages. - Firmware development for tests of interaction with the periphery.
At this stage, it is necessary to write the firmware that only correctly interacts with the periphery (not the one that makes the device perform its function). It's important to include the main computational algorithms in the test firmware, though. - Firmware testing.
Testing of computing algorithms of the firmware can be performed locally; interaction with the periphery can be tested using a simulator. An example of testing for AVR microcontrollers is described in my previous article:
Then you need to perform firmware testing using the debugger.
14. The development of firmware that implements the device's functionality.
Firmware implementation based on the previously tested modules for interaction with periphery, computational algorithms, and firmware optimization. Modular tests, tests on simulator, tests on hardware should also be performed. You can safely apply TDD at this stage.
15. What if the schematic flaws are found out at this stage?
If significant drawbacks of the circuitry (unstable behavior of the periphery, lack of computing power) are detected at this stage, return to item 5 (this means the inevitable loss of time and money).
16. Load tests, tests under aggressive conditions.
Tests under aggressive conditions are best when conducted in a specially prepared environment that simulates external influences. You are supposed to have a dozen prototypes with stable firmware to be crashed by maximum operating modes. Сollecting and checking the necessary characteristics of the device also takes place at this stage. If the tests fail, detect the issues and resolve them. Return to item 5.
17. Preparation of design documentation for launching a product test series.
You will need to prepare the documentation for your project as well as the production files. Then you are supposed to search for manufacturers, place orders for the production of boards, enclosures, and mechanics. When the necessary equipment is installed locally, it is necessary to prepare the plan of technology for batch production and hire the personnel (the given theme deserves a separate article, and we will cover it in one of our upcoming publications).
18. Certification (if applicable).
If necessary, you need to get your device certified for daily use. Here are a few steps to be taken:
— Contact a certification center.
— Provide the officials with your technical documentation.
— Send a small batch (up to 10 pcs.) of devices to the certification center for testing.
19. Launch of a test batch not exceeding 100 pcs.
Deliver your product and collect the first portion of user feedback, paying special attention to product support. In the case of circuitry issues detection, search for methods to solve them,and go to item 7. If software bugs are found, search for methods to fix them, and go to item 12. In case of successful use for a long period of time, launch a larger batch of devices.
In the context of this plan, the development of device cases and mechanical parts tightly correlates with the development of circuitry. It should be carried out in parallel and follow the same process as the development of circuitry.
The development and prototyping of devices differ greatly from software development. The main reason for this is the lack of ability to quickly manipulate the physical components of the device, as opposed to manipulations with virtual software components. Simply speaking, it is very difficult to make or roll back electronic device changes. It is much easier and faster just to make a device from scratch by applying the necessary changes to the scheme.
Conclusion
Errors in hardware projects are as inevitable as in any other one. It is important to detect them and provide an adequate response. You shouldn't be afraid of reissuing prototypes — it's a common practice to achieve stable operation of the device's hardware. To successfully finalize a device development, you will need transparent communication both inside the development team and with the customer. I hope this article has helped you to acquire basic skills and knowledge of the hardware manufacturing process. Good luck with hardware development and prototyping!


Latest articles here