


Analyze with AI
Get AI-powered insights from this Mad Devs article:
What is continuous integration?
Continuous integrationis a software development practice where members of a team integrate their work frequently, usually each person integrates at least daily—leading to multiple integrations per day. Each integration is verified by an automated build (including test) to detect integration errors as quickly as possible. Many teams find that this approach leads to significantly reduced integration problems and allows a team to develop cohesive software more rapidly.
For the first time, it was conceptualized and proposed by Grady Booch in 1991. It is one of the main elements of extreme programming practice.
I already have such a project, on which I tried the following three CIs:
- Circle CI
- Cirrus CI
- Travis CI
And so, in descending order, I will talk about each of these CIs in the list. I'll tell you about the speed of work, the complexity of configuration, and other differences. And so, let's get started!
Special thanks to Fedor Korotkov for the help in translating and clarifying inaccuracies. It is very cool!
Circle CI
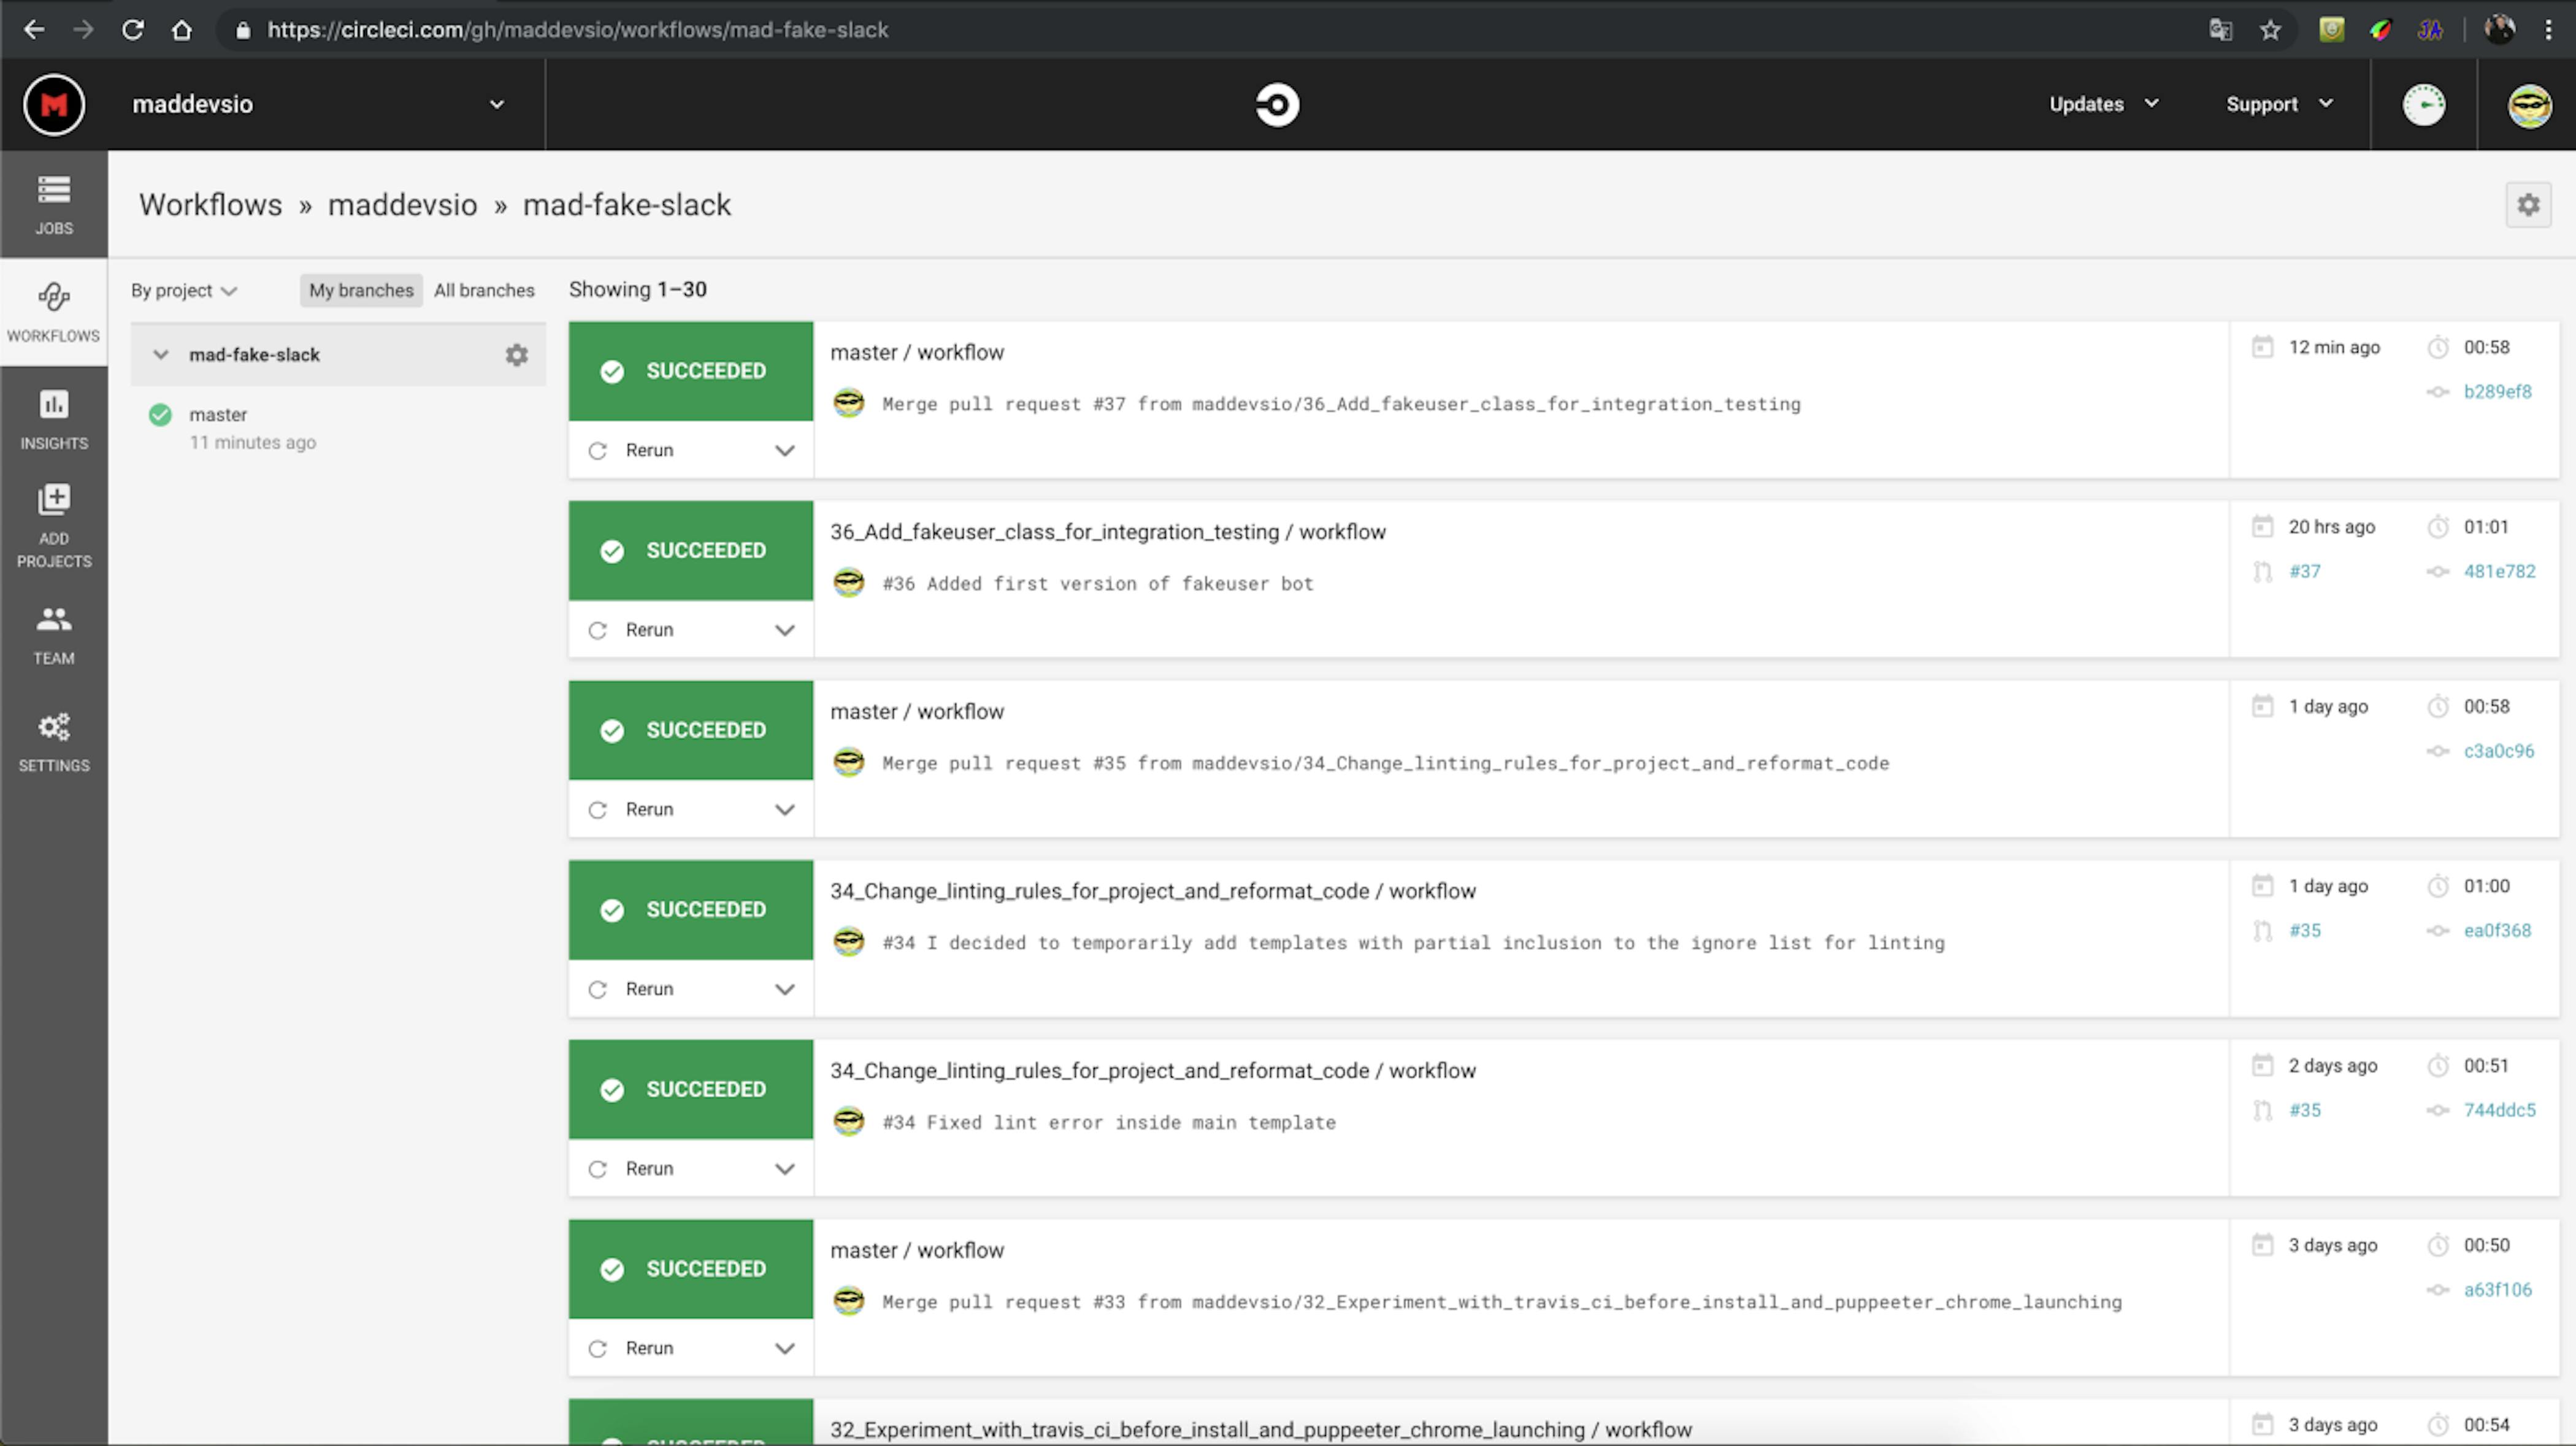
This is what the Circle CI interface looks like.
By the way, I wanted to say at once that Circle CI is the fastest of all of the above, the first place, but as it will be later seeing after measuring build times, Cirrus CI is 22 seconds faster and it turns out that it takes the first place instead of Circle CI. The same build, for the same purpose - to run integration tests, passes very quickly and you observe the result for your Pull Request one of the first. This is very cool since the time to run the tests is very valuable for the developer, the faster pass of tests on CI guarantee that developers will be able to deploy the new functionality faster.
Circle CI build step timing
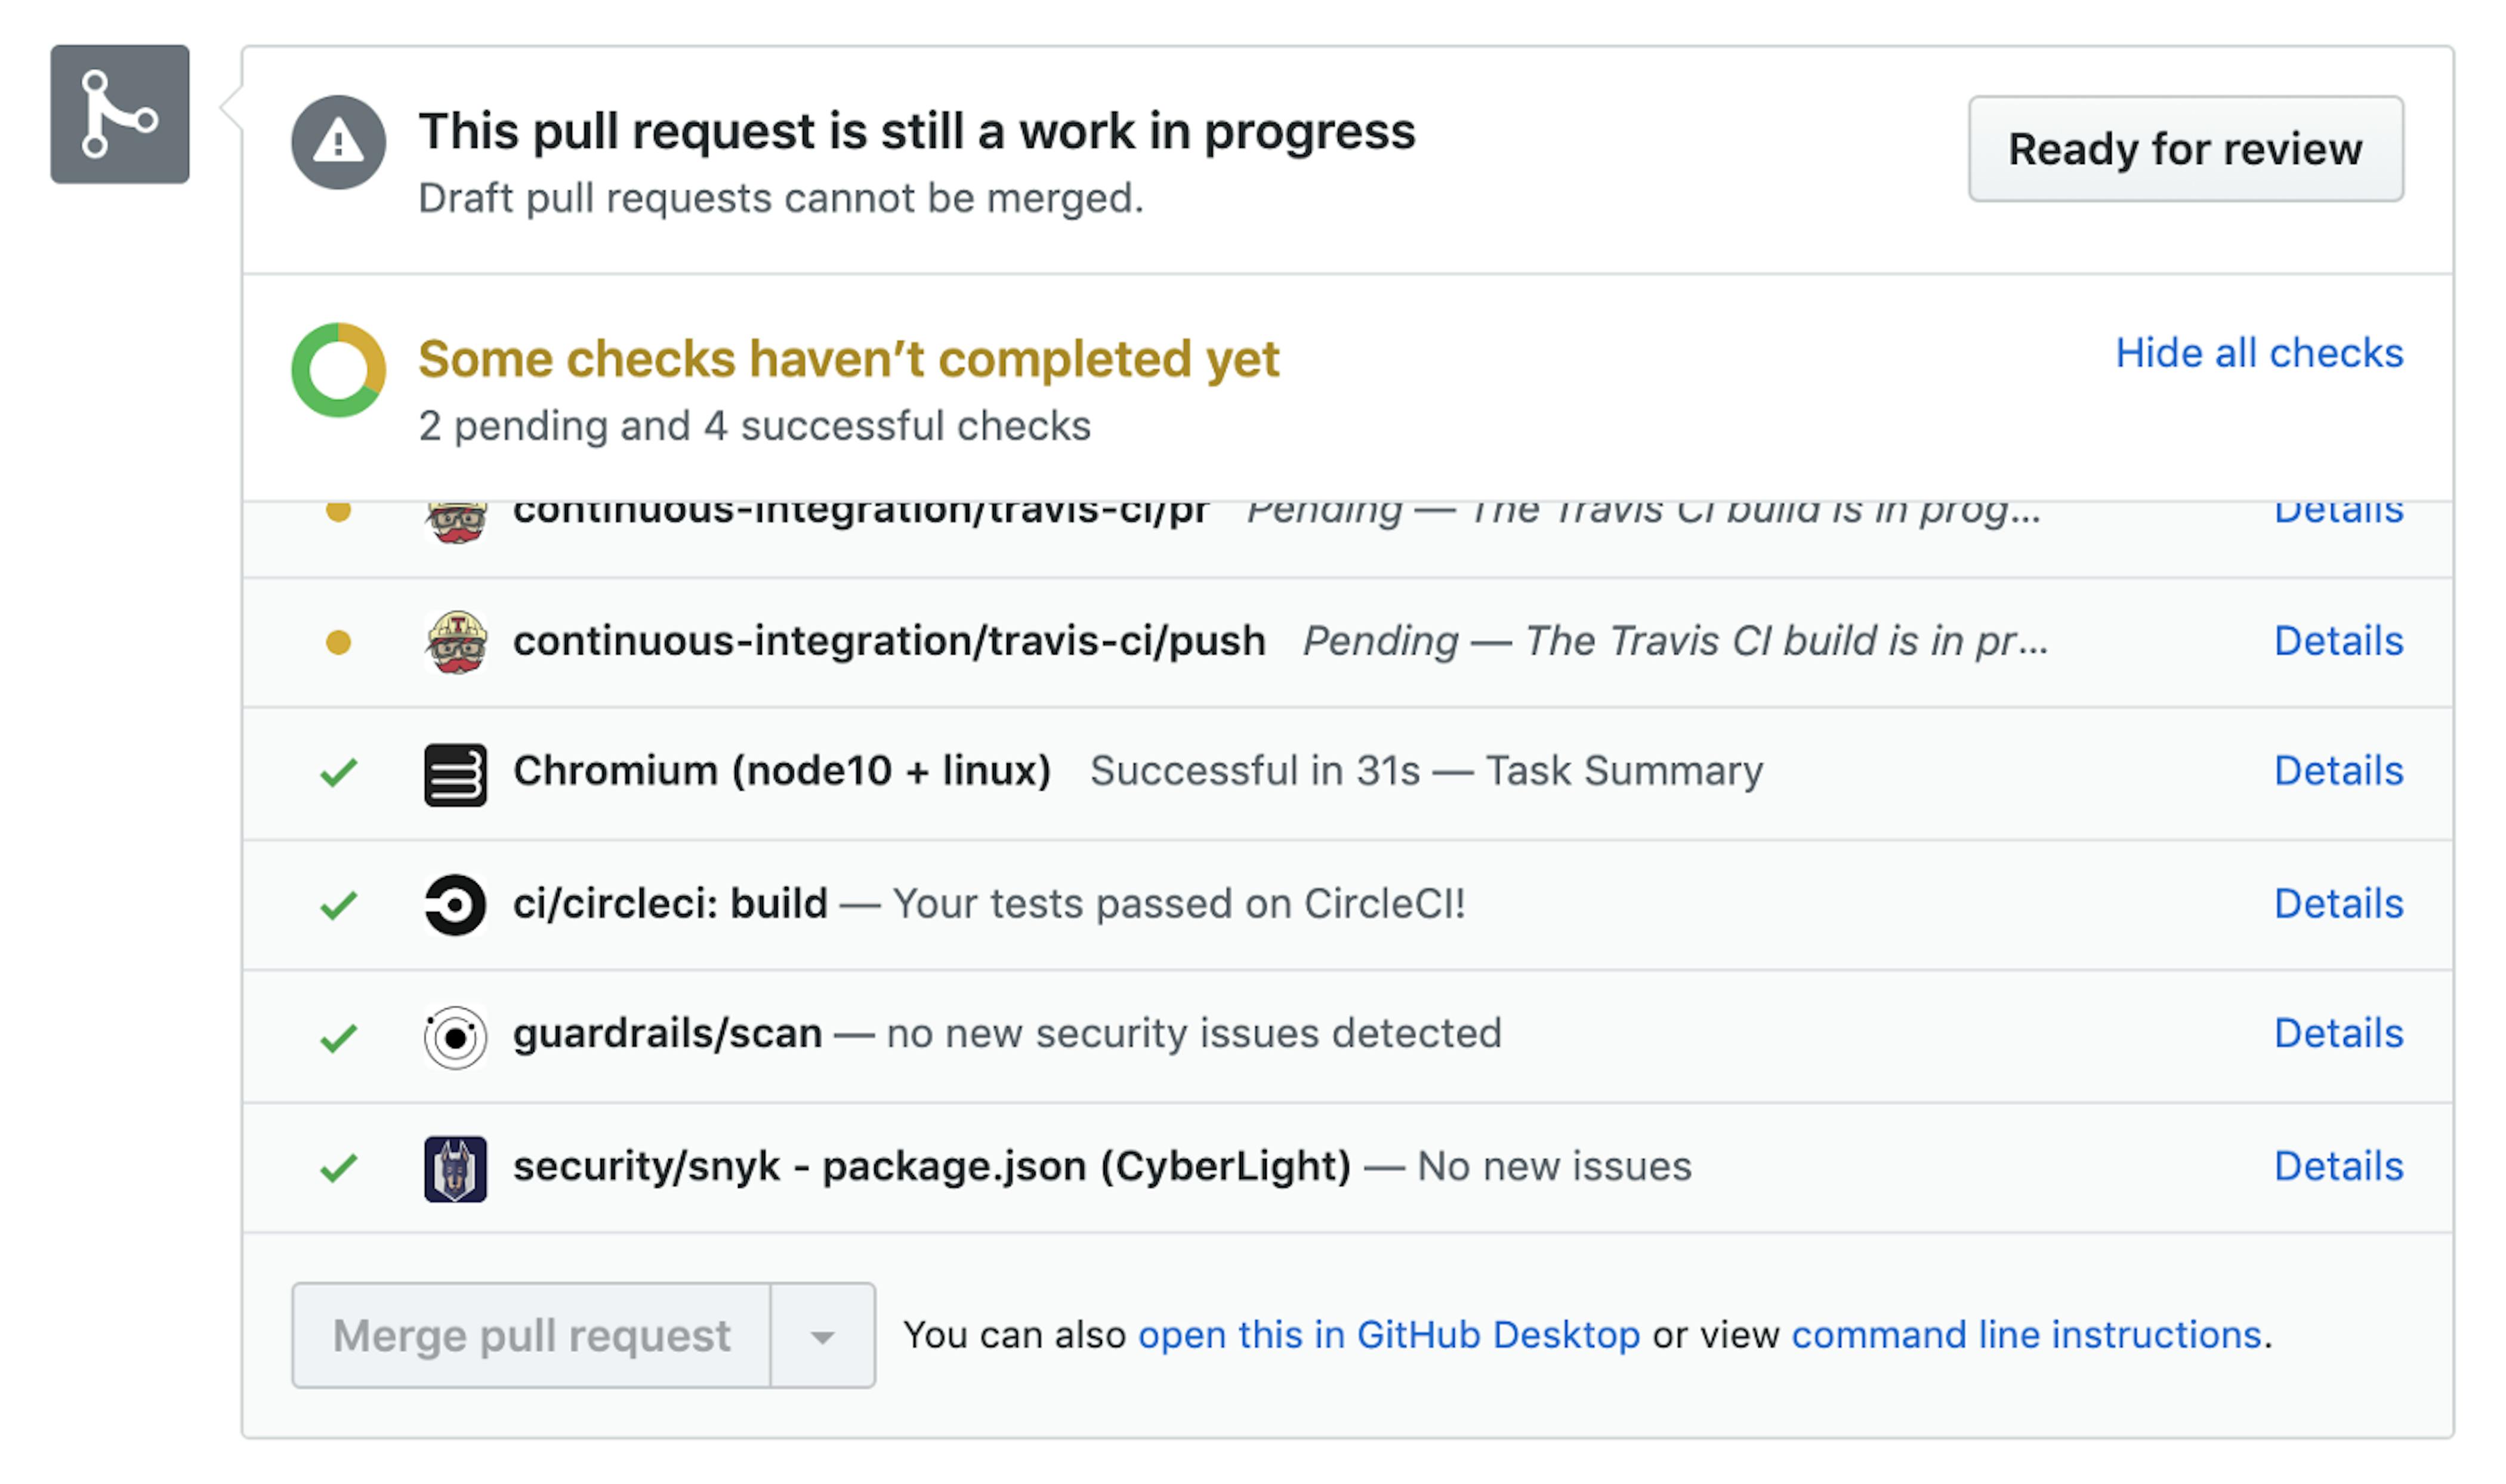
Screen of starting and passing tests on CI for Pull Request
The timing of launching integration tests on Circle CI is as follows:
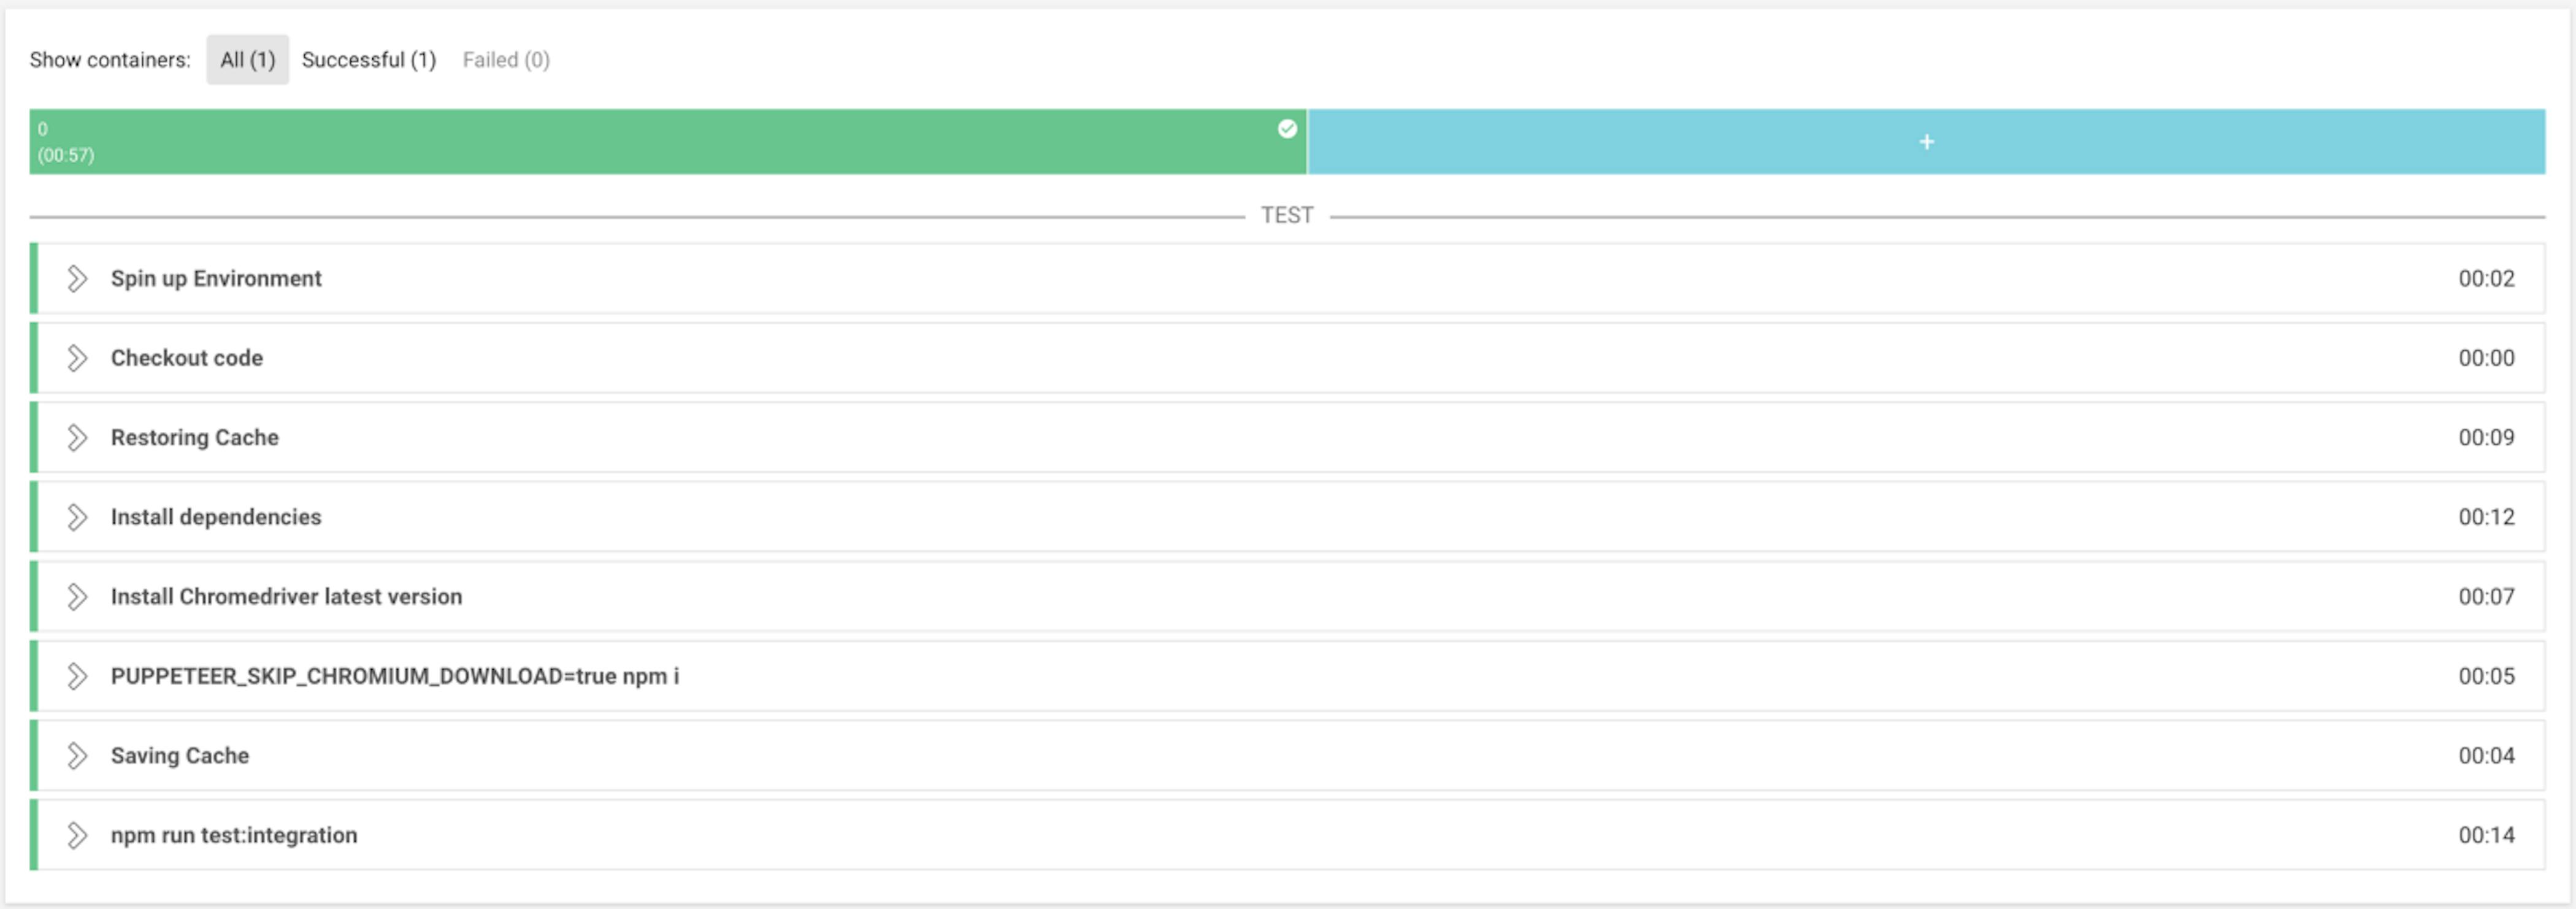
Timing of steps to run the integration tests
All build steps passed and took 57 seconds, very cool!
- Spin up environment — 2 seconds
- Checkout code — 0 seconds, very cool!
- Restoring cache — 9 seconds
- Install dependencies — 12 seconds (installing dependencies for google-chrome-stable)
- Install Chromedriver latest version — 7 seconds (installation of google-chrome-stable)
- PUPPETEER_SKIP_CHROMIUM_DOWNLOAD=true npm i — 5 seconds (installing dependencies via node package manager with a key indicating puppeteer that you do not need to download chromium).
- Saving cache — 4 seconds (caching contents of node_modules folder)
- npm run test:integration — 14 seconds (launching of integration tests through puppeteer)
Total: 53 seconds
The queue to start the build ~ 4 seconds
Circle CI configuration for running tests using puppeteer
It all starts with creating a configuration file named config.yml inside the .circleci folder, which should be in the project's root.
GitHub Gist is loading...
The configuration file is very coolly structured, which allows you to immediately see the moments related to Jobs. It immediately focuses that only one Job will be launched and all settings for this Job are below.
- It is very convenient to specify which Docker image is needed for your project.
- You must specify working_directory — a folder relative to the root folder / where your build will be.
- And you immediately see which steps will be included in the CI build in the steps: section.
- The ability to cache contents of node_modules folder is cool because it contains "whole Internet". :)
- Each execution step can be named so it is more understandable, and you can specify the command will be executed for the corresponding step.
Writing configuration for Circle CI is very convenient and trouble-free work.
Cirrus CI — fashionable and cross-platform CI from Cirrus Labs
I think this is the coolest implementation of CI, because it supports Linux, Windows and macOS platforms. And all in one box! If your project is cross-platform, then you won't find a better CI. On the Cirrus CI website, you can read more about its capabilities.
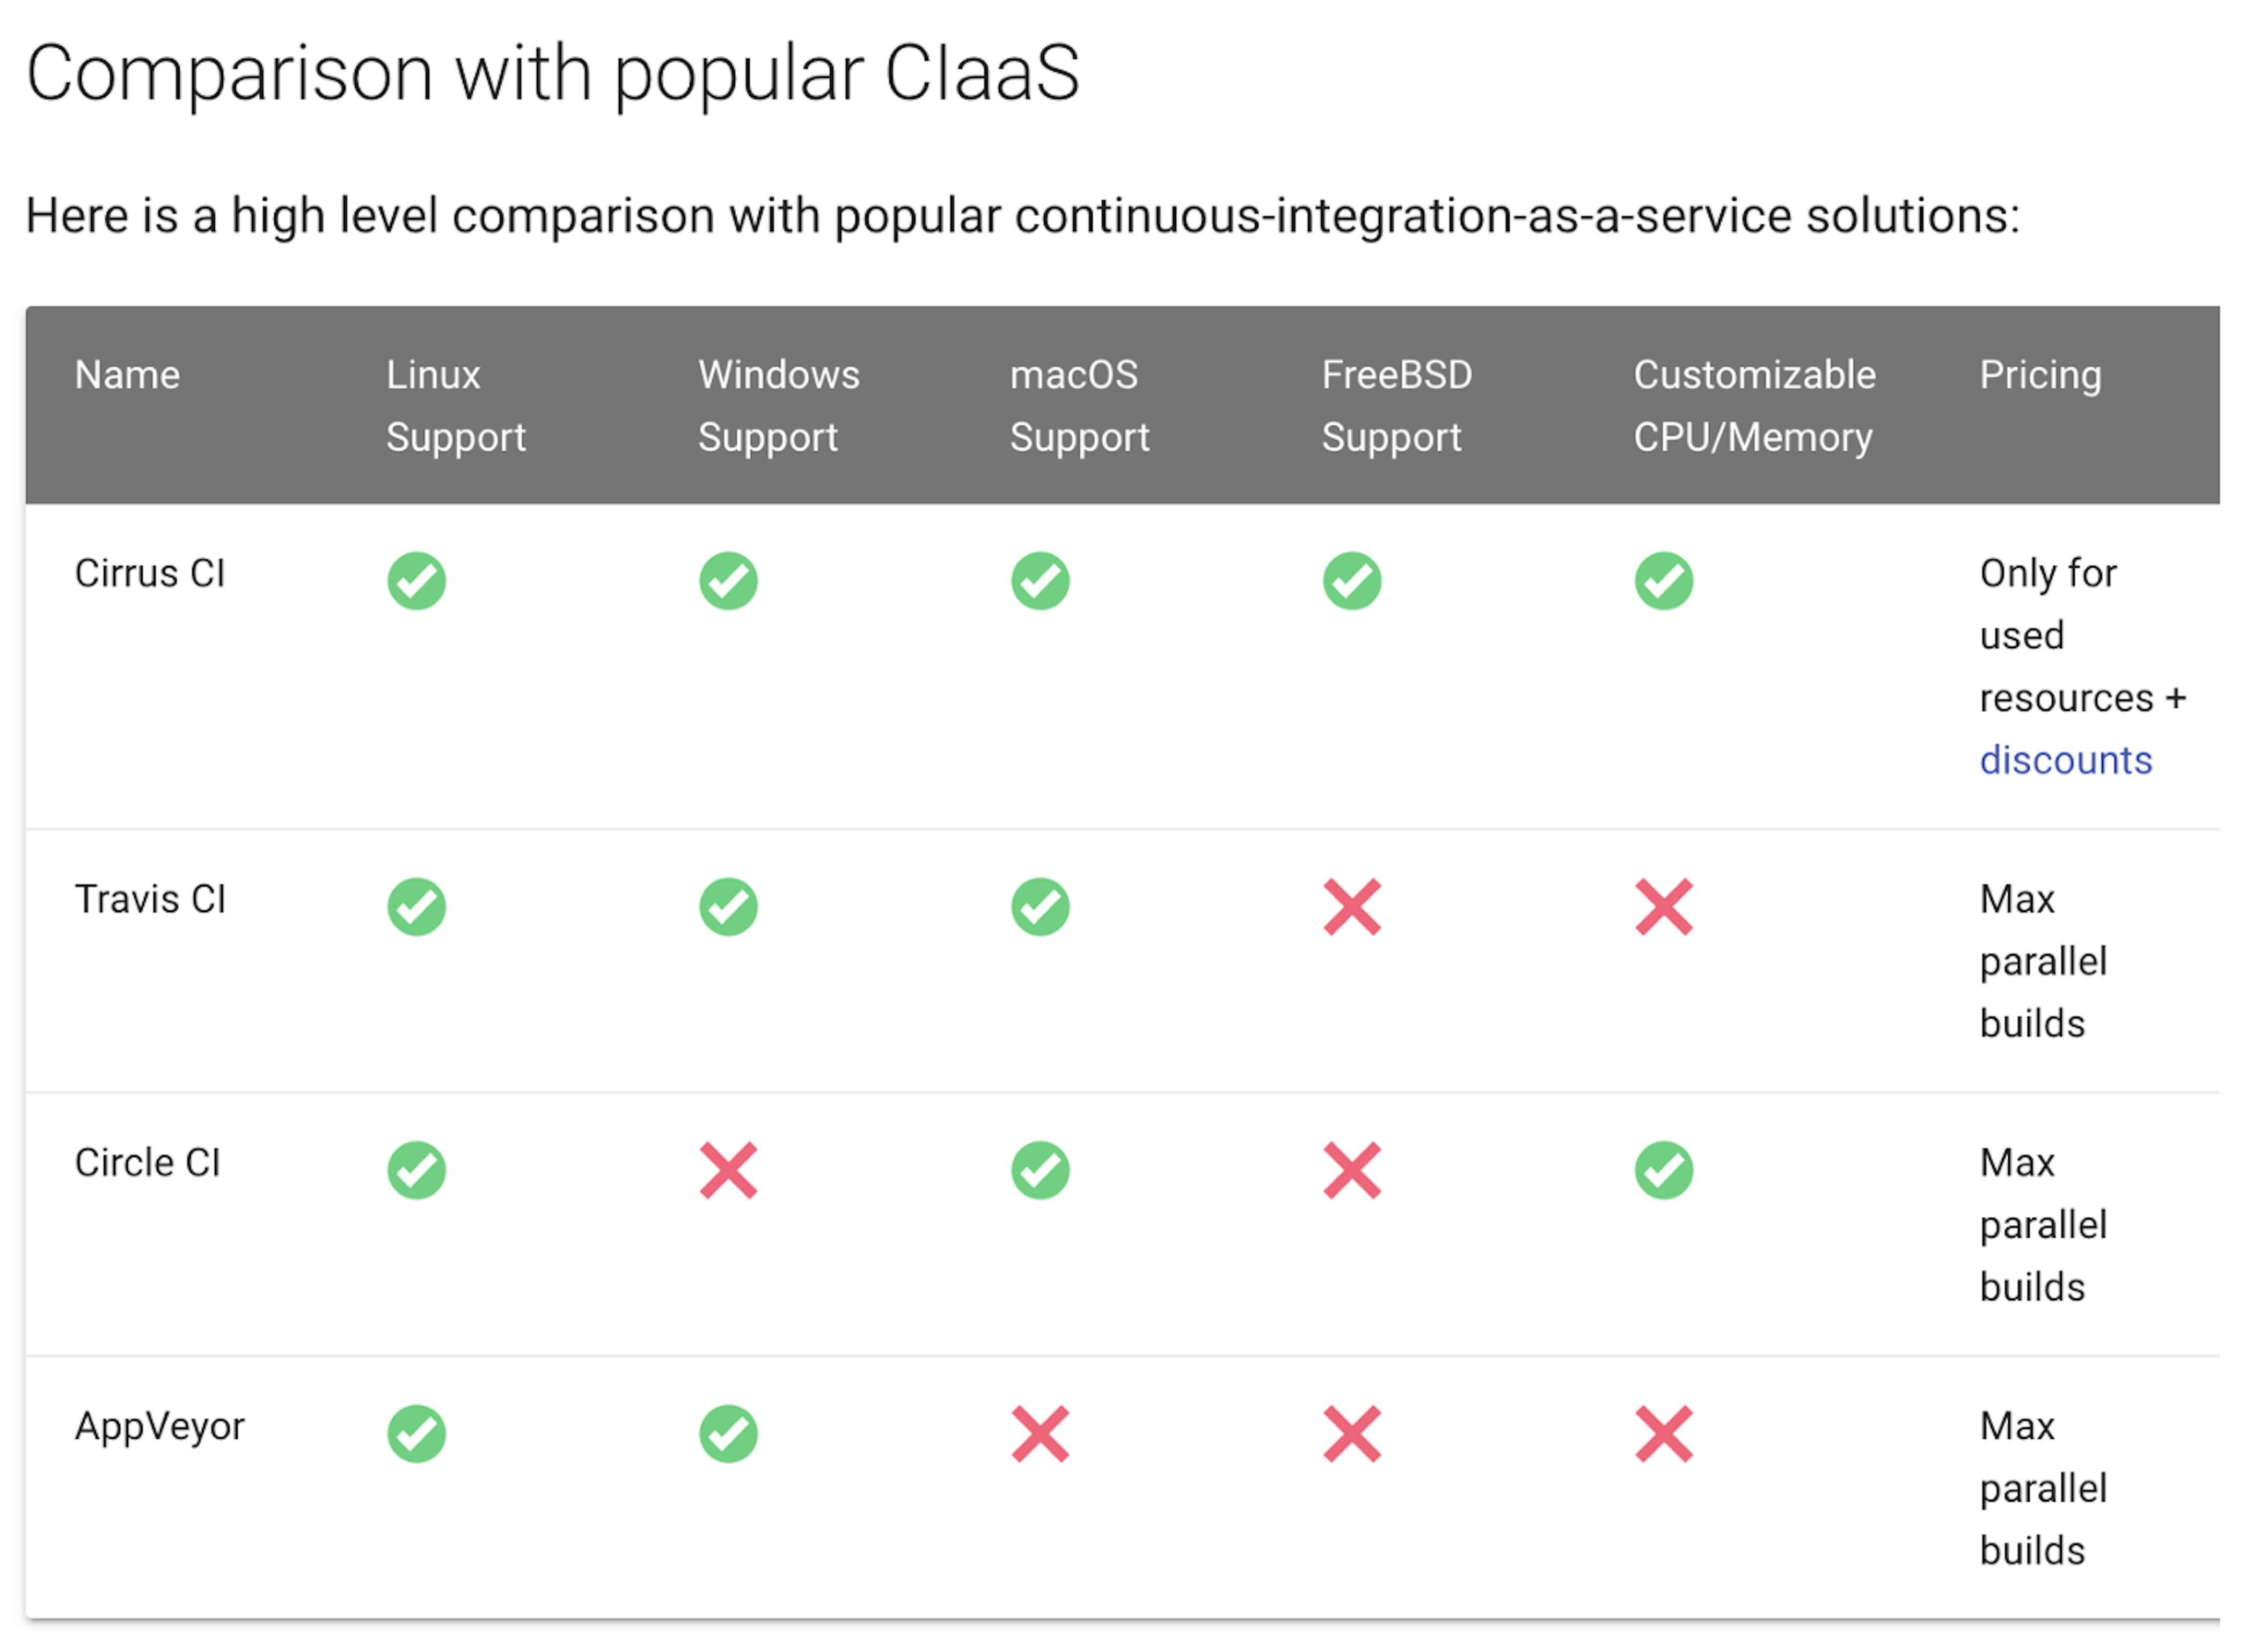
Comparison with popular CIaaS
This CI naturally takes the first place, according to the speedy passage of the build.
Setting up a Cirrus CI build
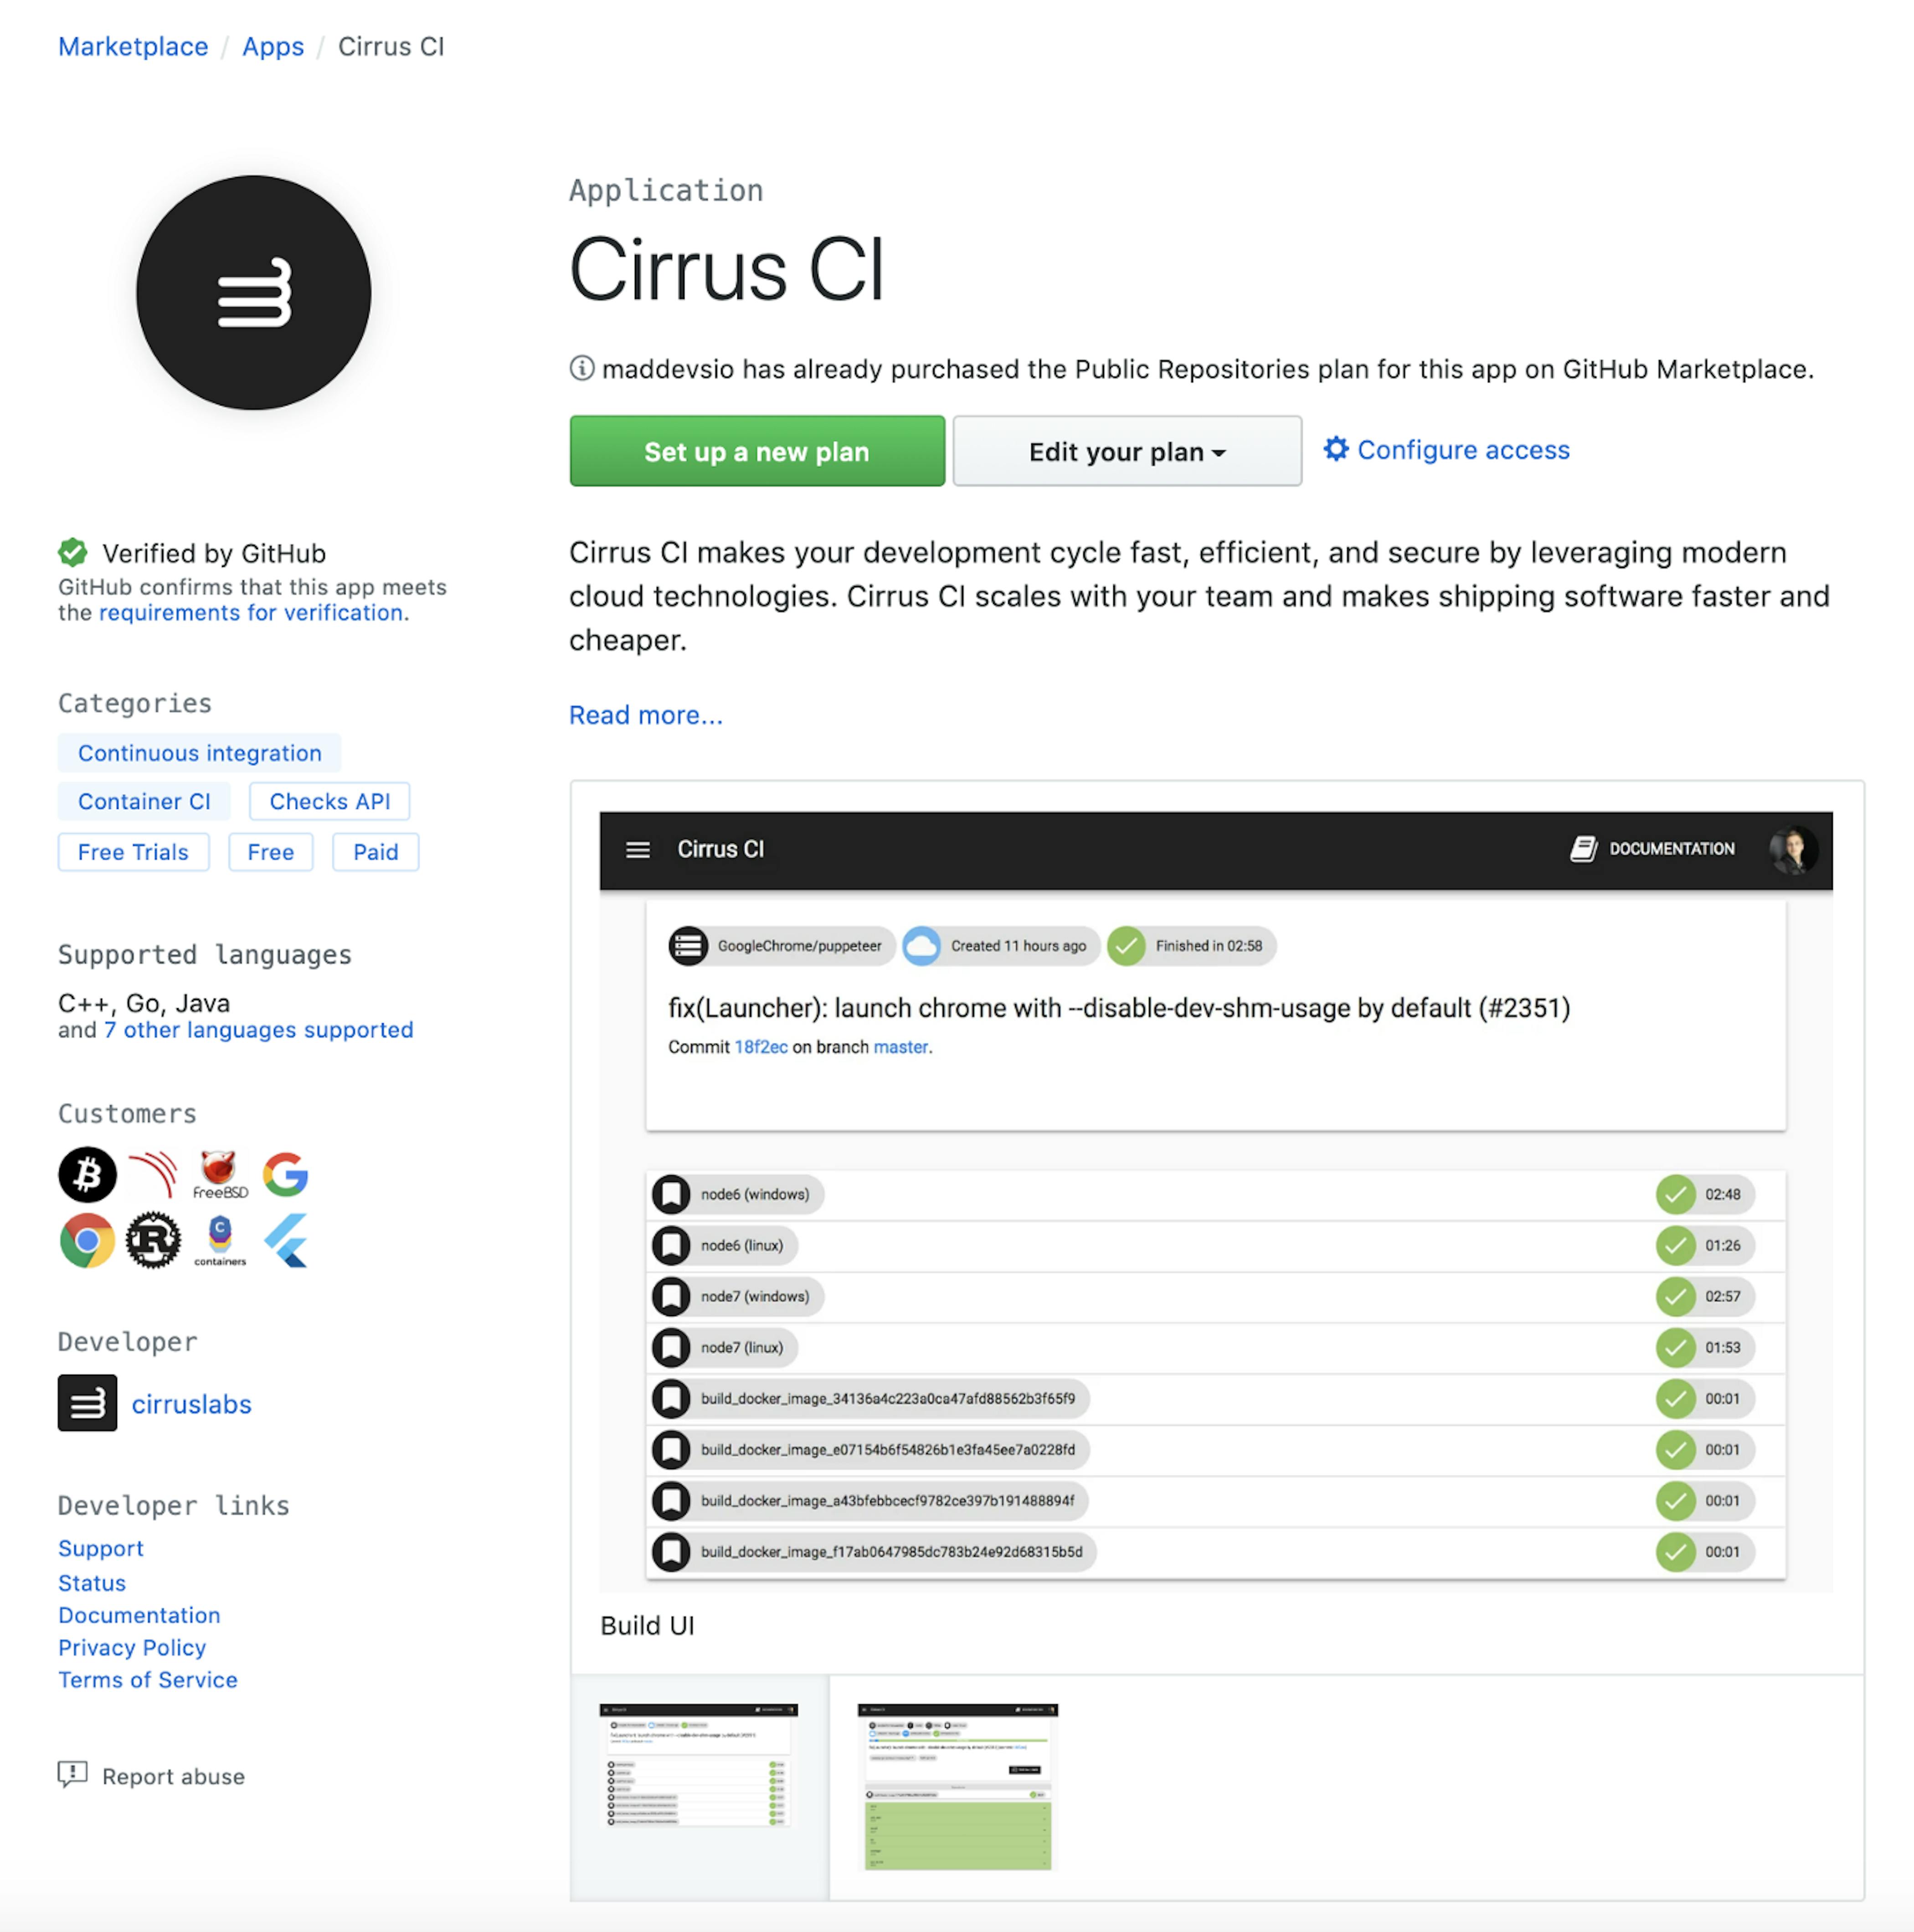
- To do this, install Github App from GitHub Marketplace inside your repository or organization settings.
- Next, you need to choose a plan.
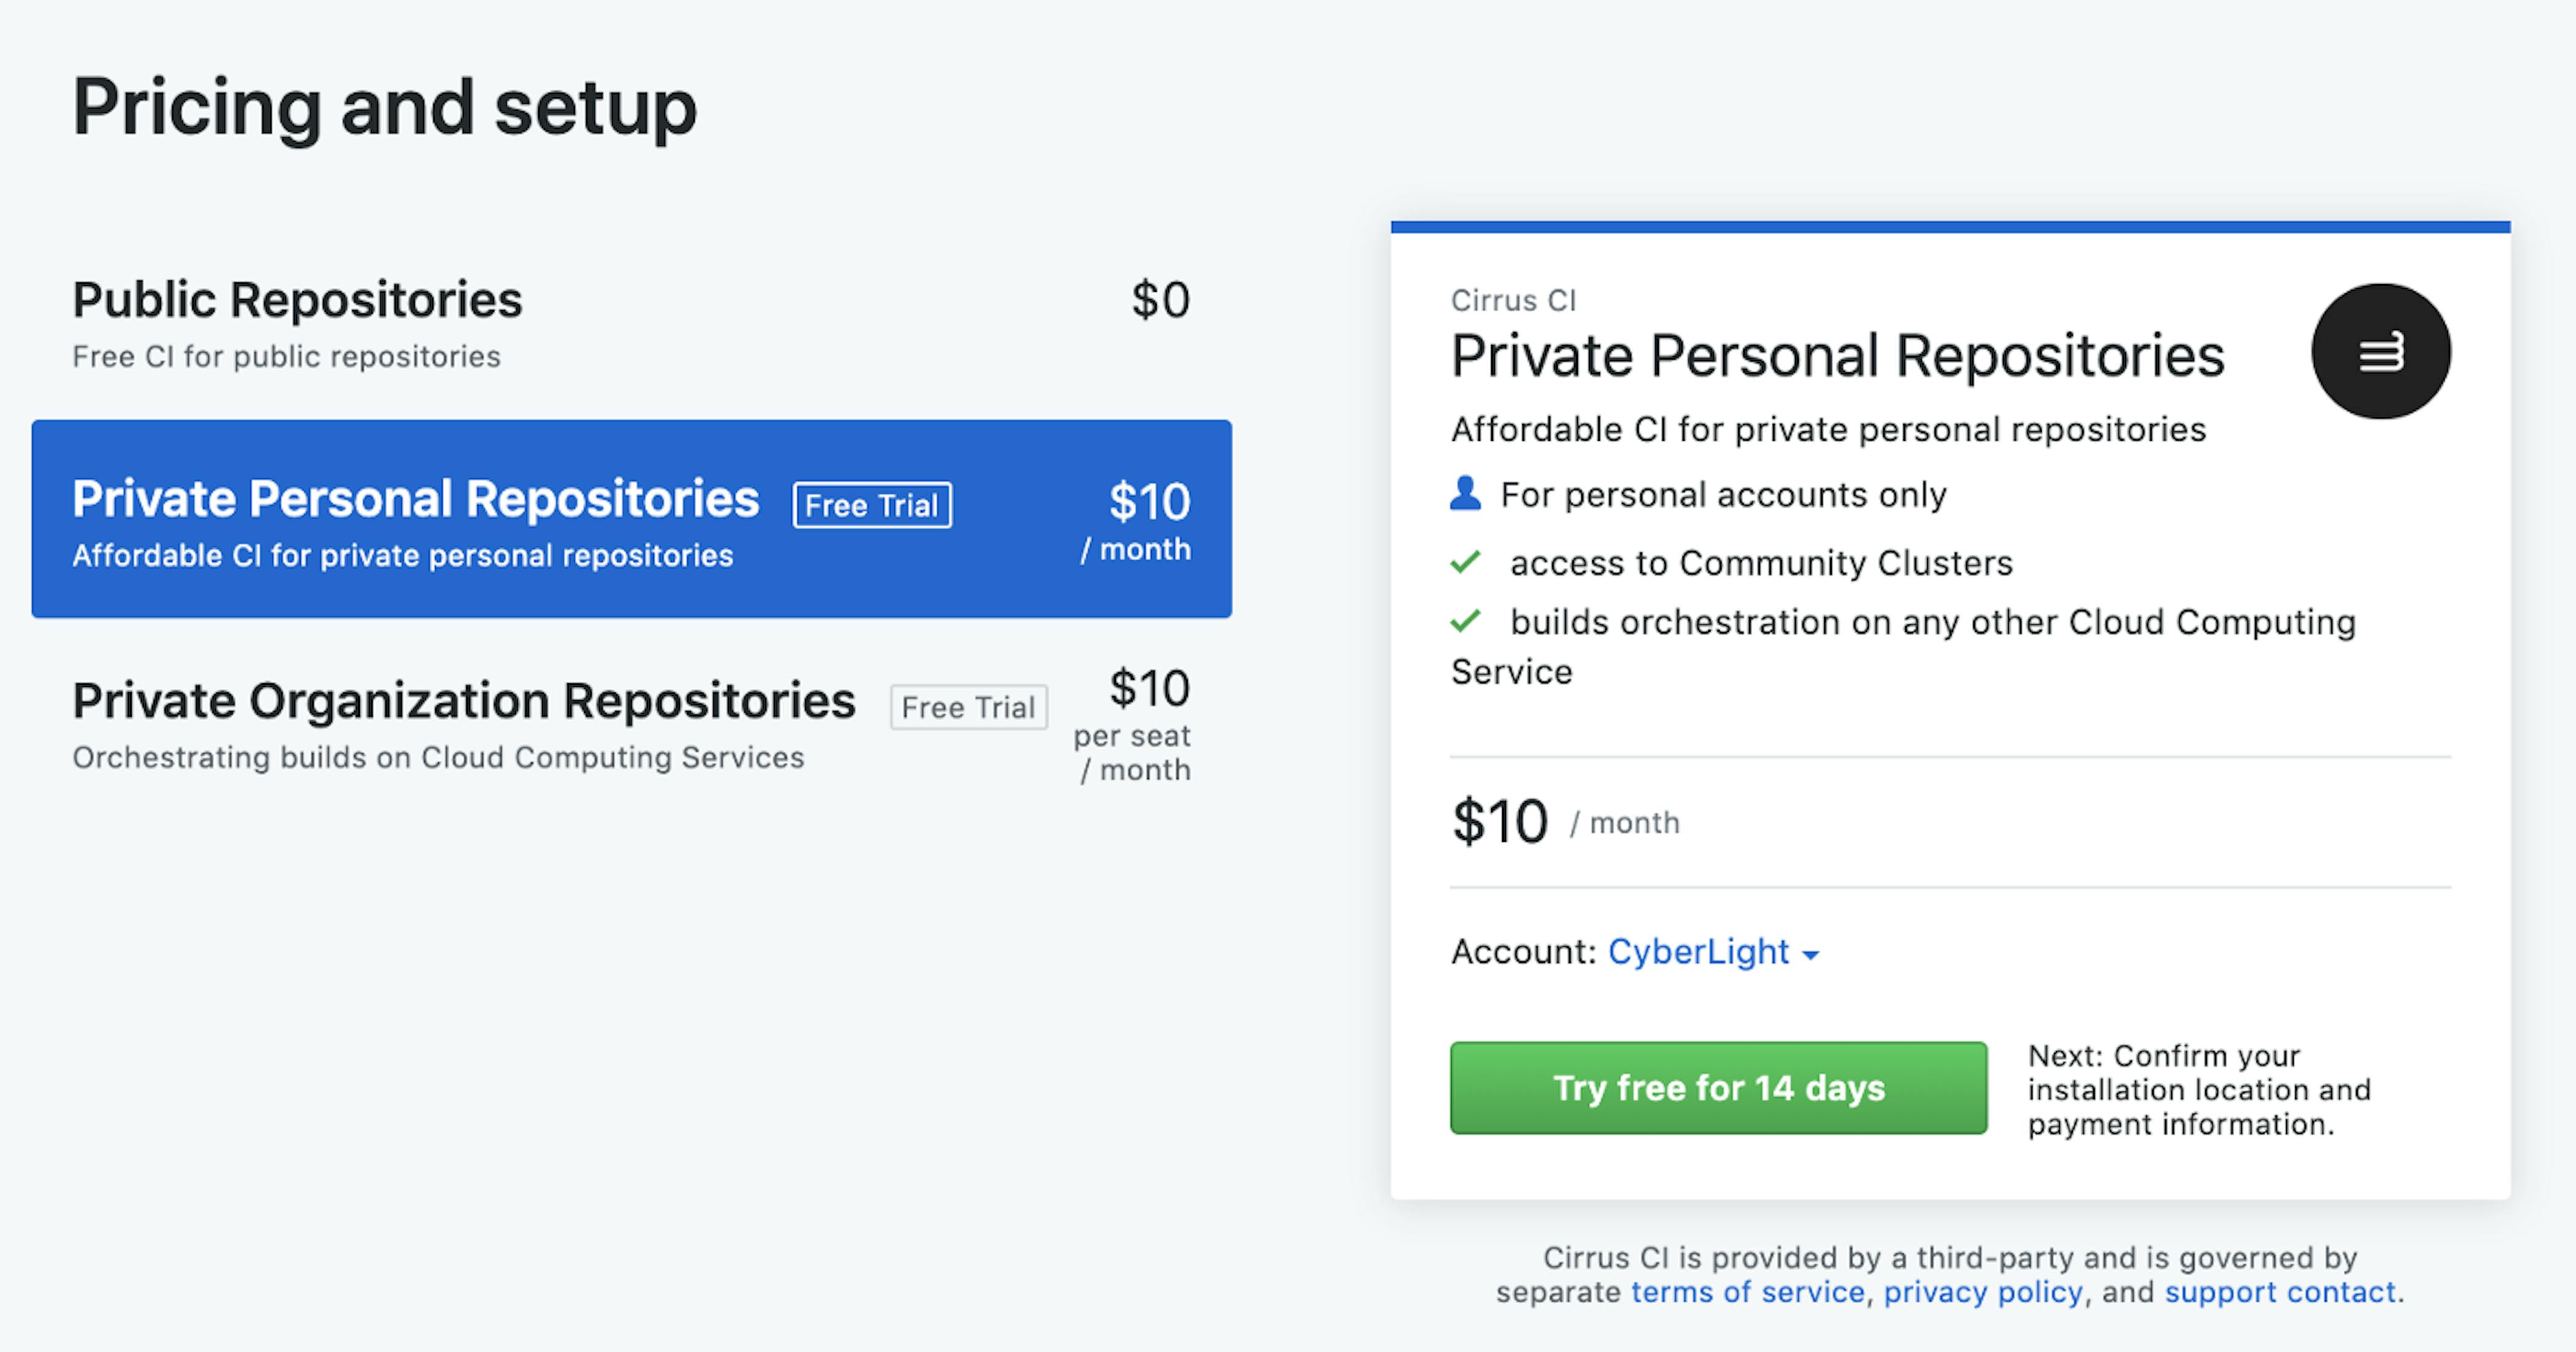
- Fortunately, there is no need to pay anything for public repos and thanks for that to Cirrus Labs! There is no time limit for public repositories except these concurrency limits.
- For personal private repositories, Cirrus is $10/month with the same limits. For organization private projects, you can either connect your own infrastructure or use per-second billing with no concurrency limits. Each organization also gets 200 CPU hours to try things out.
The Cirrus CI application setup page for your repo or organization
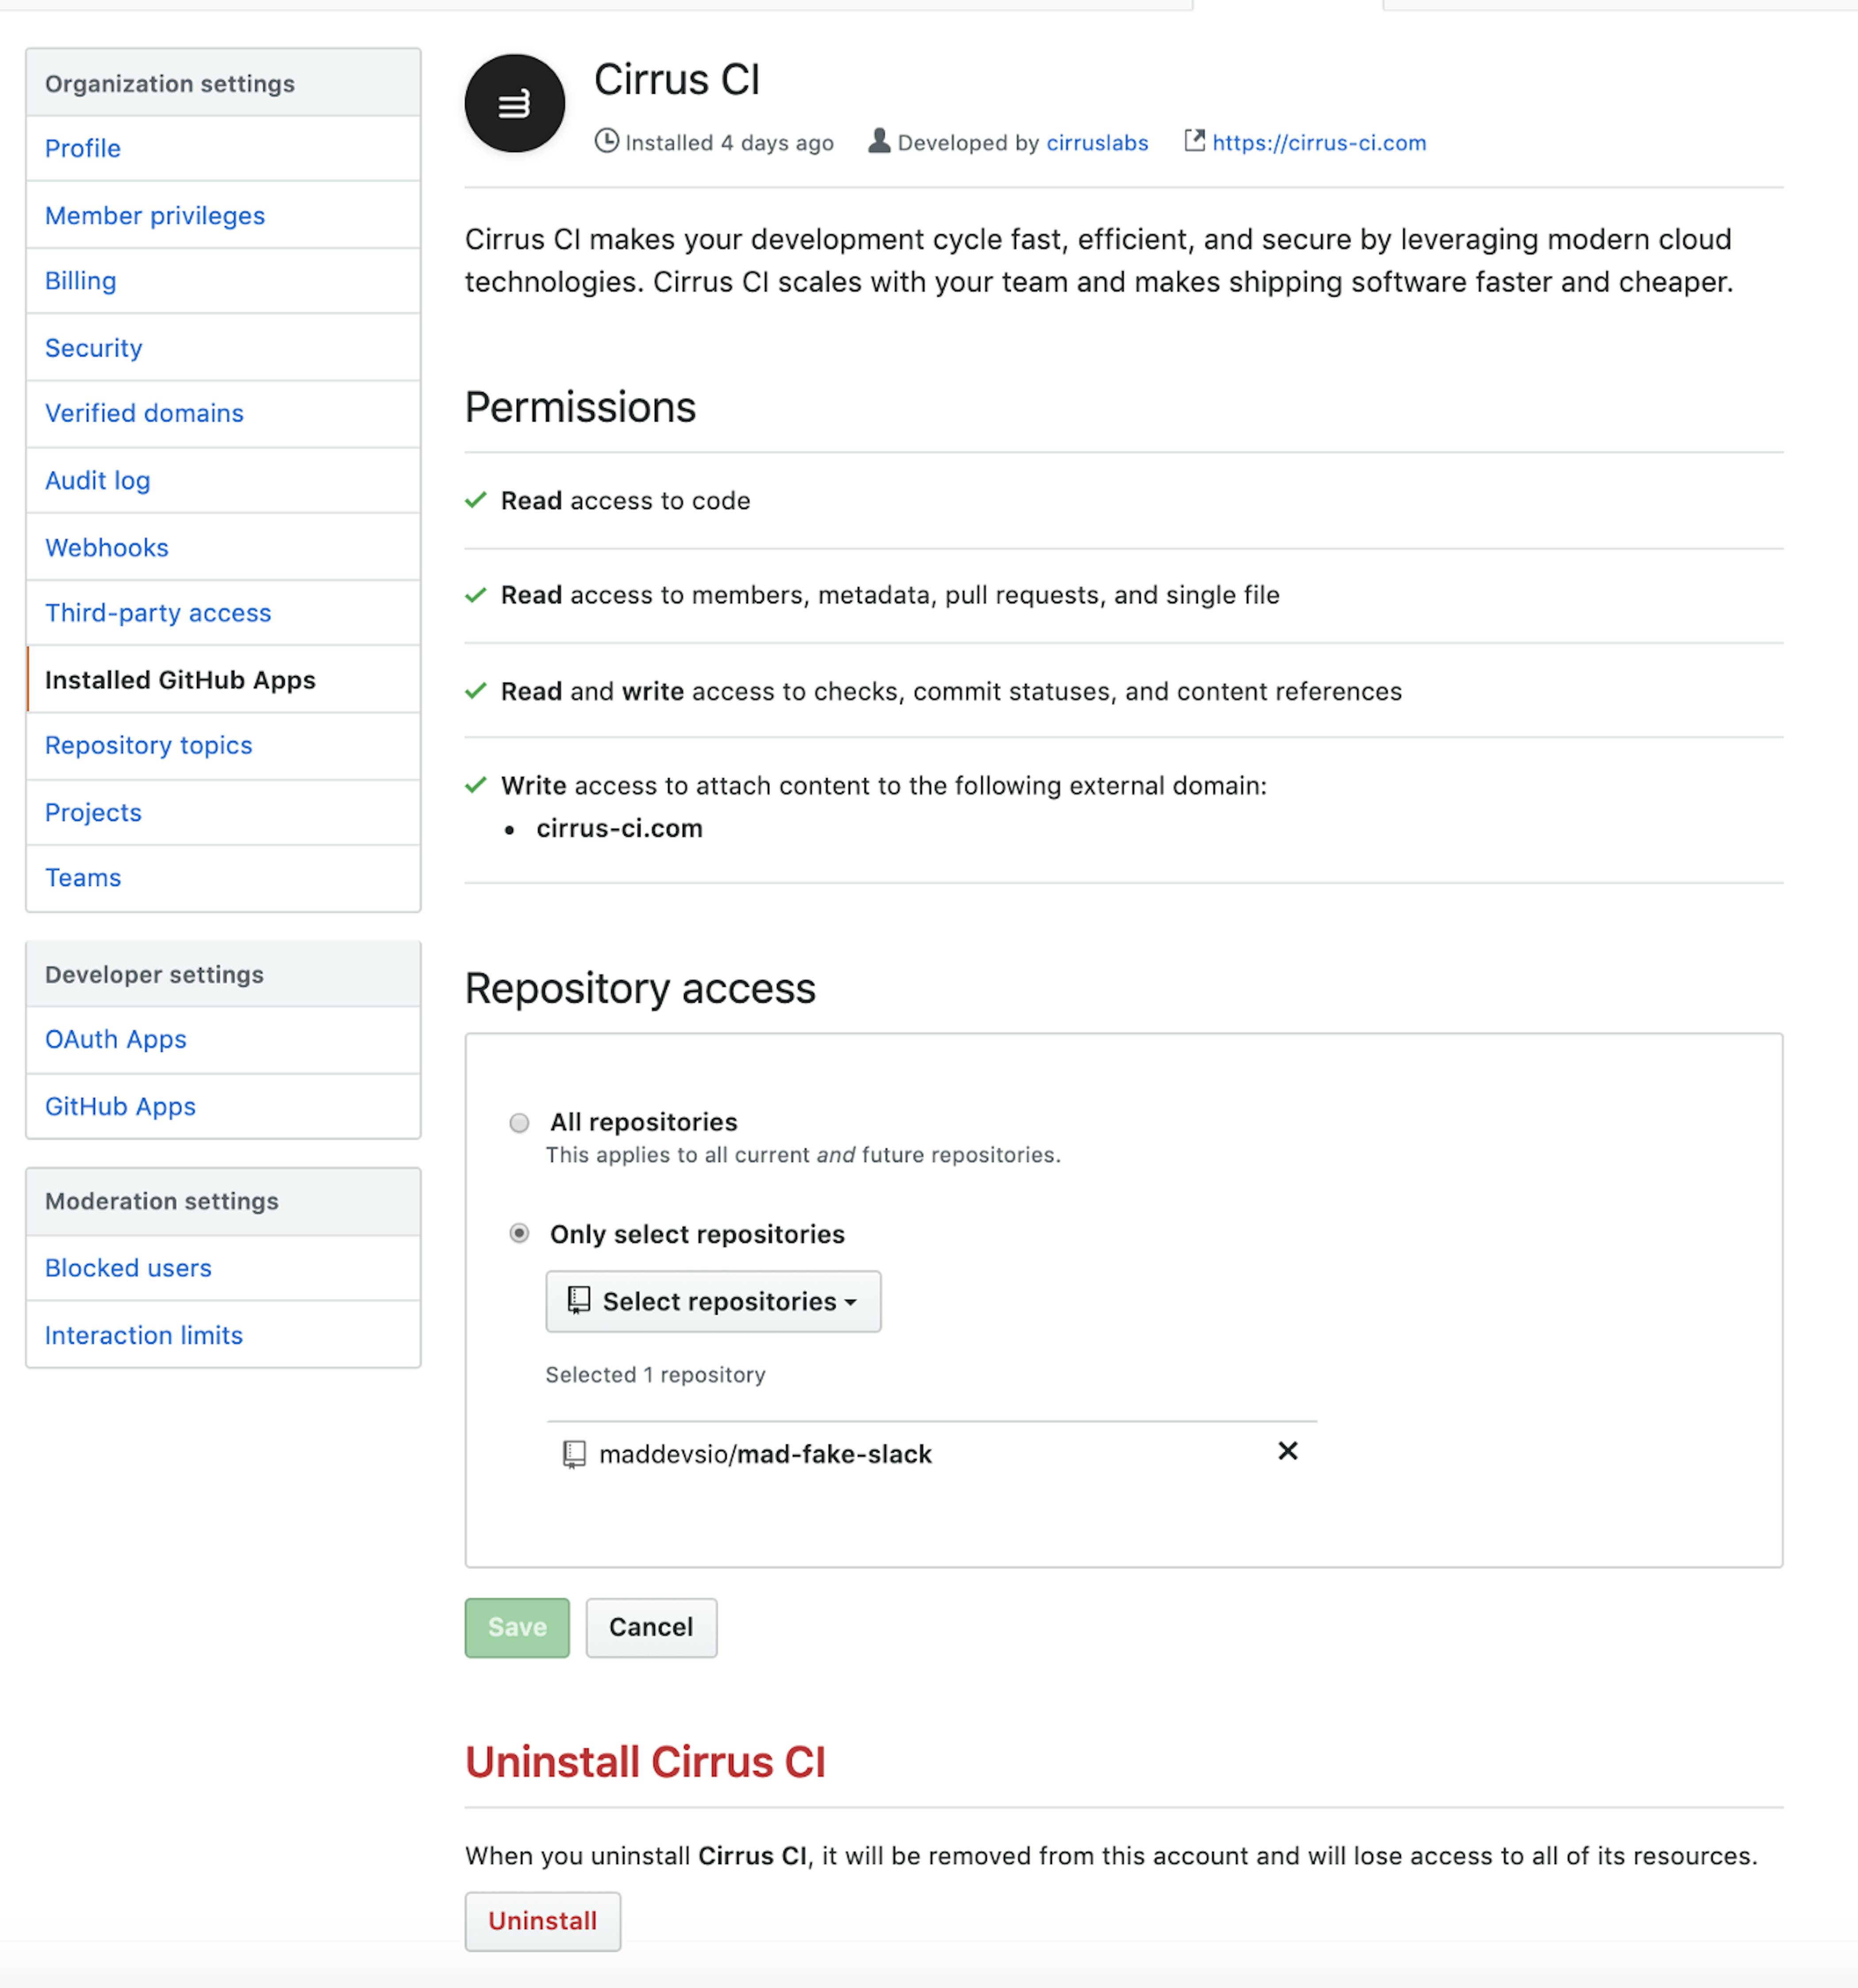
Everything is very convenient here too! You can choose which repositories will be tracked for changes and trigger builds from the Cirrus CI side. For this respect to CirrusLabs.
A little bit about the interface of Cirrus CI application
This UI is available directly in your repo. It is very convenient when on the screen below you can see the number of steps and their timing.

Timing of Cirrus CI
Judging by the time spent at the build stages, we see only 31 seconds, which is much less than the time spent by Circle CI.
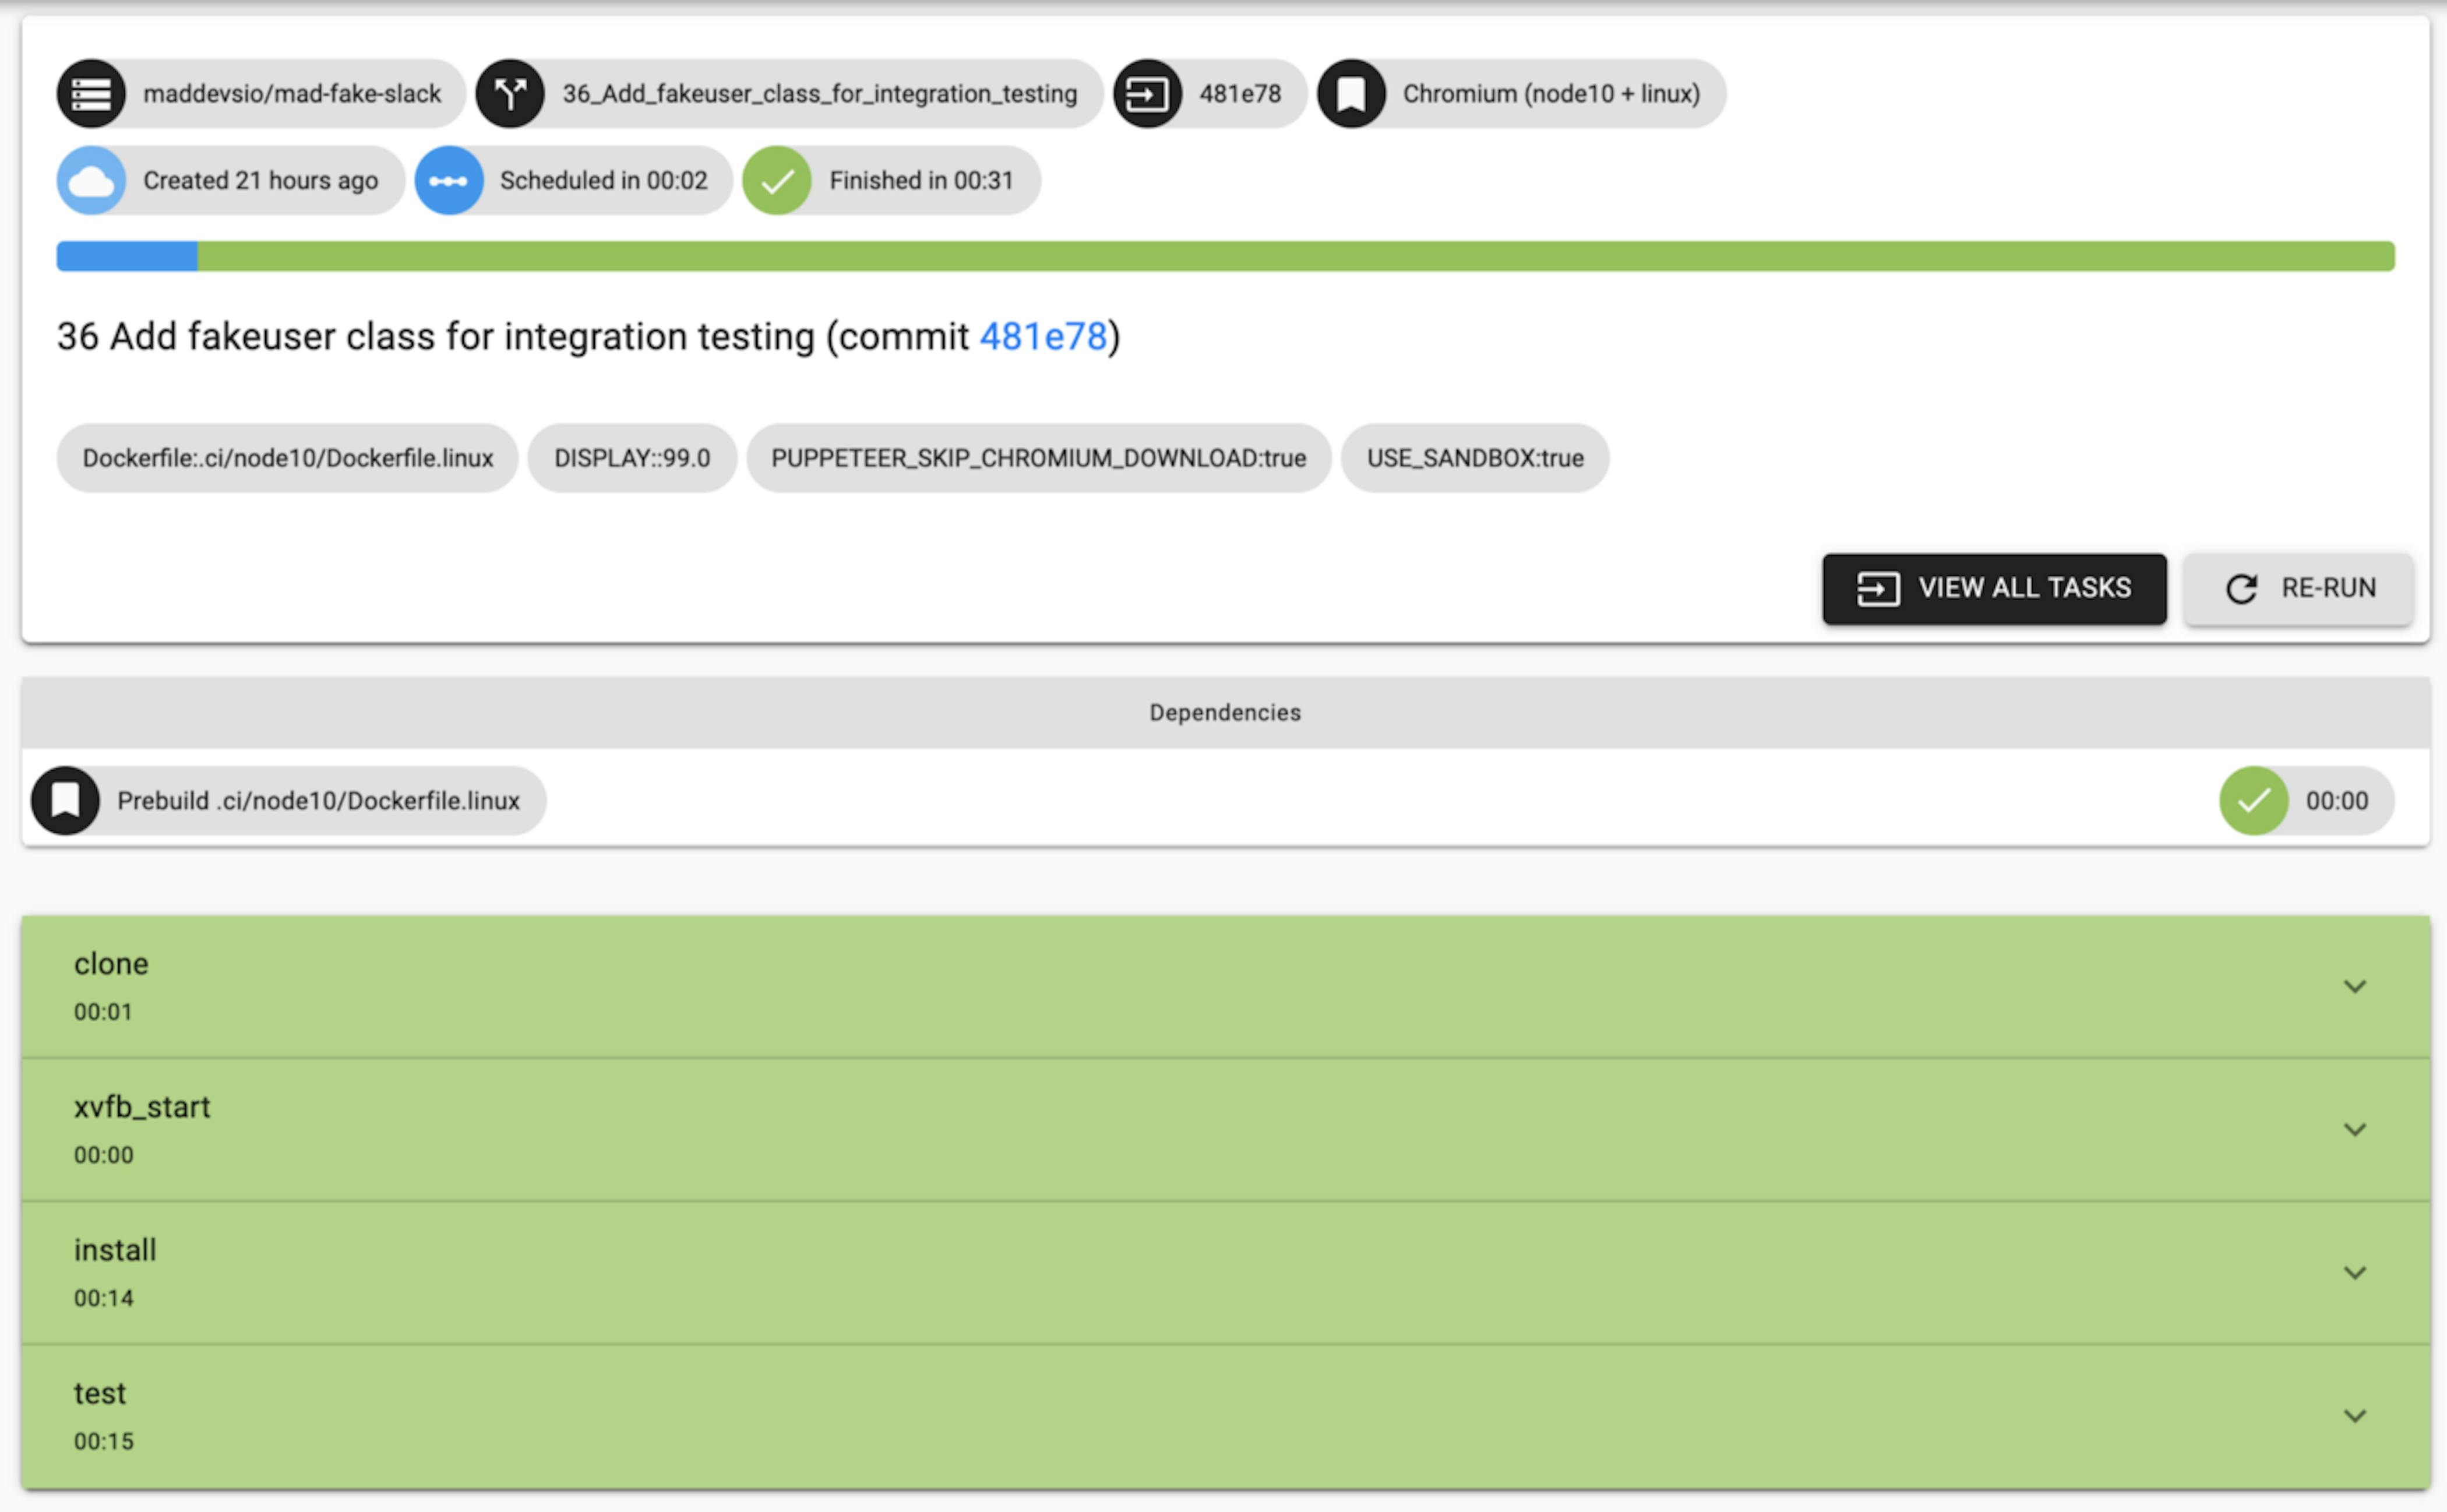
List of all tasks and steps on Cirrus CI
As you can see, the Prebuild task is not executed, since nothing has changed in the docker file for the test environment.
Cloning repos, running xvfb for the future for non-headless tests + installing dependencies through npm and running tests, all together take 31 seconds! Not bad at all! Cirrus CI is faster than Circle CI! Another penny to the karma of the Cirrus Labs!
Cirrus CI configuration to run puppeteer tests
The entire configuration is also based on yml and is described in the .cirrus.yml file, which should be in the root of your project.
GitHub Gist is loading...
I believe that this is the closest approximation of config what is used for VSCode and it is great!
The most important feature of Cirrus CI is the ability to specify your own Dockerfile for the execution environment I need. What I hurried to use!
GitHub Gist is loading...
With the exception of selecting an individual user, in order to enable sandbox mode, the installation of google-chrome-stable repeats what is specified in .devcontainer/Dockerfile. And as it turns out, compared to Circle CI and Travis-CI — this is a cool feature! No need to move away from the usual way to install the browser and use some mystical plugins or non-obvious installation scripts that you can hardly find in the threads of discussing problems on GitHub and running tests on a particular CI associated with Puppeteer. And since the Docker image is built only once upon a change to Dockerfile, you can make sure that your execution environment is the same for every single build.
Travis CI
This is probably the longest running build compared to Circle CI and Cirrus-CI. And for this reason, Travis CI is at the end of the list.
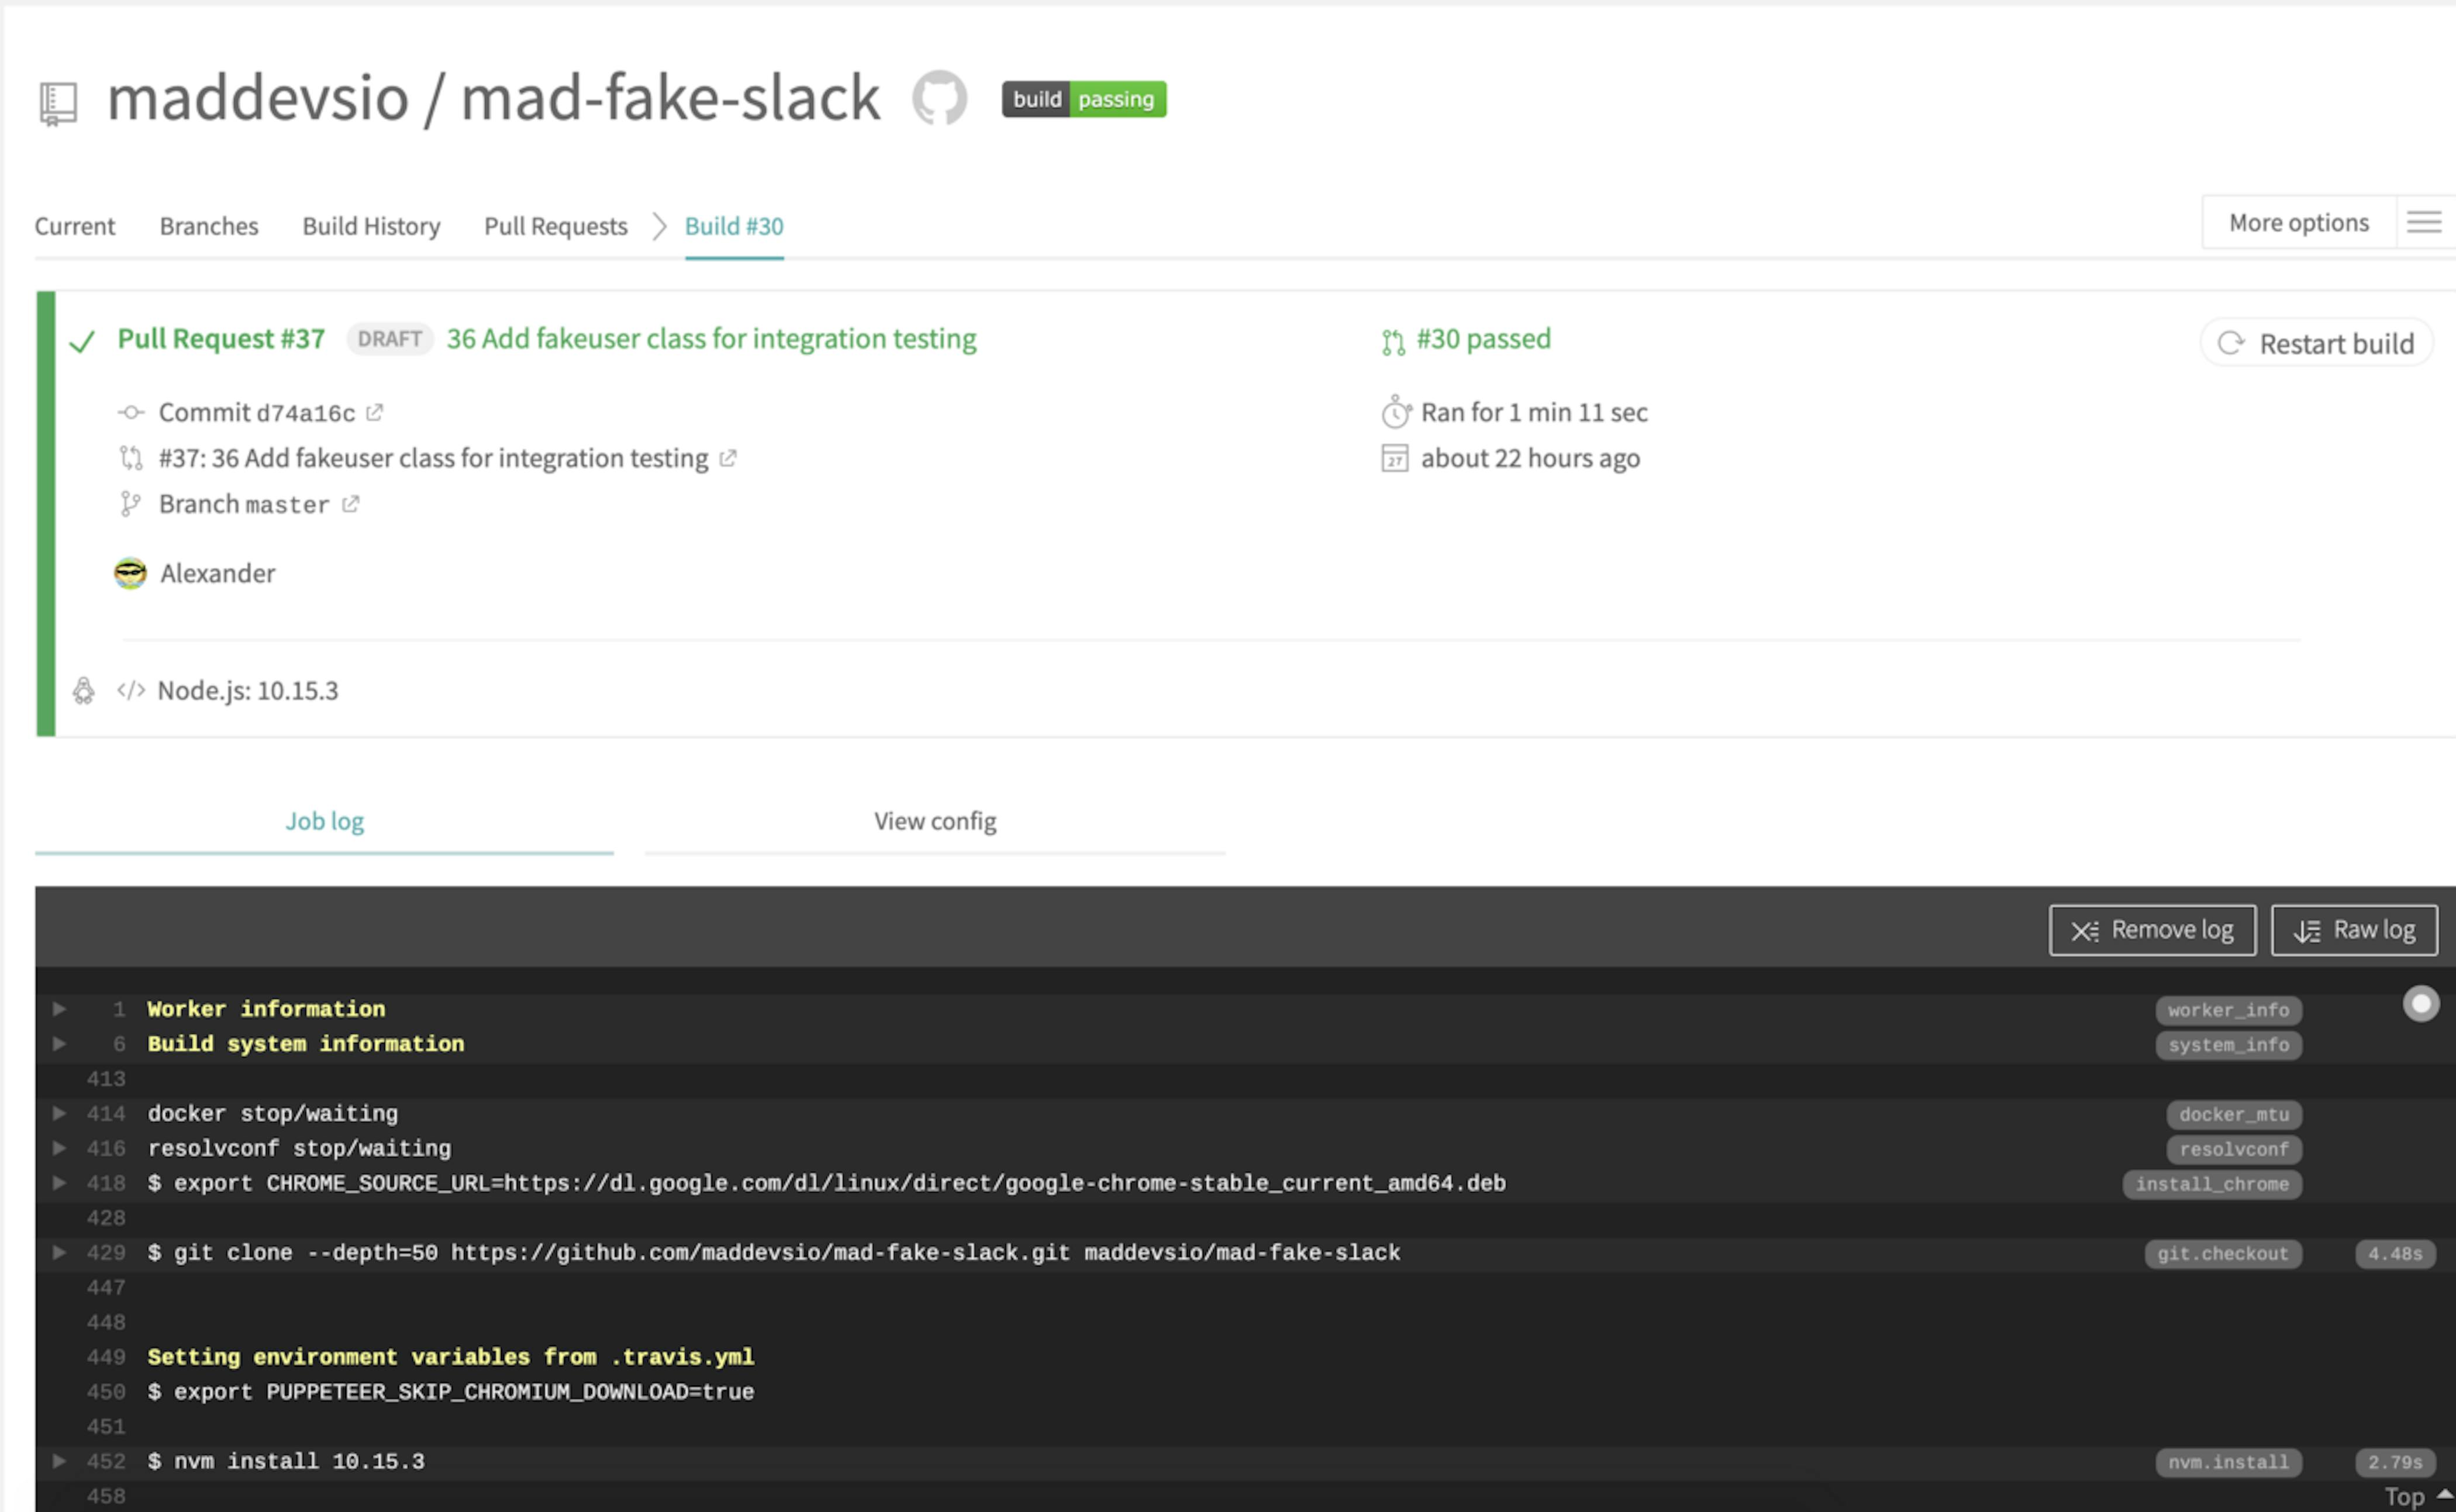
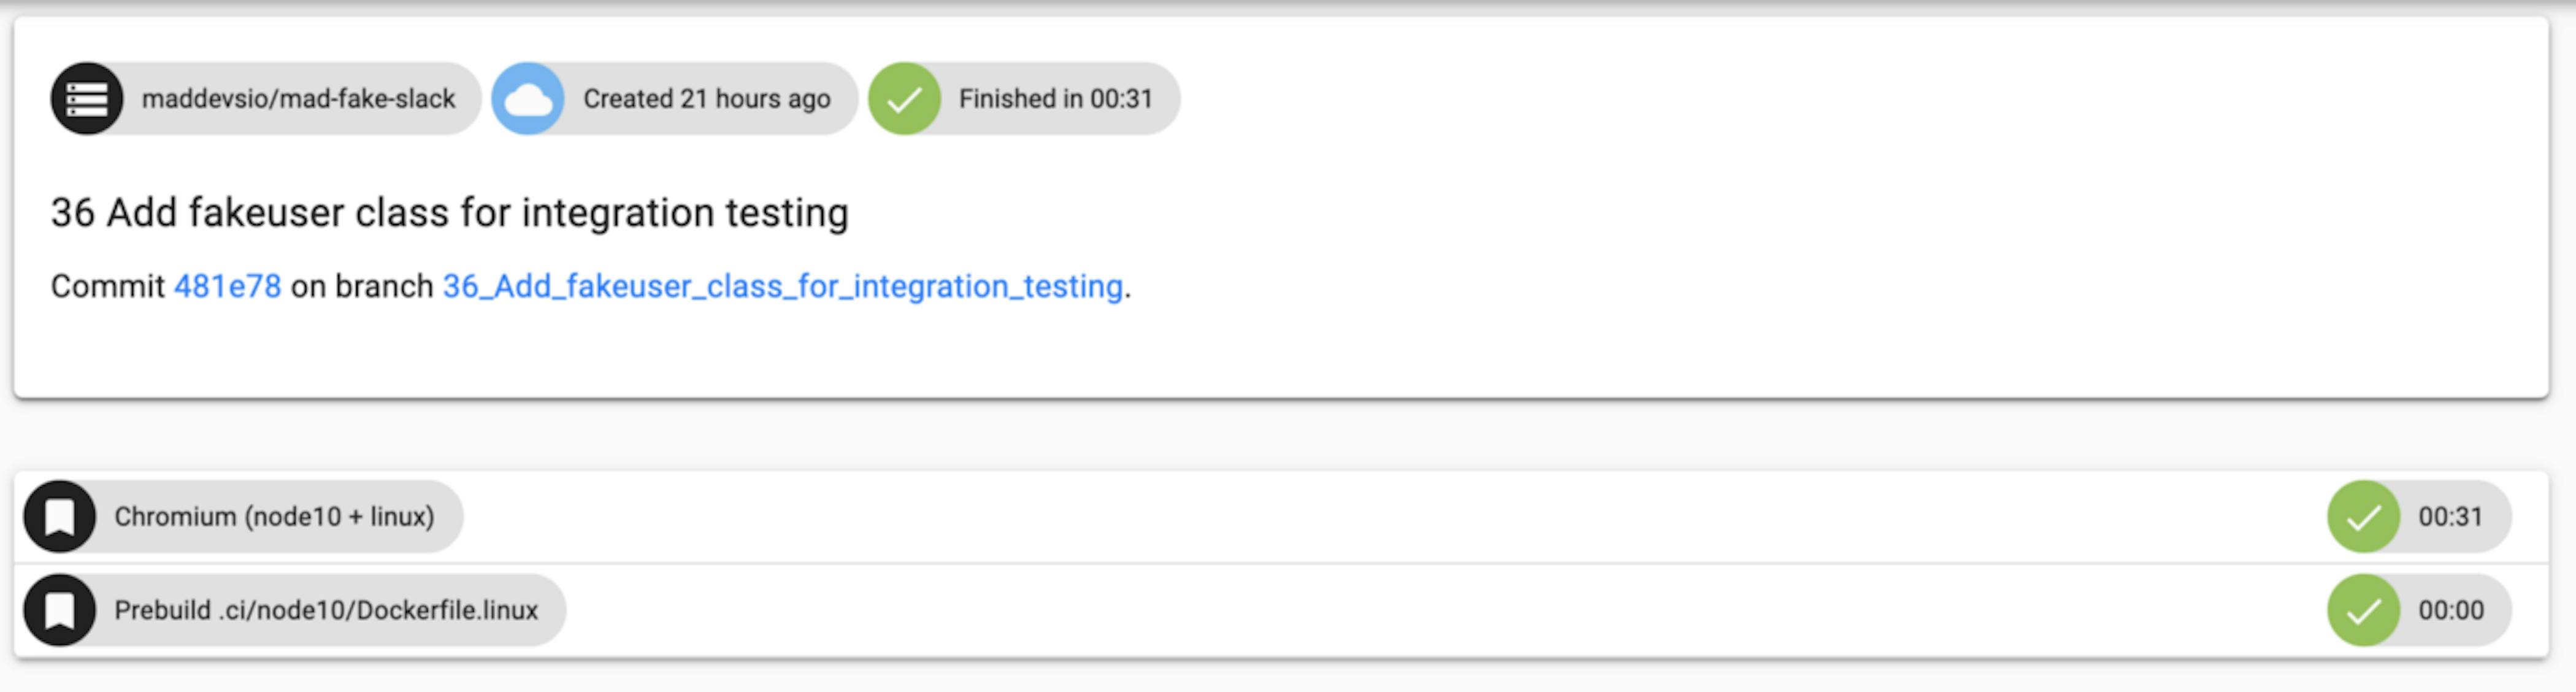
An example of the Travis CI interface for thecurrent/latestbuild.
Build timing of Travis CI
As can be see from the interface, the total execution time was 1 minute 11 seconds. This is 2 times longer than Circle CI and ~ 3 times more than Cirrus CI.
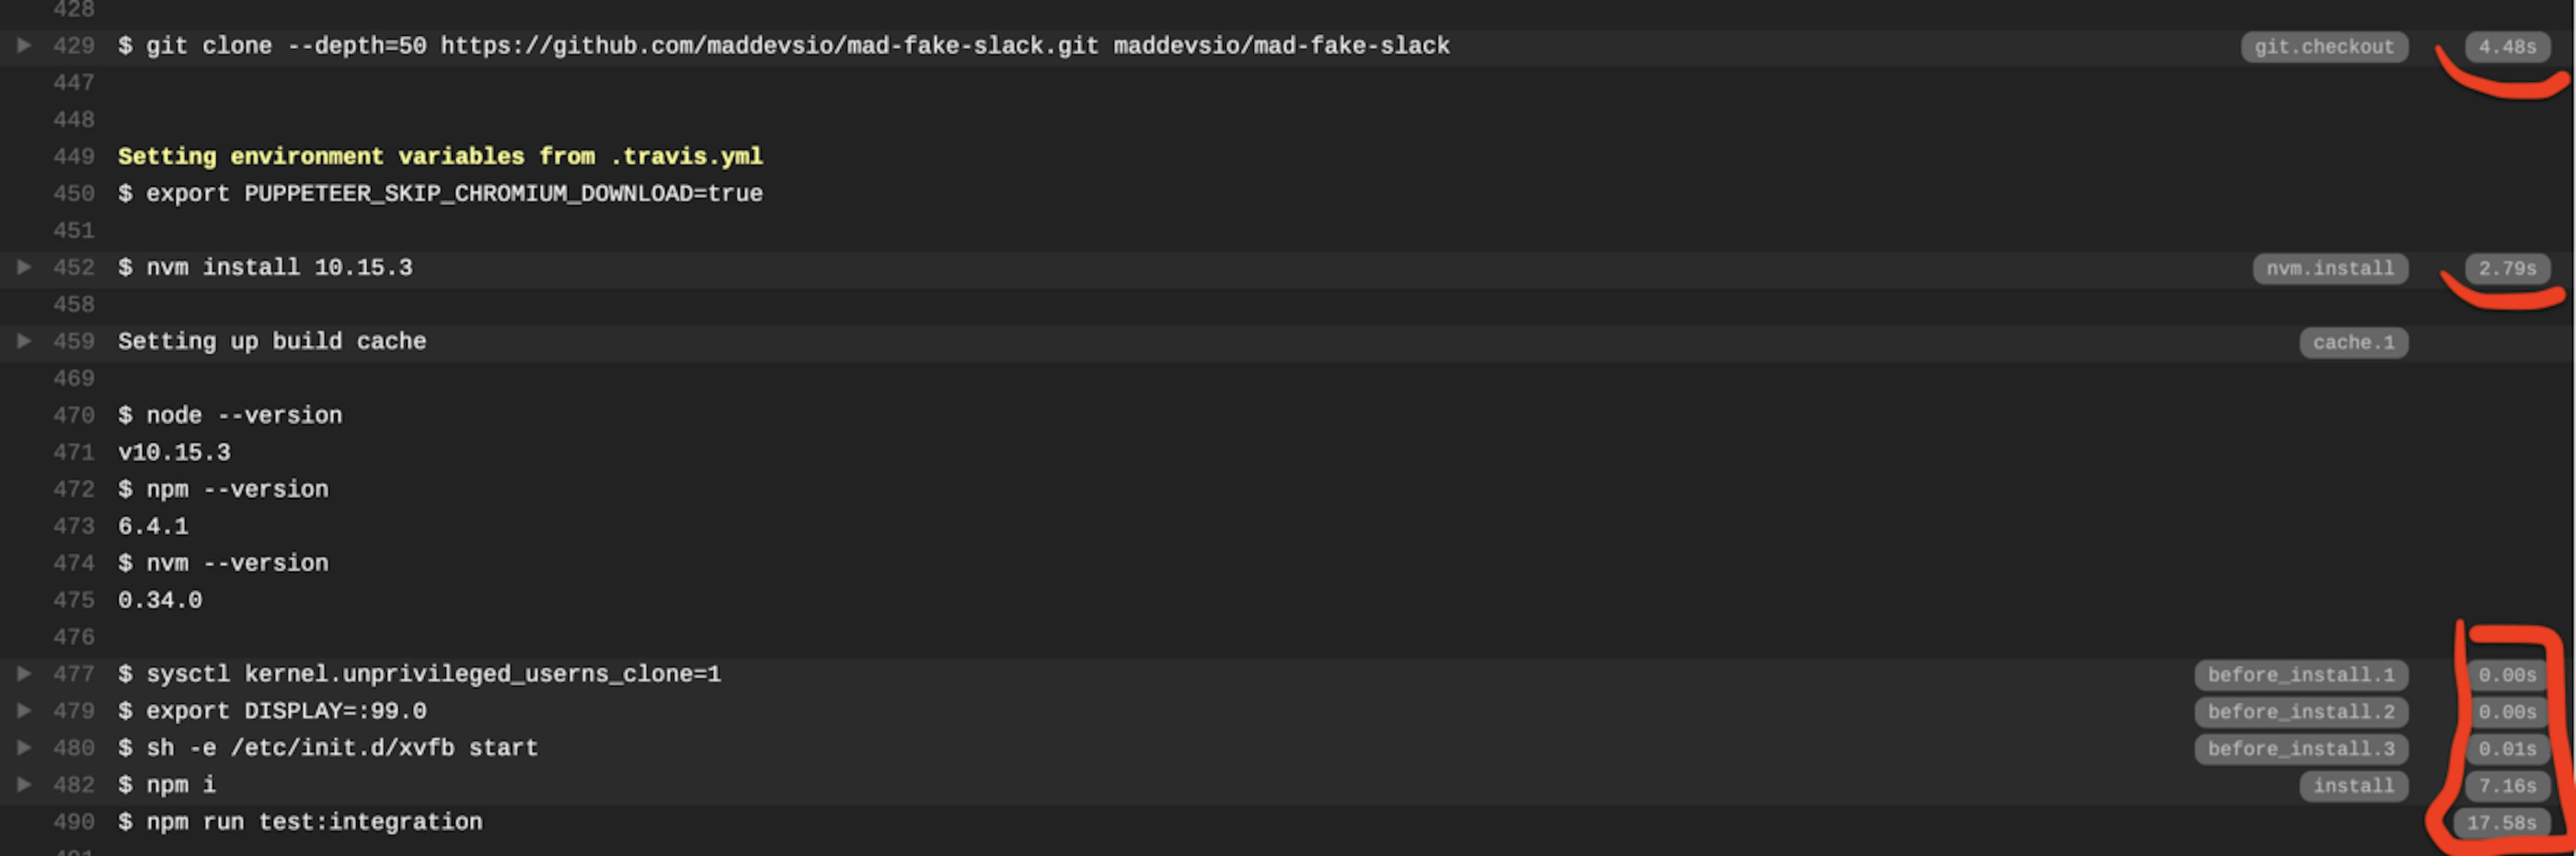
The timings of steps are indicated directly in the interactive log.
- Repo cloning — 4.48 seconds
- Installation of node.js 10.15.3–2.79 seconds
- Launching xvfb — 0.01 seconds
- Installing dependencies through npm — 7.16 seconds
- Running of integration tests — 17.58 seconds
In total: 32.02 seconds! What? Where did 1 minute 11 seconds come from?
Judging by the RAW log, I see that the rest of the time was spent creating the environment (this time is not spent on Circle CI and Cirrus CI), and this happens every time again. Travis uses generic purpose VMs with many packages pre-installed and many add-ons ready to be installed. This means that when Travis updates their environment with newer versions of packages there are no guarantees that your CI builds continue working like before. You cannot rely on reproducibility of your execution environment like with Docker images which are immutable. In general, there was a hot discussion of tasks with the docker inside. In it, people complained that their build passes 9 minutes on Travis CI, whereas locally, due to caching images of the docker, the build finishes in a minute.
Un-obvious things which I encountered using Travis-CI
- These are environment variables in the key of the configuration file env: It seems that everything seemed obvious, you simply indicate one variable environment per line, with its value and everything is ok. But no! As it turned out, each line, in this case, means setting each of the variables to one task. Thus, by setting 2 environment variables, I got two tasks!
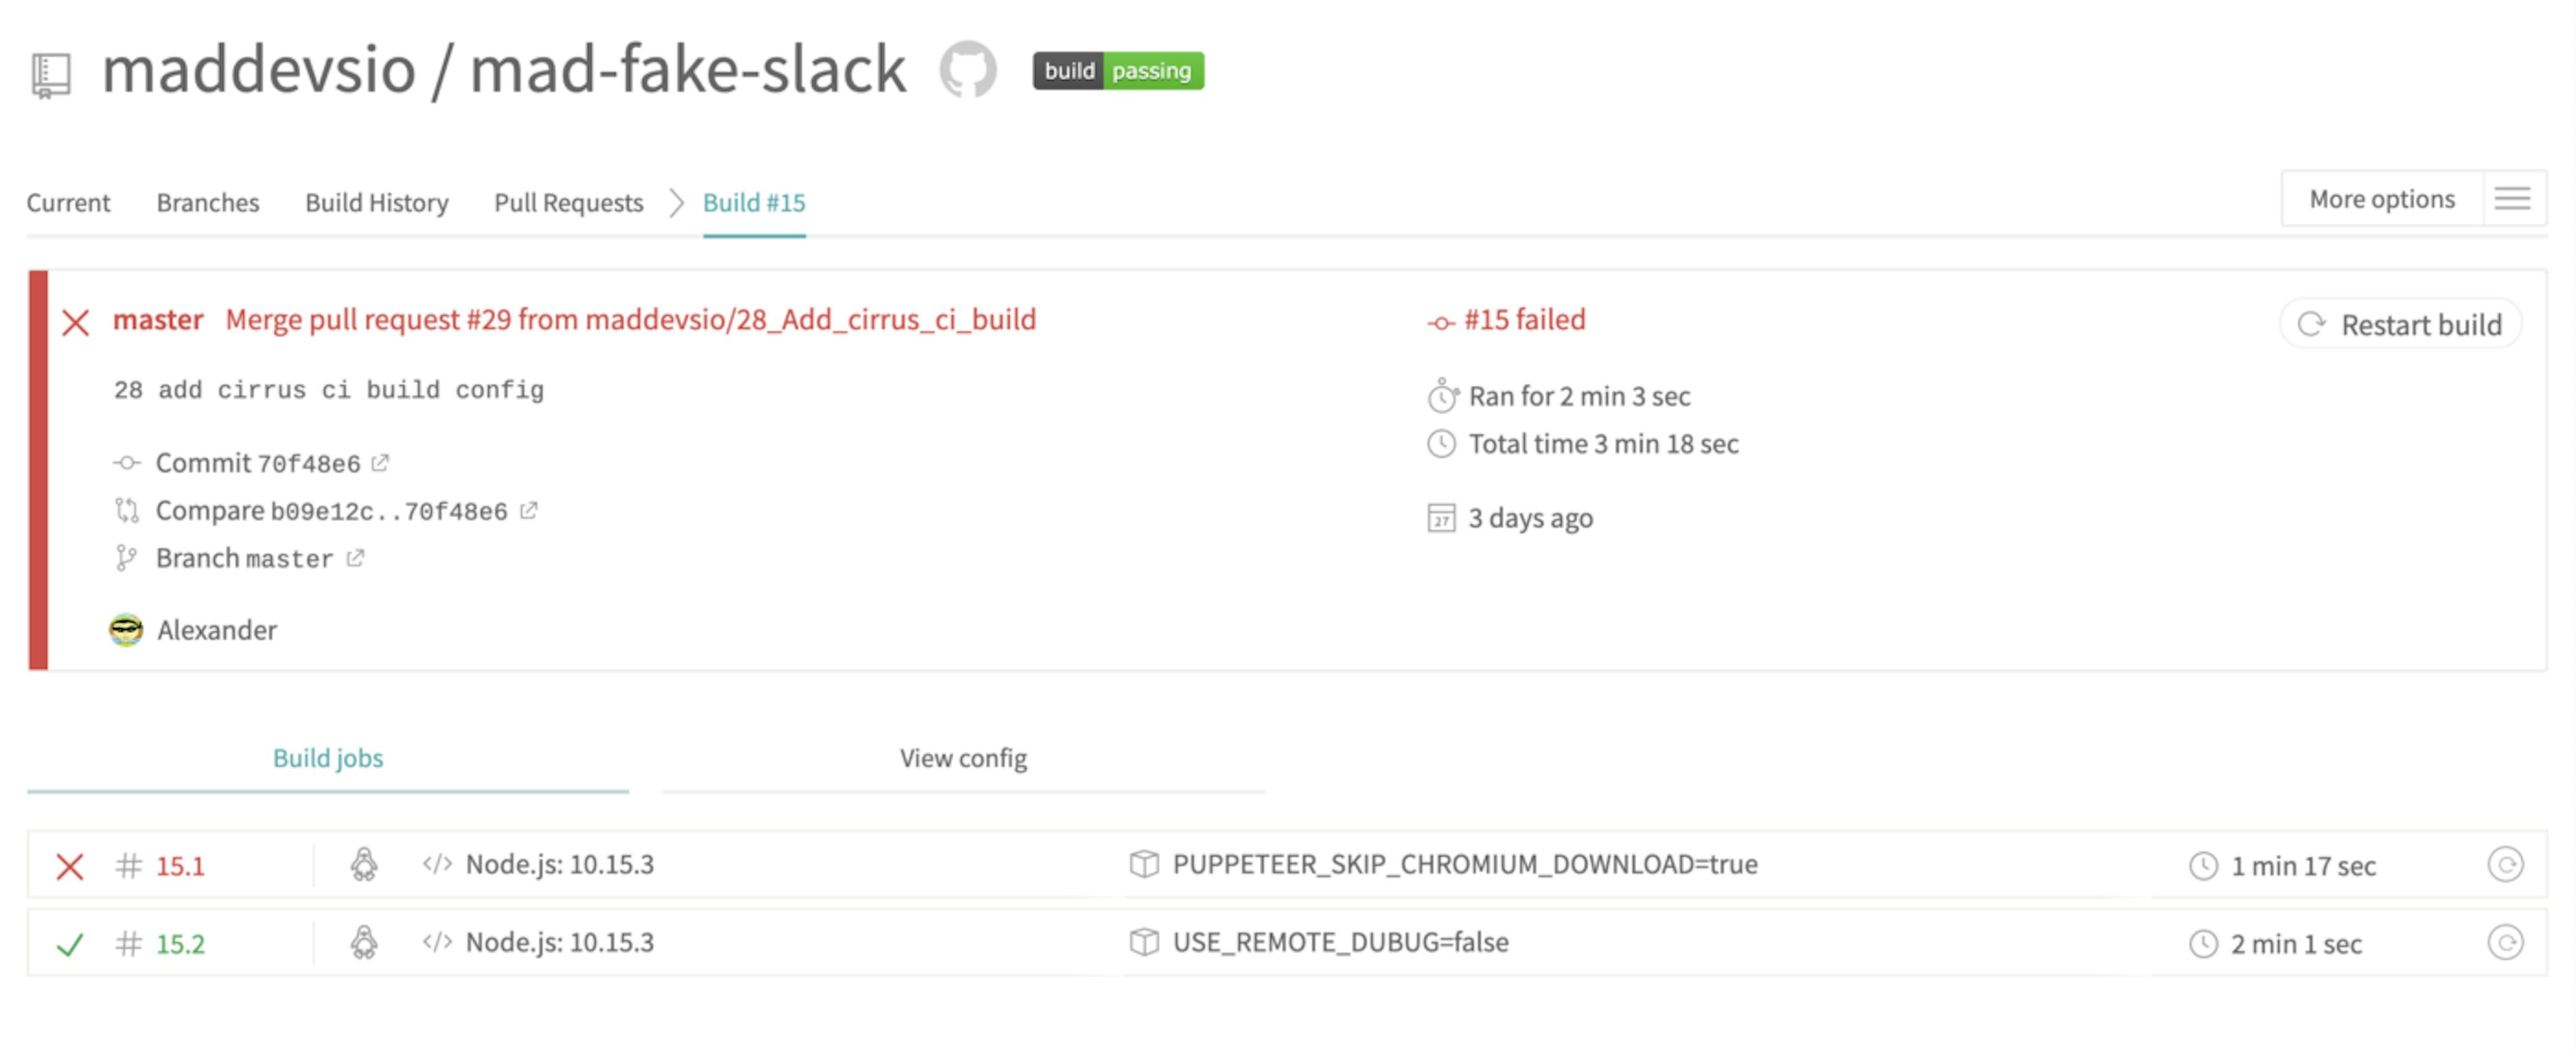
That's how two environment variables spawned — two tasks!
How is this moment fixed? Very simple! It turns out there is a global: subsection of env: in order to declare a global environment variables for all list of tasks. Now the env: section looks like this:
env:
  global:
    - PUPPETEER_SKIP_CHROMIUM_DOWNLOAD=true
    - USE_REMOTE_DUBUG=false
In this case, no matter how many variables are set, all of them will be set for all tasks and the generation of new tasks (by the number of variables) will not occur.
- There is also very little information on how to launch and install google-chrome-stable browser to run tests on puppeteer. In Github questions, many claimed that everything needed to launch the puppeteer is already in the Ubuntu Trusty version, but the browser names are clearly different, and the browser launch did not lead to success (by default, the 67th version of chrome in the system) and the build failed with an error “time out”. Someone suggested launching a browser at the before_install step, as below.
- google-chrome-stable — headless — disable-gpu — remote-debugging-port=9222http://localhost&
But why? I can run Puppeteer myself. And after several unsuccessful attempts to find a way to install the browser myself, I found in the discussions on GitHub that the browser can be installed via add-ons.
addons:
  chrome: stable
In this way, I achieved the installation of the same browser for the Travis-CI build (version 75) that I use locally. You can read here how to write the configuration for GUI and headless browsers.
Travis CI configuration to run puppeteer tests
The configuration for Travis-CI is to write a .travis.yml file, which must be located in the root directory of the project.
GitHub Gist is loading...
As a result, after a visual measurement of build timings at all three CIs and the actual timings of build steps, the leader among all three CI is Cirrus CI. All thanks to great Docker support and ability to prebuilt Dockerfiles. Nowadays almost every project on the internet provides a Dockerfile that has not only the project installed but also exact versions of packages it depends on. This allows your CI builds to run your tests right away without the need to install packages every time. Travis-CI does not shine with such examples from the very beginning and this fact does not allow to write a basic configuration using docker images or caching principles.
So the conclusion is: Use CI, where Docker integration is already a first class citizen. Docker images can be prebuilt and reused for every build saving your precious time.
Thank you for reading this article to the end! I hope the collected material will benefit everyone who begins to encounter the CI world around us!


Latest articles here