[Common Architectures in iOS Development]
What is software architecture?
Simple explanation:
The basic structures of a software system are what software architecture is, and it is the discipline that deals with creating these systems. Each structure consists of software elements, their relations and the properties between them. Its architecture is the basis of both this system and its development by defining work assignments for both design and implementation teams.
More complex explanation with comparison:
Good software architecture provides a robust framework that supports the software's requirements and keeps it flexible, scalable, and manageable. It involves making strategic choices about the system's structures and standards, considering aspects like performance, security, maintainability, and scalability.
Bad architecture, conversely, might lead to a system that is difficult to understand, maintain, or extend. It often results in:
- Rigidity: The system is hard to change because every change forces many other changes.
- Fragility: Changes cause the system to break in places that appear to have no relation to the altered areas.
- Immobility: It's hard to disentangle components to reuse in another software system.
Good architecture smoothly accommodates changes due to new requirements or environments, whereas bad architecture might struggle or necessitate significant reworking to adapt.
Let's dive into the most common architectures in iOS development.
MVC (Model–View–Controller)
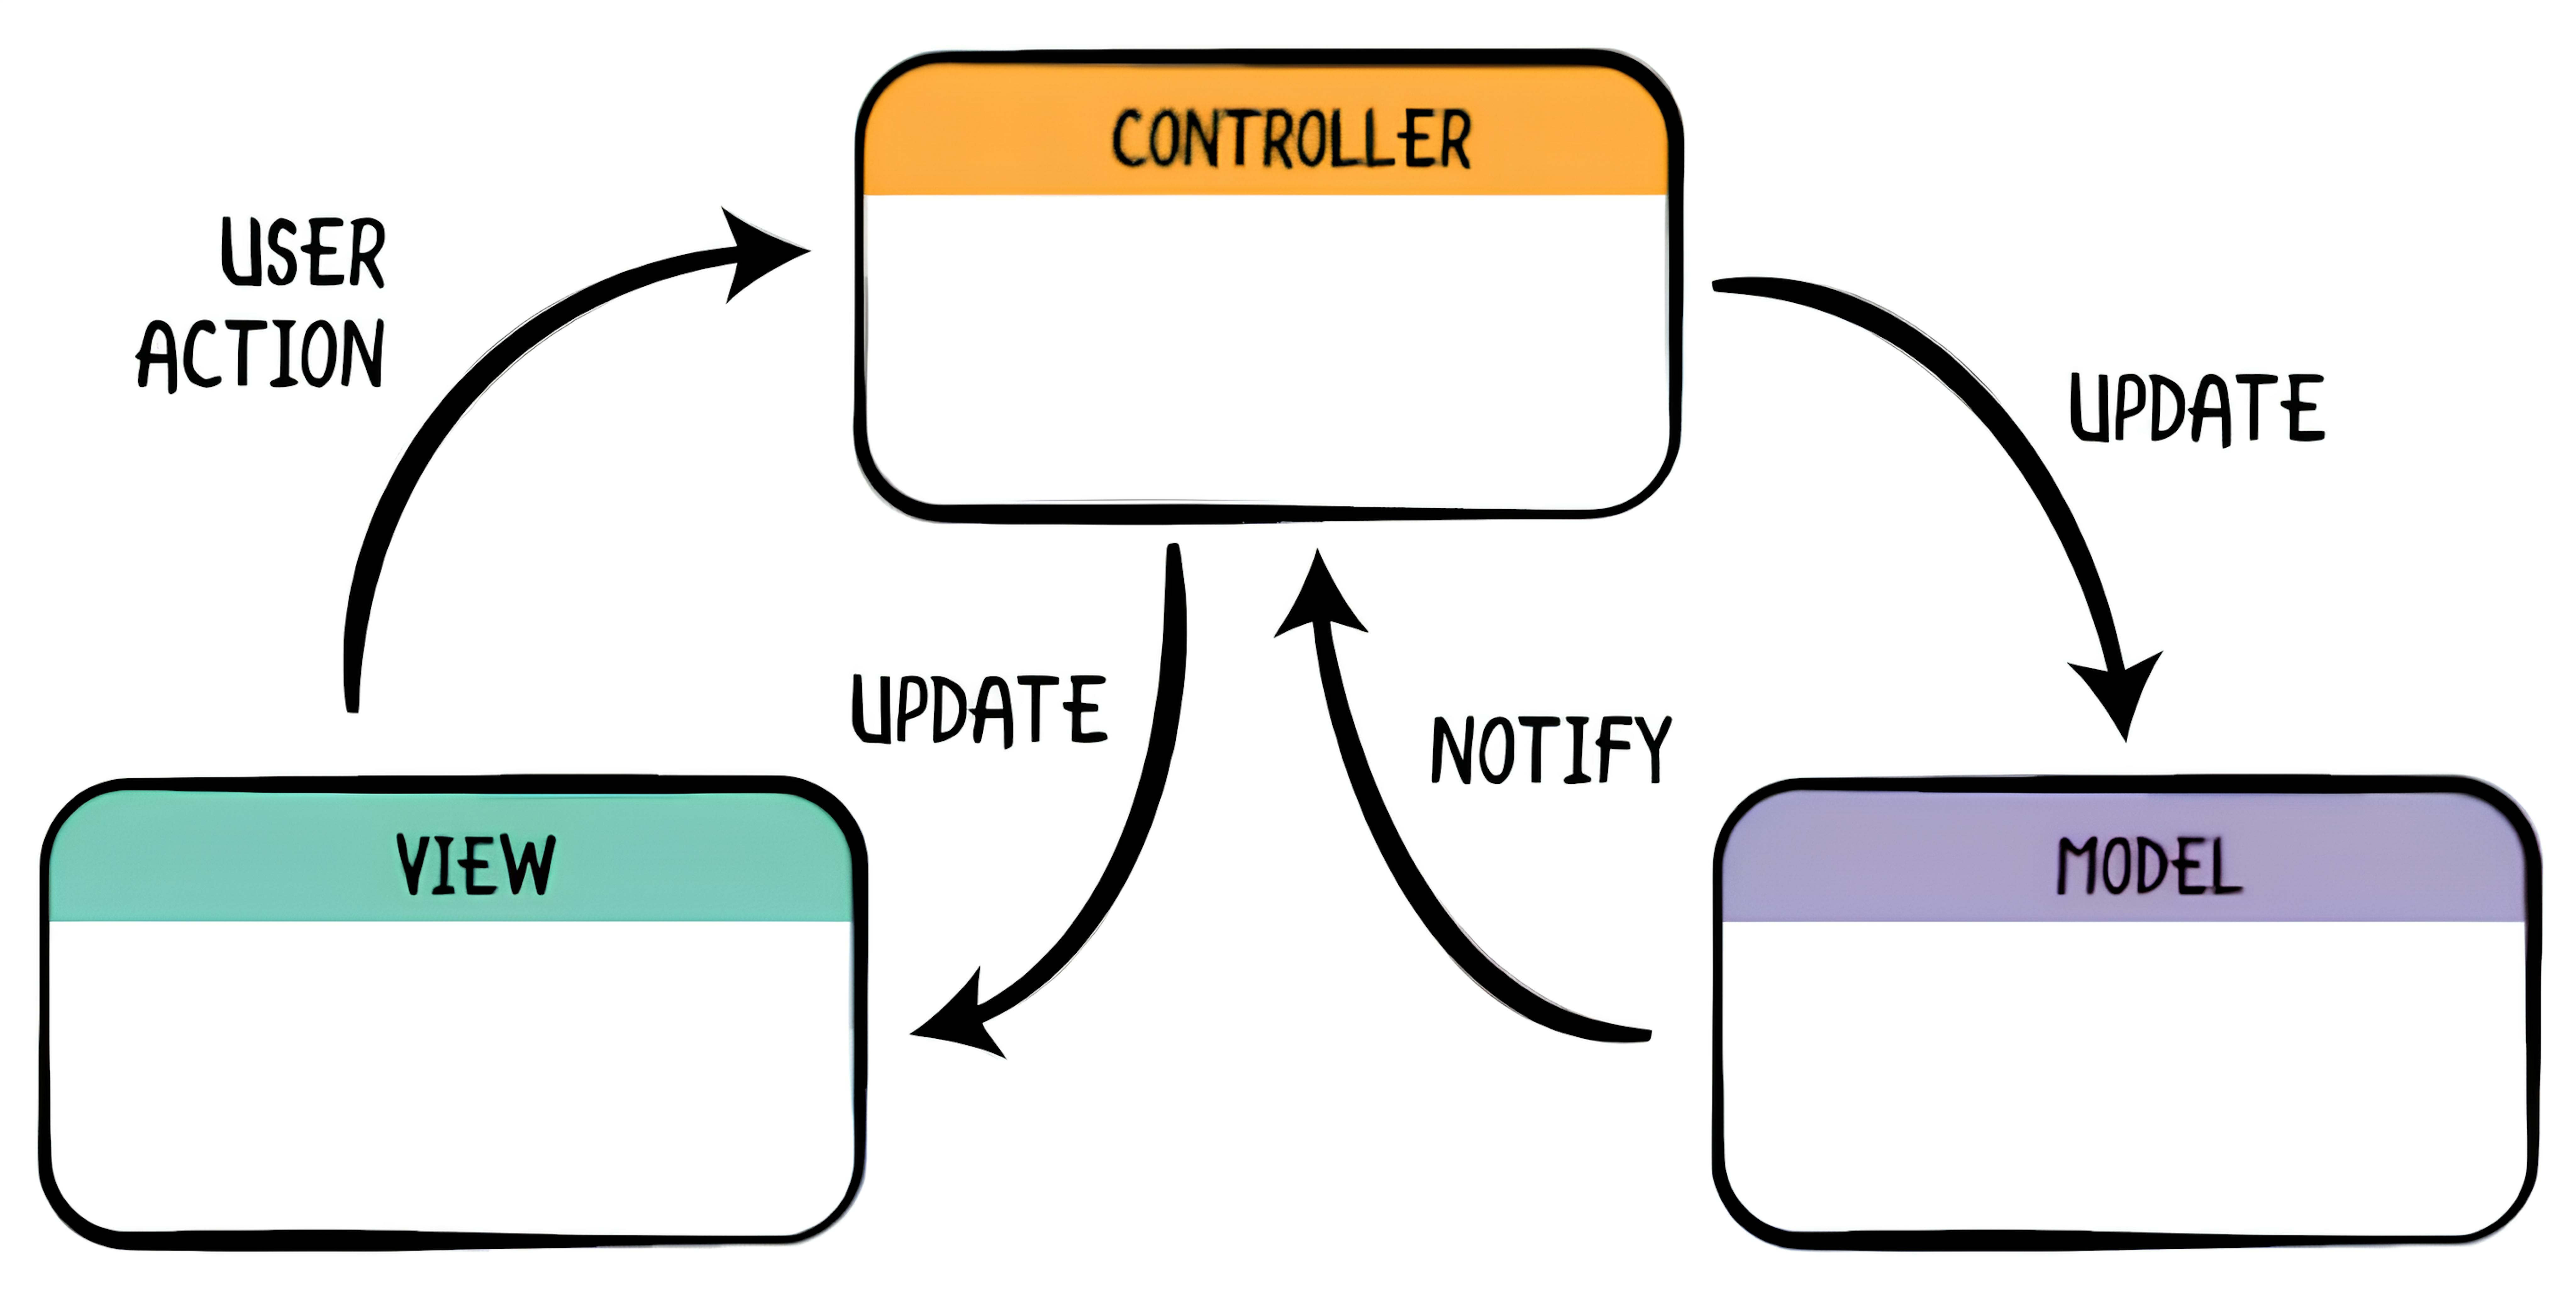
MVC is one of the oldest and most traditional architecture patterns in software engineering. It divides an application into three interconnected components, each with distinct responsibilities:
- Model: Manages the data and business logic of the application. It only handles the data and its processing, sending updates to the view when data changes.
- View: Handles the display, formatting the data provided by the model into a form that the user can interact with.
- Controller: Acts as an intermediary between the model and the view. It takes user input from the view, processes it (with possible updates to the model), and returns the display output.
// Model
struct UserProfile {
    var name: String
    var age: Int
    var email: String
}
// View
class UserProfileView: UIView {
    var nameLabel: UILabel = UILabel()
    var ageLabel: UILabel = UILabel()
    var emailLabel: UILabel = UILabel()
    func displayUserProfile(name: String, age: Int, email: String) {
        nameLabel.text = name
        ageLabel.text = String(age)
        emailLabel.text = email
    }
}
// ViewController
class UserProfileViewController: UIViewController {
    private lazy var userView: UserProfileView = UserProfileView()
    private var user: UserProfile
    init(user: UserProfile) {
        self.user = user
    }
    override func viewDidLoad() {
        super.viewDidLoad()
        updateUserProfileView()
    }
    private func updateUserProfileView() {
        userView.displayUserProfile(name: user.name, age: user.age, email: user.email)
    }
}
In this example:
- The Model (UserProfile) simply contains data.
- The View (UserProfileView) displays the data.
- The Controller (UserProfileViewController) manages the interaction between the model and the view, updating the view when the model changes.
Strengths and weaknesses
Strengths:
- Clear separation of concerns
- Familiar pattern to many developers
- Easy to implement in small applications or prototypes
Weaknesses:
- In complex applications, the controller can become overly complicated ("massive view controller" problem).
- Tends to tightly couple the view and the model via the controller, which can affect scalability and maintainability
Summary
MVC is particularly suitable for simpler applications where the data model is not complex and the user interactions are straightforward. It has been widely used in iOS development, but as applications grow, developers might opt for more advanced architectures to better manage complexity and ensure scalability.
MVVM (Model–View –ViewModel)
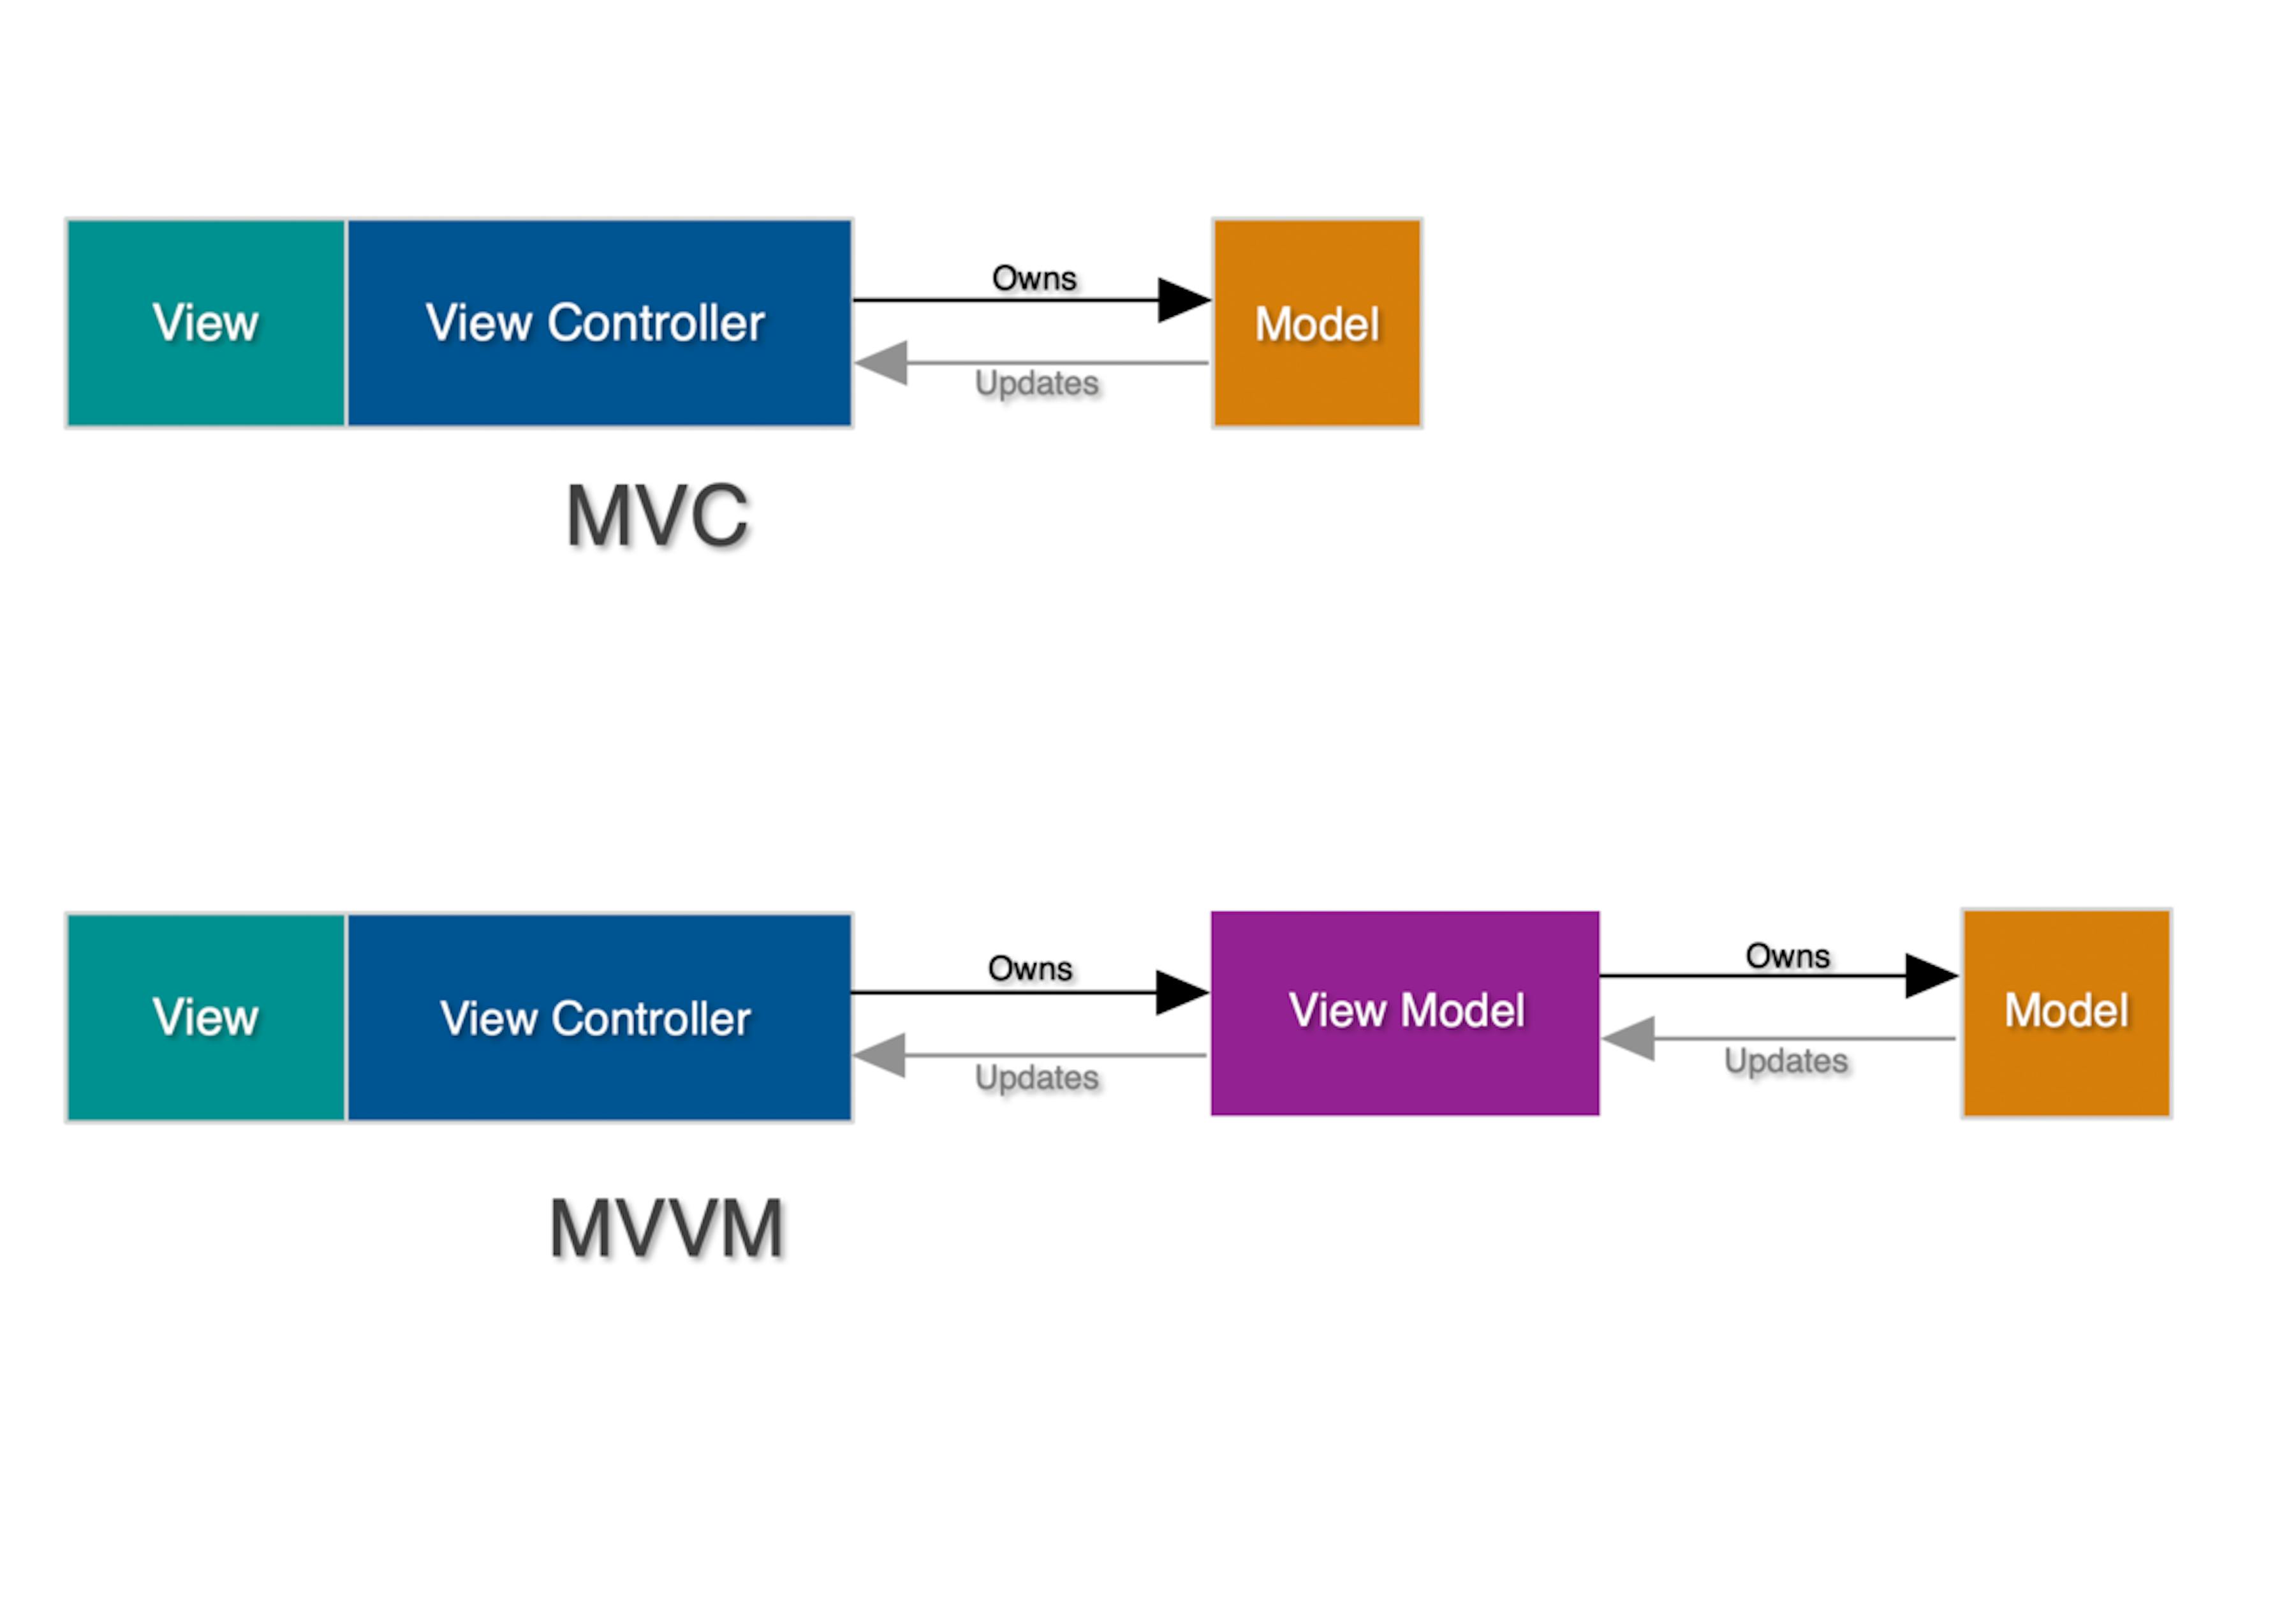
MVVM is a more modern approach compared to MVC, designed to address some of MVC's shortcomings, particularly around the separation of concerns between the user interface and the business logic. In MVVM, the responsibilities are divided among three components:
- Model: Represents the data and business logic, similar to MVC.
- View: Handles the graphical and input/output components, directly linked to what the user sees and interacts with.
- ViewModel: Acts as an intermediary between the Model and the View. It handles most of the view logic, taking responsibility for transforming model data into values that can be displayed on a view.
The Model (Task) simply contains the data.
// Model
struct Task {
    var title: String
    var description: String
    var isCompleted: Bool
}
ViewModel: TasksViewModel which prepares task data for display and handles user interactions like marking a task as completed.
//ViewModel
protocol TasksViewModelProtocol {
    func fetchTasks(onSuccess: @escaping ([Task]) -> Void, onError: @escaping (APIError) -> Void))
}
class TasksViewModel: TaskViewModelProtocol {
    private let networkManager: NetworkManagerProtocol
    init(networkManager: NetworkManagerProtocol) {
        self.networkManager = networkManager
    }
    func fetchTasks(onSuccess: @escaping ([Task]) -> Void, onError: @escaping (APIError) -> Void)) {
        networkManager.getTasks { [weak self] (response) in
            switch response {
                case .success(let data):
                    let tasks = data.map { Task(title: $0.name, description: $0.description, isCompleted: $0.isDone) }
                    onSuccess(tasks)
                case .failure(let error):
                    onError(error)
            }
        }
    }
}
View: TasksListViewController that displays a list of tasks.
class TasksListViewController: UIViewController {
    private lazy var tasksTableView: UITableView!
    private let viewModel: TasksViewModelProtocol
    init(viewModel: TasksViewModelProtocol) {
        self.viewModel = viewModel
    }
    override func viewDidLoad() {
        super.viewDidLoad()
        updateTasksTableView()
    }
    private func updateTasksTableView() {
        viewModel.fetchTasks(onSuccess: { [weak self] (tasks) in
            self?.reloadTableView(with: tasks)
        }, onError: { [weak self] (error) in
            self?.showErrorAlert(with: error.description)
        })
    }
}
In this example, you can see how the viewModel is responsible only for business logic. It receives data from the server, processes it, bringing it to the desired form, and returns it to View. Only the view knows what to do with this data.
Advantages of MVVM in Swift
Separation of concerns:
- MVVM enforces a clear separation of concerns, with distinct roles for the Model, ViewModel, and View. This separation makes the codebase more organized and maintainable.
Testability:
- MVVM makes it easier to write unit tests for your application. The ViewModel, which contains most of the application logic, can be thoroughly tested in isolation from the user interface.
Reusability:
- ViewModels are often designed to be reusable. The same ViewModel can be used with different Views to present the same data or functionality in various parts of the app.
Scalability:
- MVVM can scale well for larger and more complex applications. As your project grows, it's easier to add new features and maintain existing ones because of the separation of concerns.
Maintainability:
- Changes to the user interface or business logic can be made independently. This reduces the risk of introducing bugs when modifying one part of the application.
Flexibility:
- MVVM allows for greater flexibility in user interface design. Designers can work on the Views, while developers work on the ViewModels and Models, making it possible to iterate on the UI without affecting the underlying logic.
Disadvantages of MVVM in Swift
Complexity:
- MVVM can introduce some initial complexity to your project, especially for smaller applications. It might be overkill for simple apps.
Learning curve:
- Developers who are new to MVVM may face a learning curve as they grasp the architecture’s concepts and patterns.
Boilerplate code:
- MVVM often requires writing additional code to bind the View to the ViewModel, which can result in boilerplate code. Swift does not have built-in data binding, so developers often rely on third-party libraries like RxSwift or Combine to handle binding.
Increased memory usage:
- In some cases, MVVM can lead to increased memory usage because it maintains separate instances of the ViewModel and Model. This can be mitigated with proper memory management but that may require extra effort.
Over-engineering:
- MVVM can be seen as over-engineering for small, simple projects where the benefits of separation of concerns may not justify the added complexity.
Summary
MVVM is best suited for applications with complex user interfaces and a significant amount of dynamic interactions between the view and the model. Here are some criteria and situations when adopting MVVM could be particularly beneficial:
- Complex UI logic: When the user interface has complex state management needs or requires frequent updates in response to changes in underlying data.
- Data-bound UI components: Applications that benefit from strong data-binding and need to keep the UI and the business logic strictly separated.
- Unit testing: Projects where unit testing of UI and business logic is a priority. MVVM facilitates testing by isolating most of the UI logic in the ViewModel, which can be tested independently of the UI (View).
- Collaborative development: If the project involves multiple developers or teams working in parallel on the UI and the logic, MVVM allows for better separation of concerns, enabling more efficient parallel development.
MVP (Model–View–Presenter)
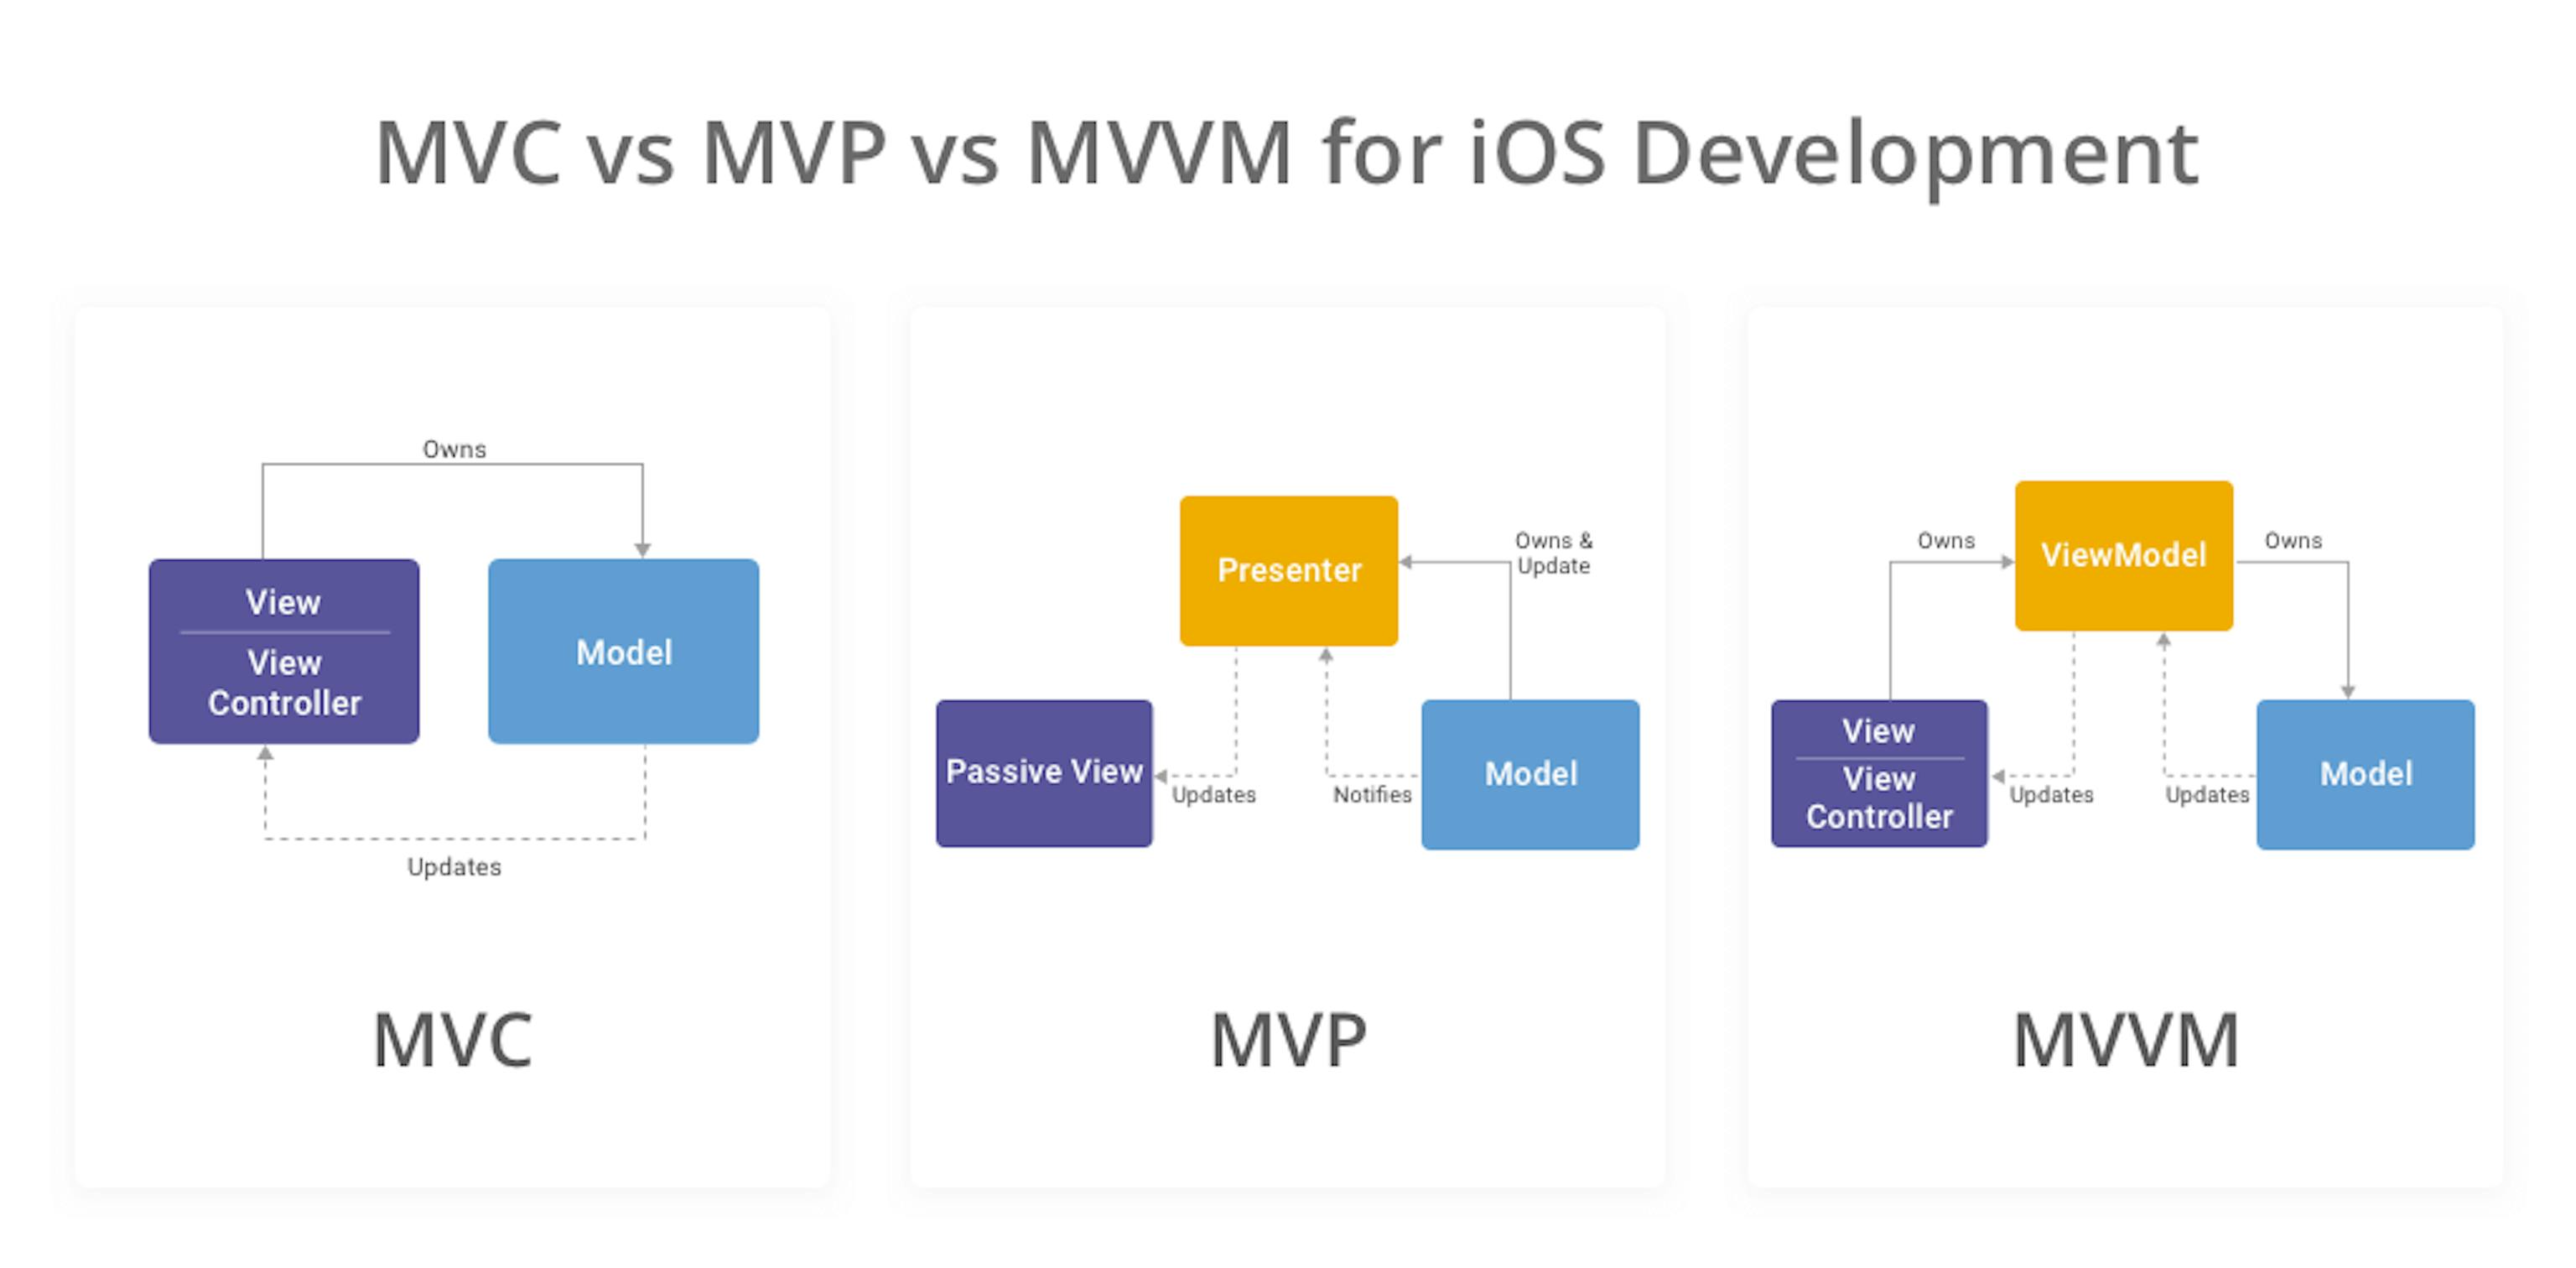
MVP (Model-View-Presenter) is an architectural pattern derived from MVC but adapted to address some of the issues particularly related to the separation of concerns between the user interface and the business logic. In MVP, the roles are defined as follows:
- Model: This represents the data and business logic of the application. It's responsible for fetching, storing, and manipulating the application data.
- View: The View is responsible for anything that has to do with user interface and user interaction. In iOS applications, this is typically a UIViewController.
- Presenter: The Presenter acts as a bridge between the Model and the View. It fetches data from the Model, applies the necessary transformations, and then passes the data to the View to be displayed.
The Model (User) simply contains the data.
//Model
struct User {
    let id: Int
    let name: String
    let email: String
}
The NetworkManager (NetworkManager) simply fetches the data from server.
protocol NetworkManagerProtocol {
    func fetchUsers(completion: @escaping ([User]?, Error?) -> Void)
}
//NetworkManager
class NetworkManager: NetworkManagerProtocol {
    func fetchUsers(completion: @escaping ([User]?, Error?) -> Void) {
        // Code to fetch users from API goes here
    }
}
The View (UserViewController) shows data to a user.
protocol UserViewOutputProtocol: AnyObject {
    func showUsers(users: [User])
    func showError(error: String)
}
//View
class UserViewController: UIViewController, UserViewOutputProtocol {
    var presenter: UserPresenterProtocol!
    override func viewDidLoad() {
        super.viewDidLoad()
        presenter.viewLoaded()
    }
    func showUsers(users: [User]) {
        // Code to update UI with the list of users goes here
    }
    func showError(error: String) {
        // Code to show an error message to the user goes here
    }
}
The Presenter (UserPresenter) has references to the view and the network manager.
protocol UserPresenterProtocol: AnyObject {
    func viewLoaded()
}
//Presenter
class UserPresenter: UserPresenterProtocol {
    weak var view: UserViewOutputProtocol?
    var networkManager: NetworkManagerProtocol
    init(view: UserViewOutputProtocol, networkManager: NetworkManagerProtocol) {
        self.view = view
        self.networkManager = networkManager
    }
    func viewLoaded() {
        networkManager.fetchUsers { [weak self] users, error in
            if let error = error {
                self?.view?.showError(error: error.localizedDescription)
            } else if let users = users {
                self?.view?.showUsers(users: users)
            }
        }
    }
}
And, finally, it's time to put it all together! You can call it from another viewController, or coordinator, or appState, or appSession, etc. It doesn't matter how you control the navigation in your app.
func assembleUserViewController() -> UIViewController {
    let viewController = UserViewController()
    let networkManager = NetworkManager()
    let presenter = UserPresenter(view: viewController, networkManager: networkManager)
    viewController.presenter = presenter
    return viewController
}
This code creates instances of the view, network manager, and presenter, and connects them together. The presenter is given references to the view and network manager, and the view is given a reference to the presenter.
Advantages of MVP in Swift
- Enhances testability as the Presenter can be easily tested separately from the UI.
- Decouples the UI from the business logic, improving maintainability.
- Allows for more straightforward, organized code where the user interface can change without much impact on the underlying business logic.
Disadvantages of MVP in Swift
- The Presenter can become overloaded with logic, leading to 'massive presenter' issues similar to 'massive view controller' in MVC.
- Requires more boilerplate to set up compared to MVC, as interactions are more tightly controlled through the Presenter.
Summary
The MVP architecture can seem complex at first, but it offers many advantages. Separating concerns makes your code more modular and easier to understand. It also encourages the development of reusable components.
MVP is particularly useful for projects where you expect the user interface to change frequently but want to keep changes from affecting the core business logic significantly. It's well-suited for larger, more complex projects where testing and maintenance are major concerns.
VIPER (View, Interactor, Presenter, Entity, Router)
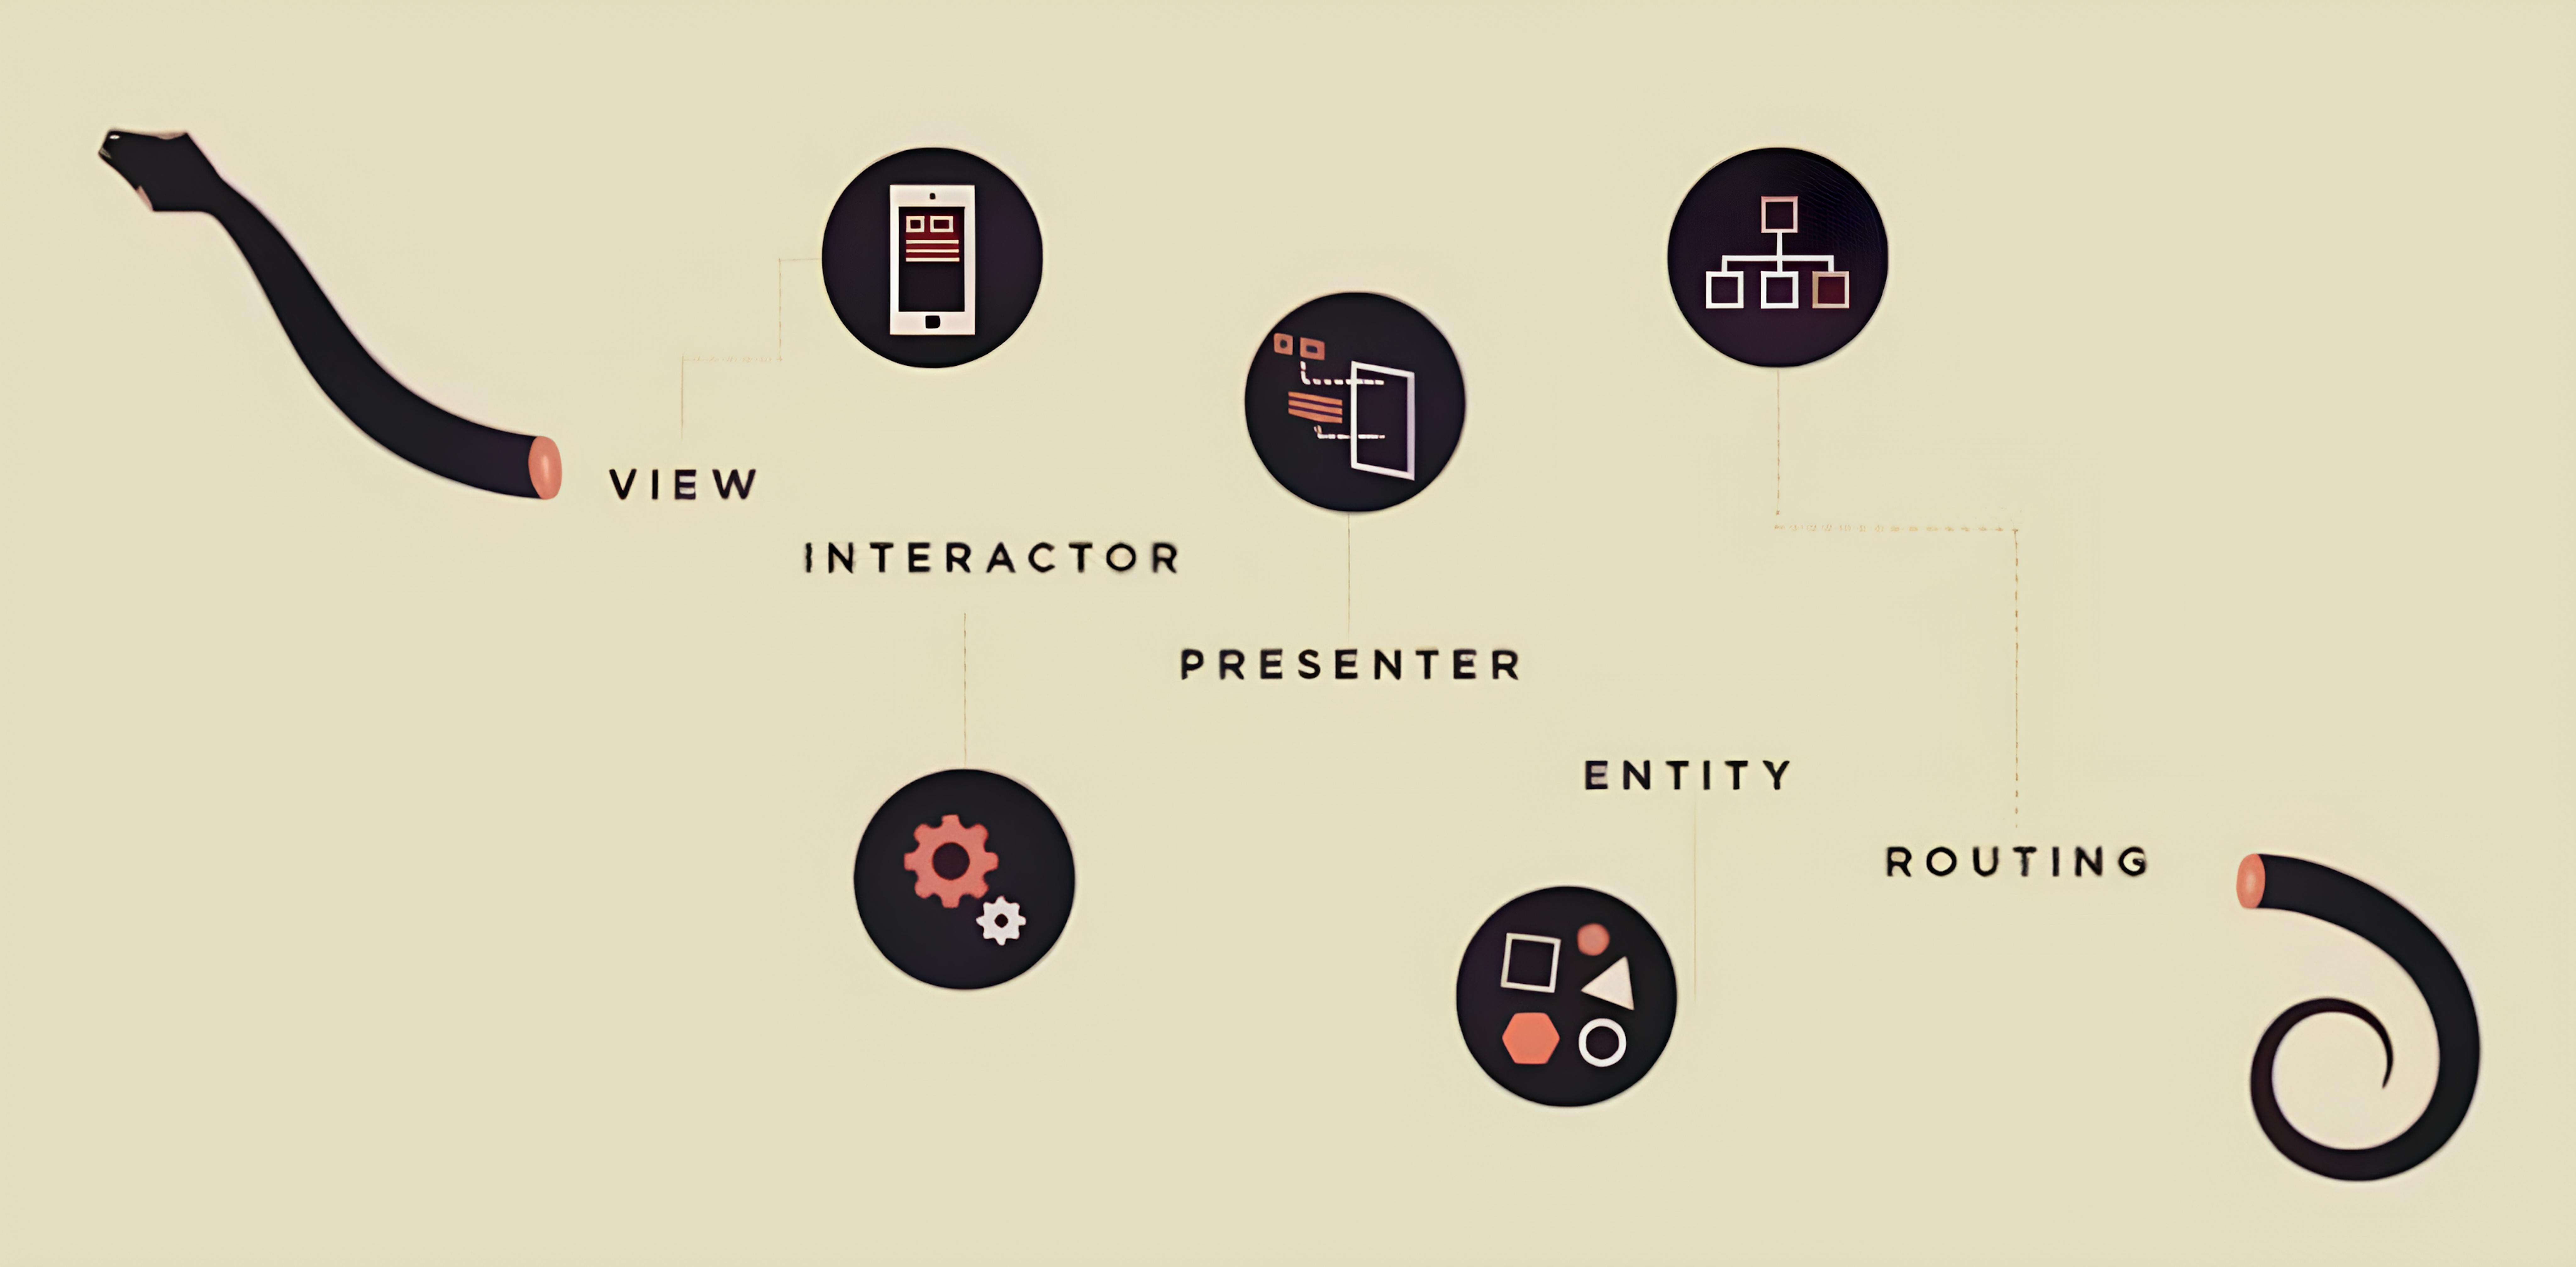
- View – A dummy object receiving touch events most of the time. Instead of MVC’s massive view controller with thousands of lines of codes all service-related codes and decisions should not exist in it. For example, when a touch event is received from the user, view object should notify the presenter, for example: “My dear presenter, a touch was received from a user, and I don’t know what to do. Please Help!”
- Presenter – The heart of the VIPER module. Only layer in the module that communicates with all other layers. Basically, all decision-making should be handled by the presenter. After the decision, the presenter has to communicate with the layer required. For example, after being notified by the view with touch event, the presenter should decide what should be done next. Does the screen need to update its UI? Then, tell the view layer to update the UI with the given info. Should data be fetched from a remote server? Then tell the interactor to fetch it. Similarly, does the app need to navigate to another screen? Then tell the router to navigate to the screen it needs.
- Interactor – Contains business logic. It builds a request from parameters and creates objects by mapping the response. After finishing the service connection, it notifies the presenter, for example: “Hey presenter, these are the puppies you're looking for” or “I'm sorry, I'm not able to fetch your needs at this moment”.
- Router – Need to navigate to another module? Tell the router which module it should be presented next and leave the rest to it. The router needs a UINavigationController instance to do such navigation stuff.
- Entity – Plain data objects mainly driven by the interactor. No more, no less.
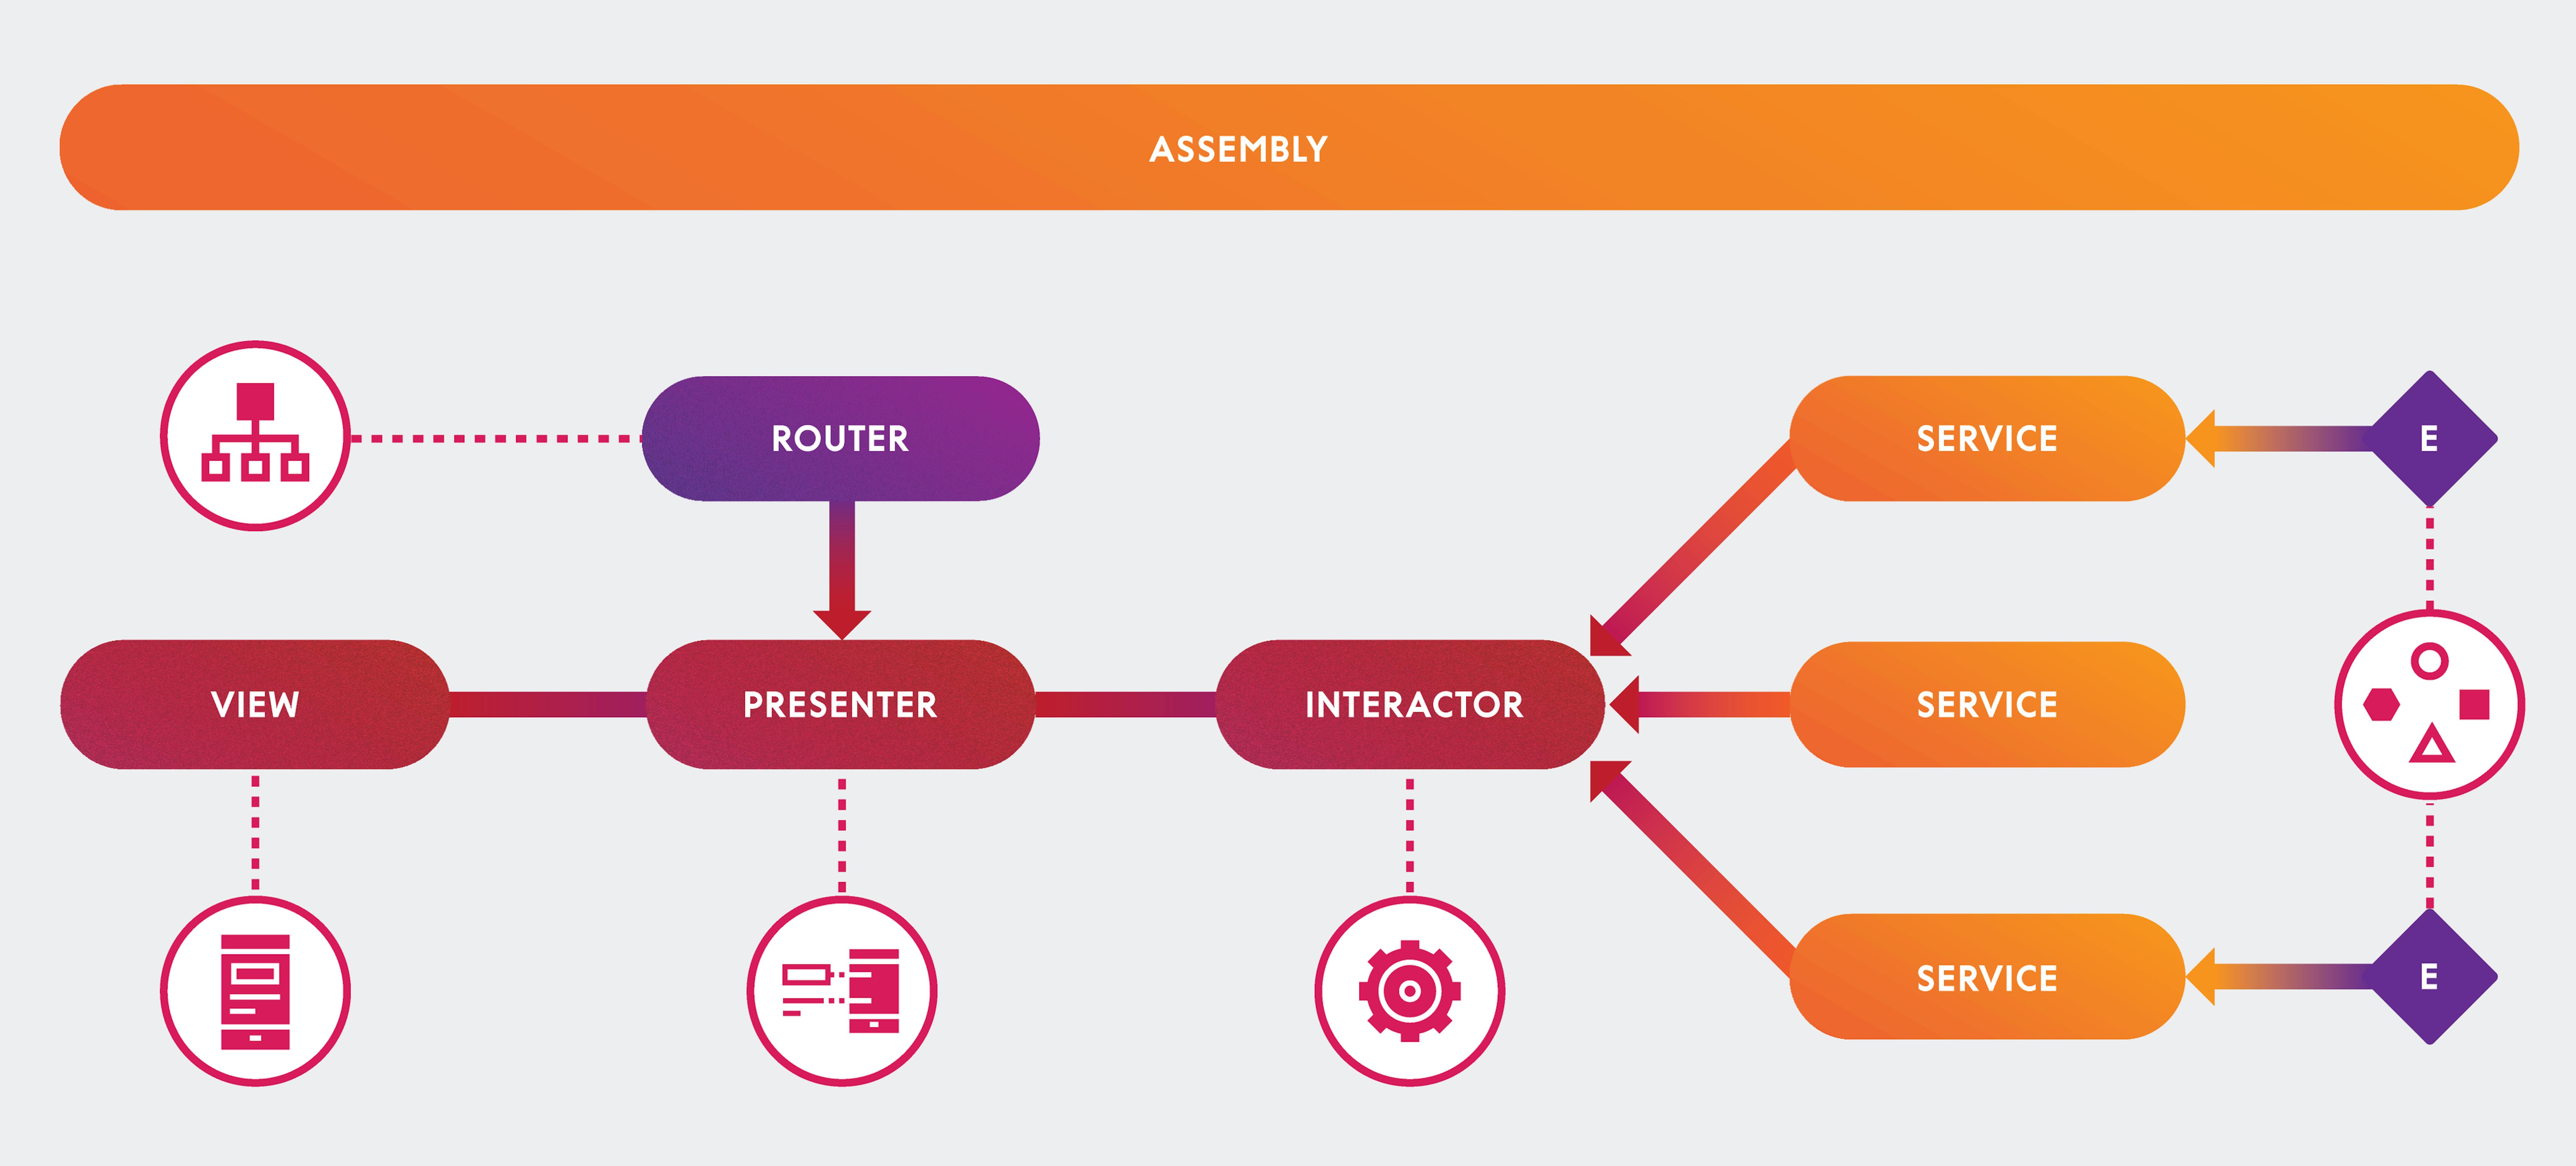
Basic example:
First of all, let's start with protocols ( we are good programmers, afterall):
// View Protocol
protocol TaskListViewProtocol: AnyObject {
    func displayTasks(_ tasks: [Task])
}
// Interactor Protocol
protocol TaskListInteractorProtocol: AnyObject {
    func fetchTasks()
}
// Presenter Protocol
protocol TaskListPresenterProtocol: AnyObject {
    func viewDidLoad()
    func tasksFetched(_ tasks: [Task])
}
// Router Protocol
protocol TaskListRouterProtocol: AnyObject {
    func navigateToTaskDetail(for task: Task)
}
The next move is the VIPER Module itself:
//Model
struct Task {
    let title: String
    let description: String
}
//Interactor
class TaskListInteractor: TaskListInteractorProtocol {
    weak var presenter: TaskListPresenterProtocol?
    func fetchTasks() {
        let tasks = [
            Task(title: "Groceries", description: "Apples, Apples, Apple Pie"),
            Task(title: "Cleaning", description: "Call someone to clean your house")
        ]
        presenter?.tasksFetched(tasks)
    }
}
//Presenter
class TaskListPresenter: TaskListPresenterProtocol {
    weak var view: TaskListViewProtocol?
    var interactor: TaskListInteractorProtocol?
    var router: TaskListRouterProtocol?
    func viewDidLoad() {
        interactor?.fetchTasks()
    }
    func tasksFetched(_ tasks: [Task]) {
        view?.displayTasks(tasks)
    }
}
//Router
class TaskListRouter: TaskListRouterProtocol {
    // Router implementation
}
//View
class TaskListViewController: UIViewController, TaskListViewProtocol {
    var presenter: TaskListPresenterProtocol?
    override func viewDidLoad() {
        super.viewDidLoad()
        presenter?.viewDidLoad()
    }
    func displayTasks(_ tasks: [Task]) {
        for task in tasks {
            print("Task: \(task.title) - \(task.description)")
        }
    }
}
And the last one is ASSEMBLE:
func assembleTaskListModule() -> UIViewController {
    let view = TaskListViewController()
    let interactor = TaskListInteractor()
    let presenter = TaskListPresenter()
    let router = TaskListRouter()
    view.presenter = presenter
    presenter.view = view
    presenter.interactor = interactor
    presenter.router = router
    interactor.presenter = presenter
    return view
}
Advantages of VIPER in Swift
- High level of modularity, making it easier to isolate dependencies and manage the codebase.
- Facilitates unit testing due to the separation of concerns.
- Enhances the maintainability of the application as each component has clearly defined roles.
Disadvantages of VIPER in Swift
- Complexity of setup and steep learning curve, which might be overkill for smaller projects.
- Requires more boilerplate code and stricter adherence to the design pattern, potentially leading to slower initial development times.
Summary
VIPER is ideal for complex and large-scale iOS applications where testability, maintainability, and scalability are crucial. It effectively addresses many of the common architectural issues by compartmentalizing functionalities and responsibilities, though at the cost of increased complexity.
