

In the previous article, I talked about Event Delegation in React. On this one, I will tell you how you can use this pattern in the world of events in order to successfully overcome difficulties in pure JS as well.
In general, I am a supporter of a detailed study of a particular pattern or innovation, since this allows not only to see what implementation difficulties may developers meet but also to test myself in a certain role as the creator of this pattern. Of course, you need to try in isolation from all the frameworks, since using pure JS, you go down to the lowest level of abstraction.
This may not be a very good comparison, but I think that frameworks in JS are high level (since they hide a lot of problems and give for each a solution, sometimes suffered by the authors. You understand, here’s both the implementation method and the moodiness and peculiarity of browsers ). But pure JS is assembler in the web world. Here you are faced with all the problems in the forehead. And only your brain, skills, and StackOverflow can help you 😂.
So, the time has come to talk about pure JS and the simplest implementation of the Event Delegation pattern.
Idea
Before starting the implementation of the pattern, I would like to fantasize and try something interesting that would show how to use some sorts of DOM API methods, which can greatly help in simplifying your task. And after a little thought, I decided that it was necessary to show the possibilities of templating and to create such a simple analogue of React using the Event Delegation pattern. This is what we will do next!
Templating
What already exists from ready-made and simple solution in the browser DOM for our mini React implementation?
Meet the tag
`<template>` — this is a mechanism for `deferred rendering` of client content that is not displayed during page loading, but can be initialized using JavaScript.
A template can be thought of as a piece of content saved for later use in a document. Although the parser processes the contents of the `<template>` element at the time the page loads, it does this only to make sure the content is valid; the content itself is not displayed.
Fine! This is what you need!
Component requirements
Now let’s decide what our components will be able to do?
- Be able to process attached event handlers through attributes and respond to them using the
Event Delegationprinciple. - Be able to use data from the first level properties of the data object. That is the usage of an attached property of a type
property.subpropertynot available. There will be the only opportunity to specifypropertyinstead ofproperty.subproperty. - In the template, the properties of the data object and the names of the event handlers should be enclosed in curly brackets, for example, like this
{property}or{handlerOfSomeEvent}. - If during the
DOMparsing, components that do not belong to the standard set from the HTMLDOMare found, then you need to try to find the registered component and replace the non-standardDOMnode with the component template. Just like inReact. - The component should be declared as follows:
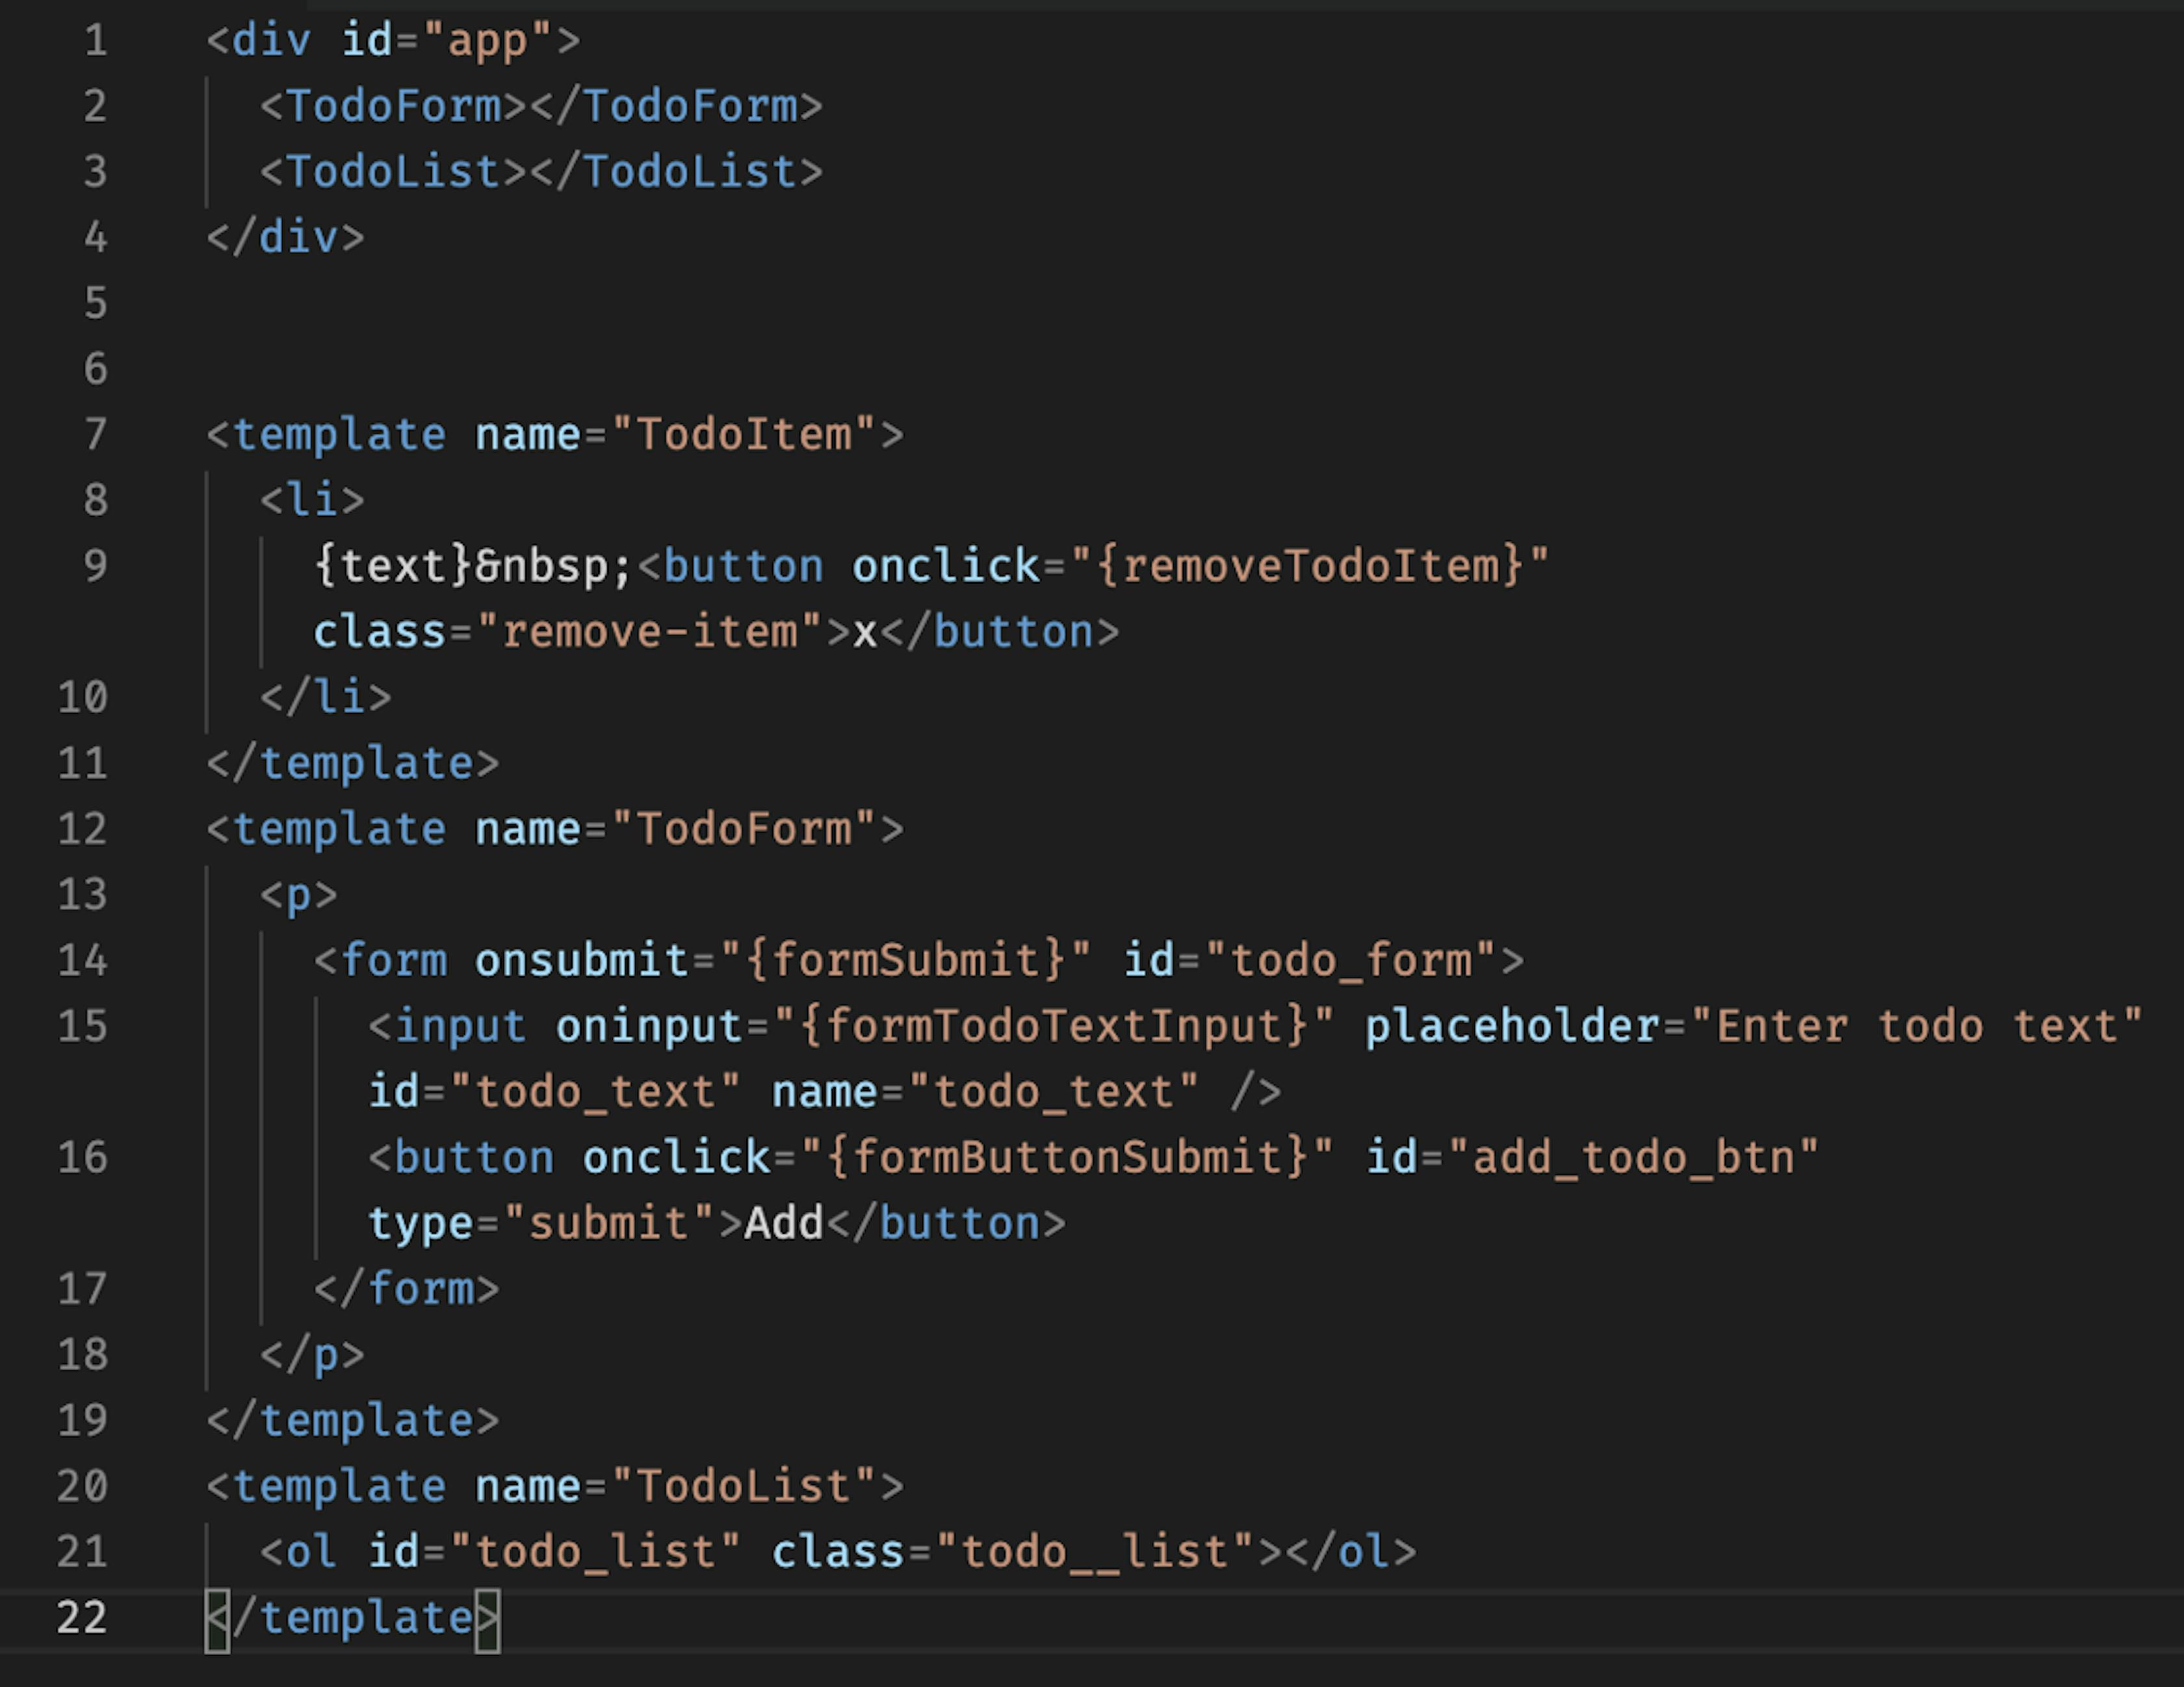
<template name="TodoList">
  <ol id="todo_list" class="todo__list"></ol>
</template>
where the name property will be used for the component name. And it will use the contents of the <template> tag as a component markup.
- To declare a component in the DOM, use a view construct of the form
<TodoList></TodoList>.
What will we test our implementation on?
Then a simple thought occurred to me. Implement a simple Todo List.
Functional:
- In fact, you can add text tasks to the list, completing the entry with the
Enterkey or by clicking theAddbutton. In this case, the text field will be cleared, and theAddbutton will be disabled. - If the task is completed, you press the button with
xat the corresponding element in the list and this task will be permanently deleted from the list.

The technology of our mini React
- The first phase is going through the DOM in search of
<template>and custom elements (HTML tags). Component registration also enters into this phase — this is the key point where we will apply theEvent Delegation. - Registration of global event handlers on the document element + Associating an event processor with each of the global handlers.
- The second phase is the replacement of custom tags with registered components from the
<template>tags.
And now below, we will take a look at all these phases in turn.
Phase One (walk through the DOM and search for component declarations)
Here you go through the DOM elements of an HTML document. In the HTML DOM, we already have the necessary tool that allows us to easily go through all the elements that interest us.
And that tool is document.createTreeWalker. Bearded 🧔🧔🏾 guys wrote this API method for promenading over HTML elements. In this case, you can specify the filtering option for nodes of HTML elements. For our case, we will use NodeFilter.SHOW_ELEMENT, we will not need text nodes, since we can walk through the text nodes ourselves, inside a specific element.
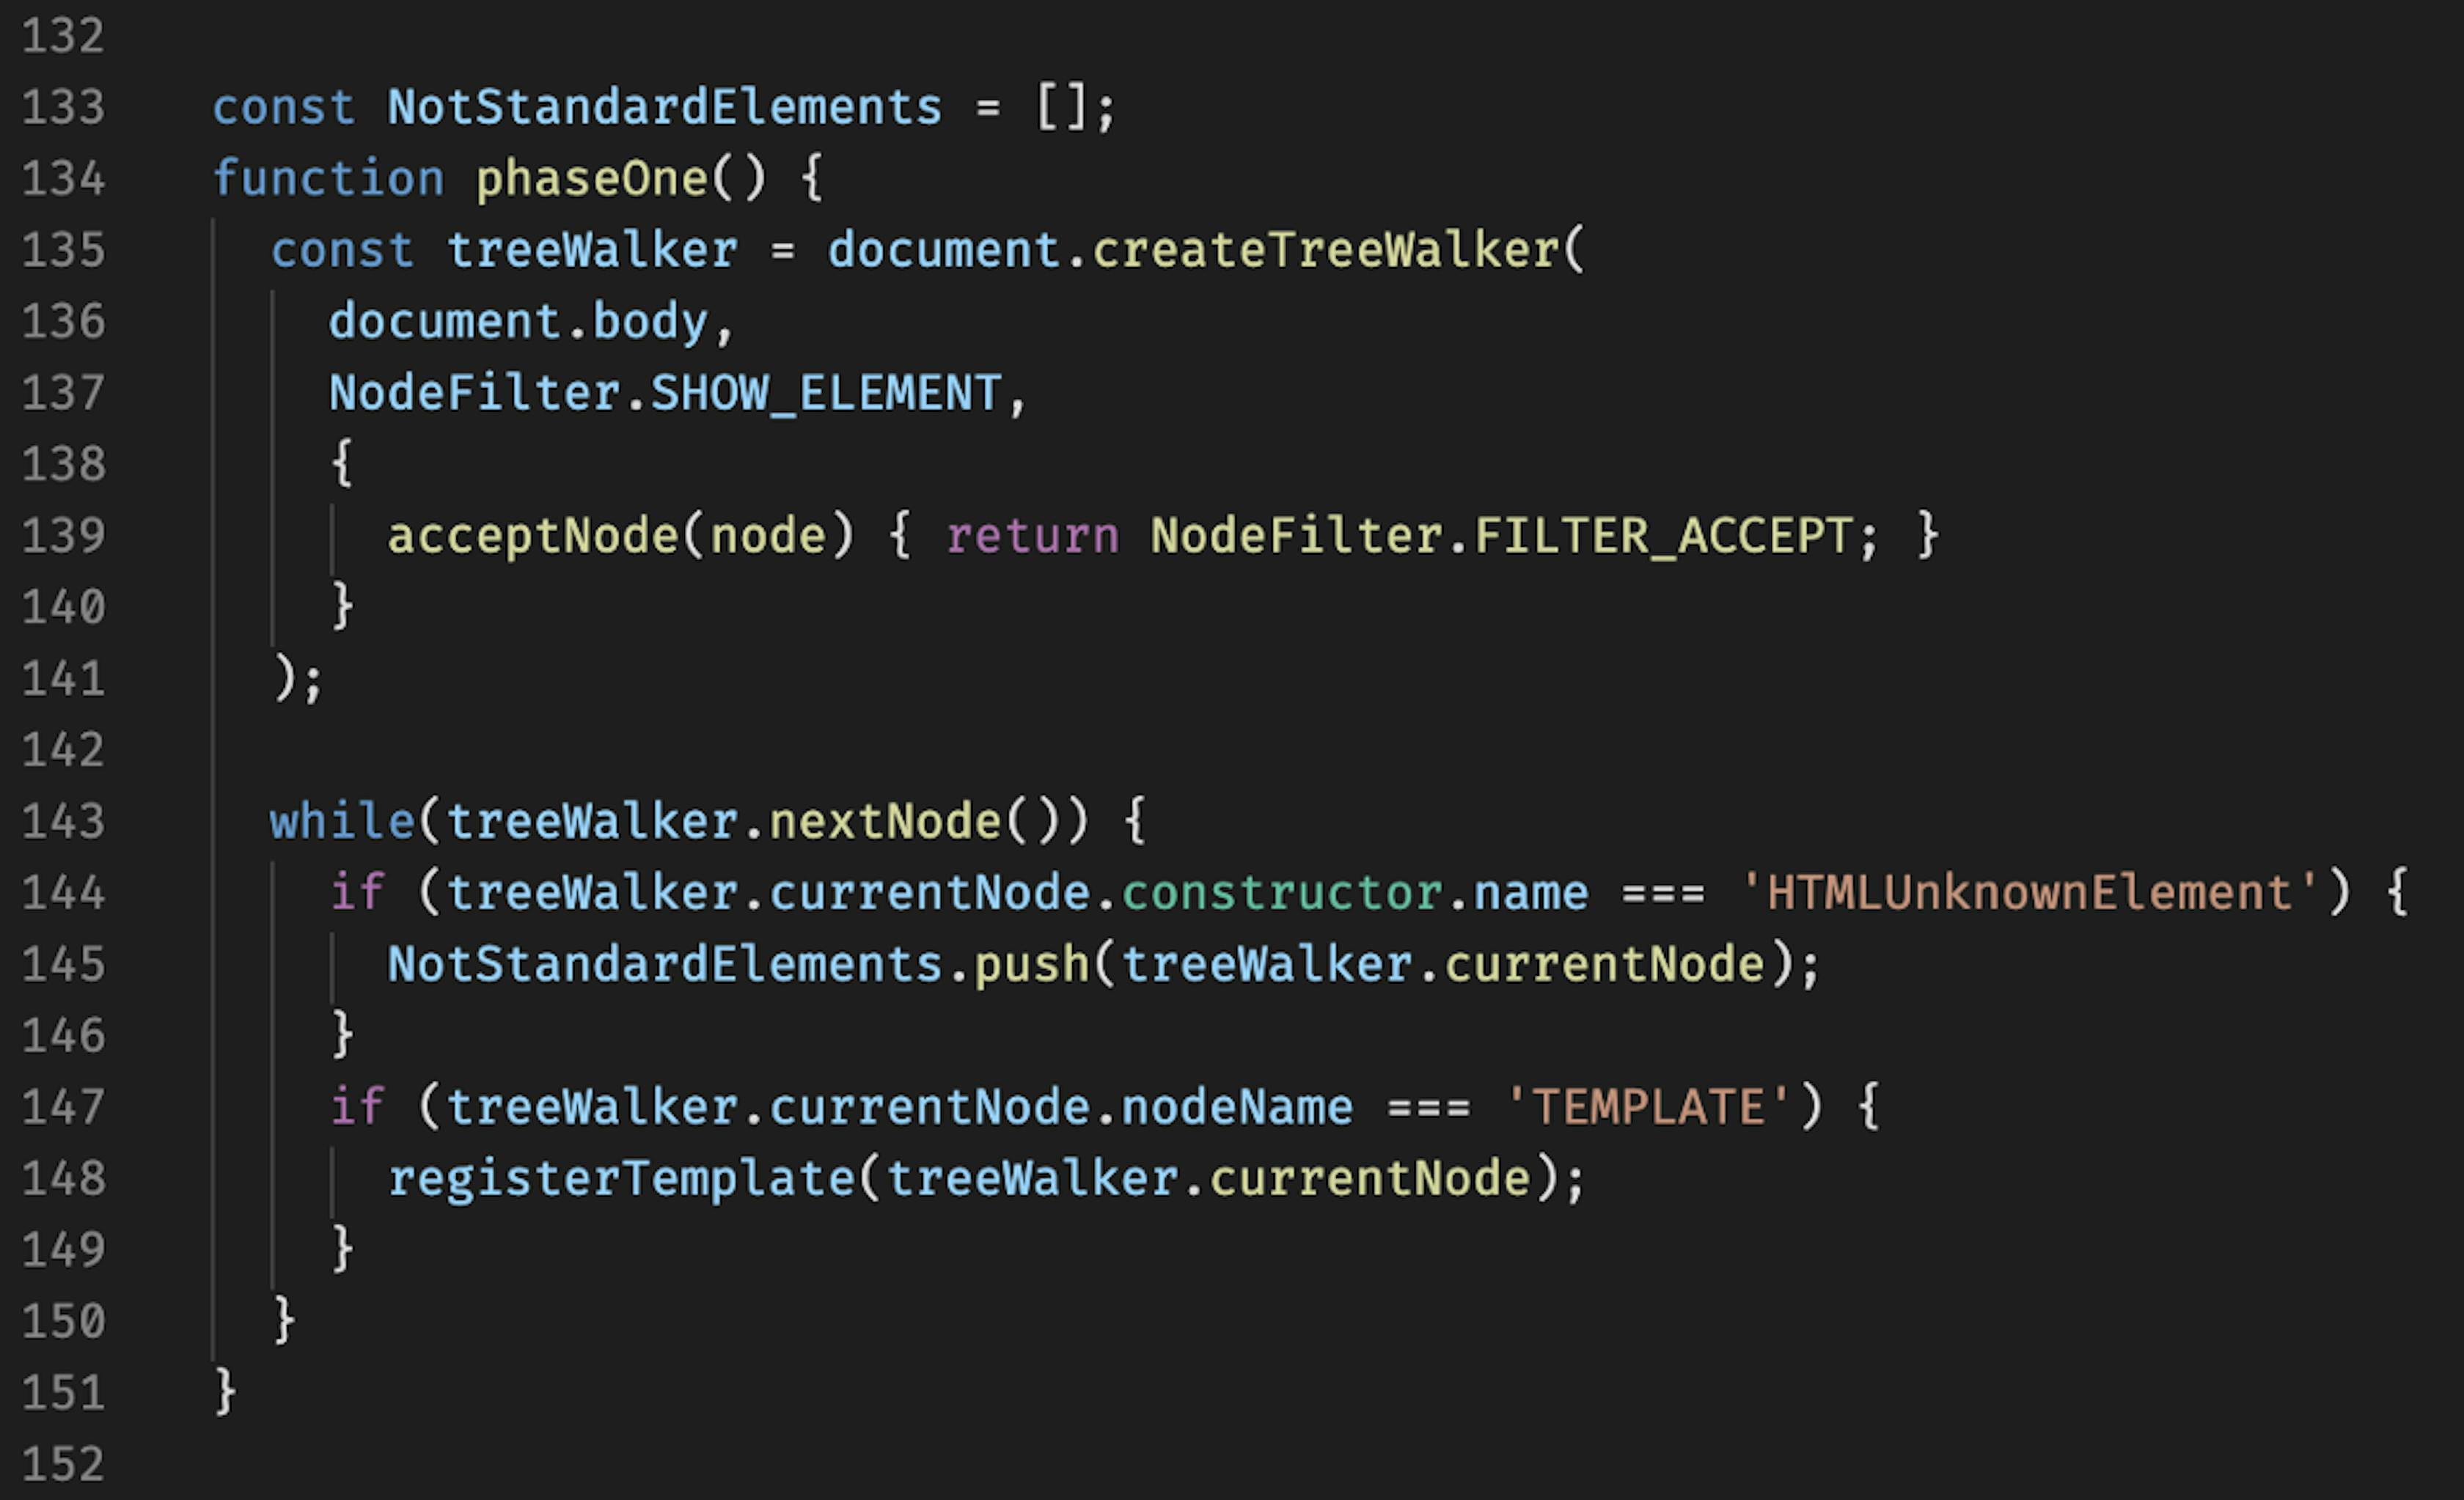
The code for this phase is concentrated here:
Phase 1 Code
To begin with, as you can see, we create an iterator object over the DOM elements. And as the root element, from which the journey along with the DOM begins, we specify document.body.
Then we specify the filter parameter NodeFilter.SHOW_ELEMENT. After the filtering parameter, we specify the acceptNode handler, in which if you wish, you can add additional filtering conditions for DOM elements. This handler should return NodeFilter.FILTER_ACCEPT for the necessary nodes, and for skipping NodeFilter.FILTER_REJECT. In our case, for example, we always return NodeFilter.FILTER_ACCEPT, since the NodeFilter.SHOW_ELEMENT flag suits us.
After creating an iterator over the DOM, using the nextNode() method and while loop.
Inside the loop, we collect non-standard DOM elements. To do this, check the name of the constructor of the DOM node and for non-standard components, the name of the constructor will correspond to HTMLUnknownElement. The found elements are written to the array for subsequent processing.
The second step, we check the name of the node for compliance with TEMPLATE. This is an announcement of our elements. And each node found, we send to the registerTemplate procedure.
Next, we will see how the component registration phase works.
First phase - registration of component templates
Here is the registration procedure:
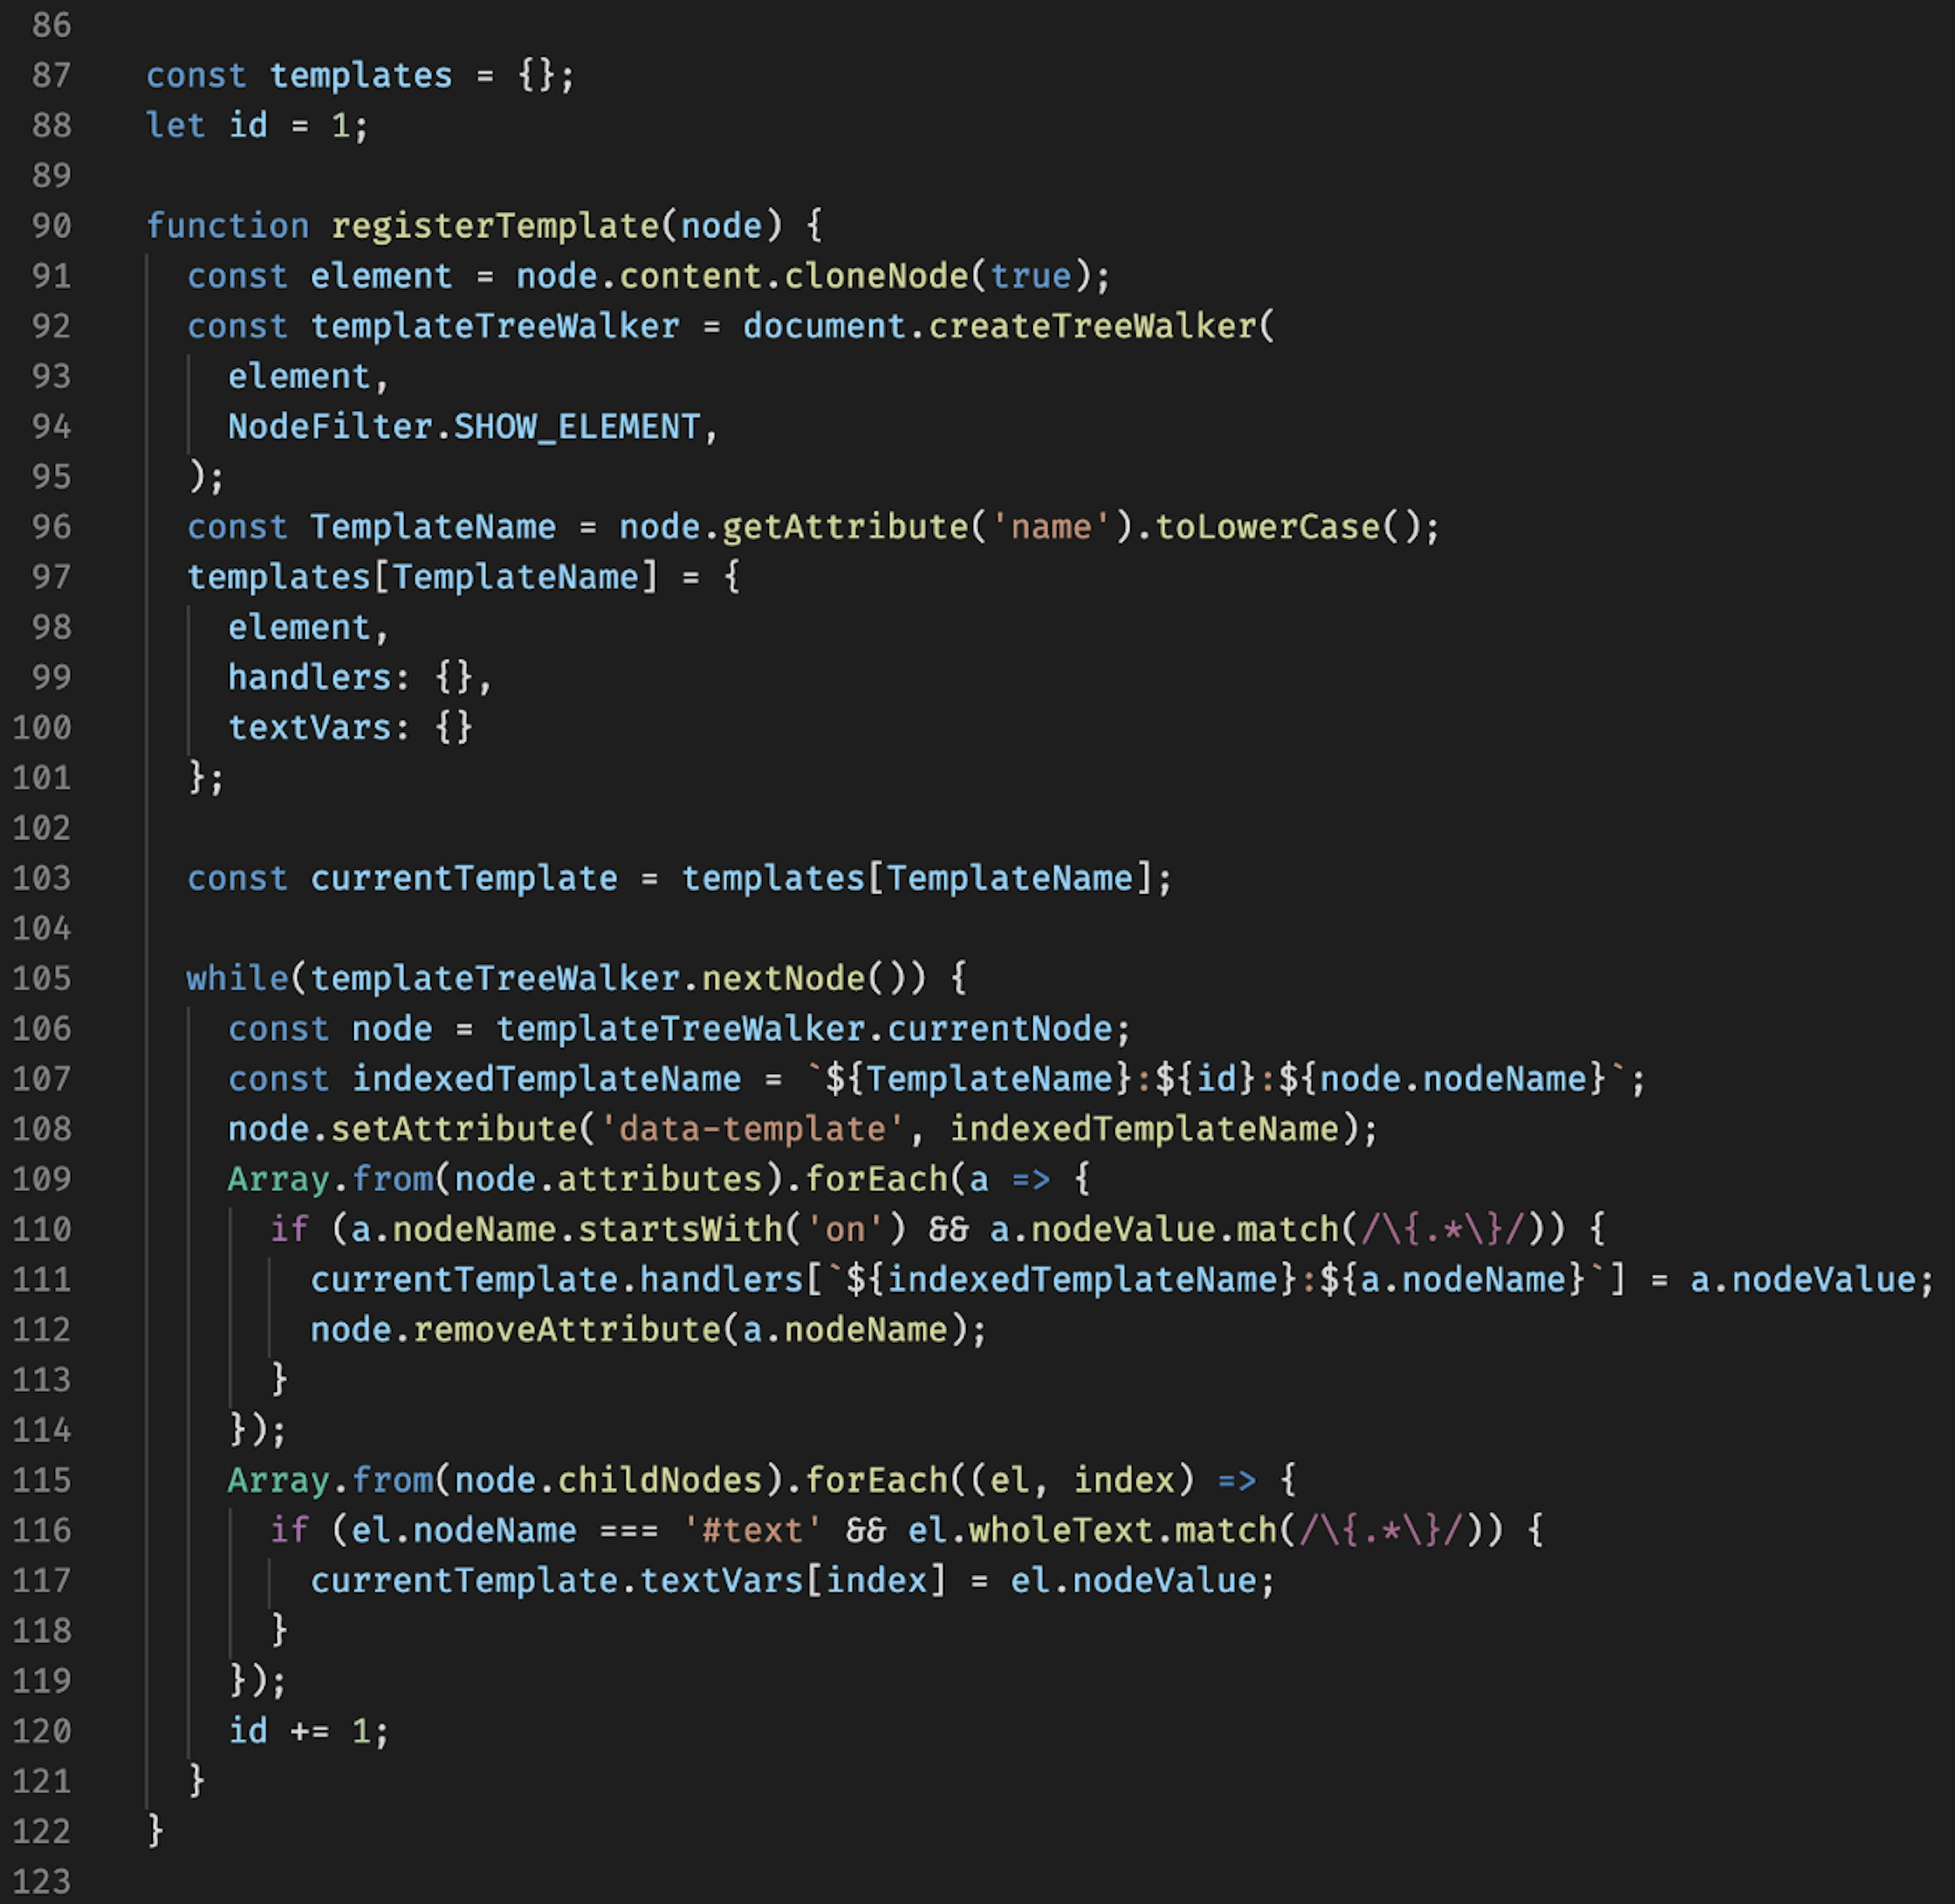
Item Template Registration Procedure
- First, we copy the contents of the template node using
node.content.cloneNode(true). You can read more about cloning here. Cloning is necessary in order to leave the original template unchanged. - As a next step, we must go through the contents of the template, identify the text variables to be inserted, and also get event handlers.
- Representation of an element in our collection will look like this:
{
  element,
  handlers: {},
  textVars: {}
};element— this is the component template node, as is, without processing.handlers— this is a collection ofkey — functionwhere all handlers for a particular element will be stored.textVars— this is a collection of `index — value. Here the position is saved in the DOM with the contents of the current node (naturally, without keeping in attention the ability of position changing, imagine that in our case the text nodes will not change positions and this is done for simplification).
4. Inside the loop through the elements of the template, the unique identifier of the template element is generated. It consists of the following parts:
const indexedTemplateName = `${TemplateName}:${id}:${node.nodeName}`;From the template name + index number + node name. This is quite enough for us to identify the element.
- Adding of
data-templateattribute, which contains a unique identifier. - We go through the collection of attributes of the current node and identify the appropriate event handlers. They start with
onprefix. And also we are forced to immediately remove the event attribute of the current node so that when inserted into the DOM, we don’t confuse the browser. - We go through the first level of nesting of child elements and fill in
textVarsfor the current element.
Registering global event handlers and event processor binding
This is the backbone of Event Delegation, the core of event processing on different elements.
The event processor looks like this:
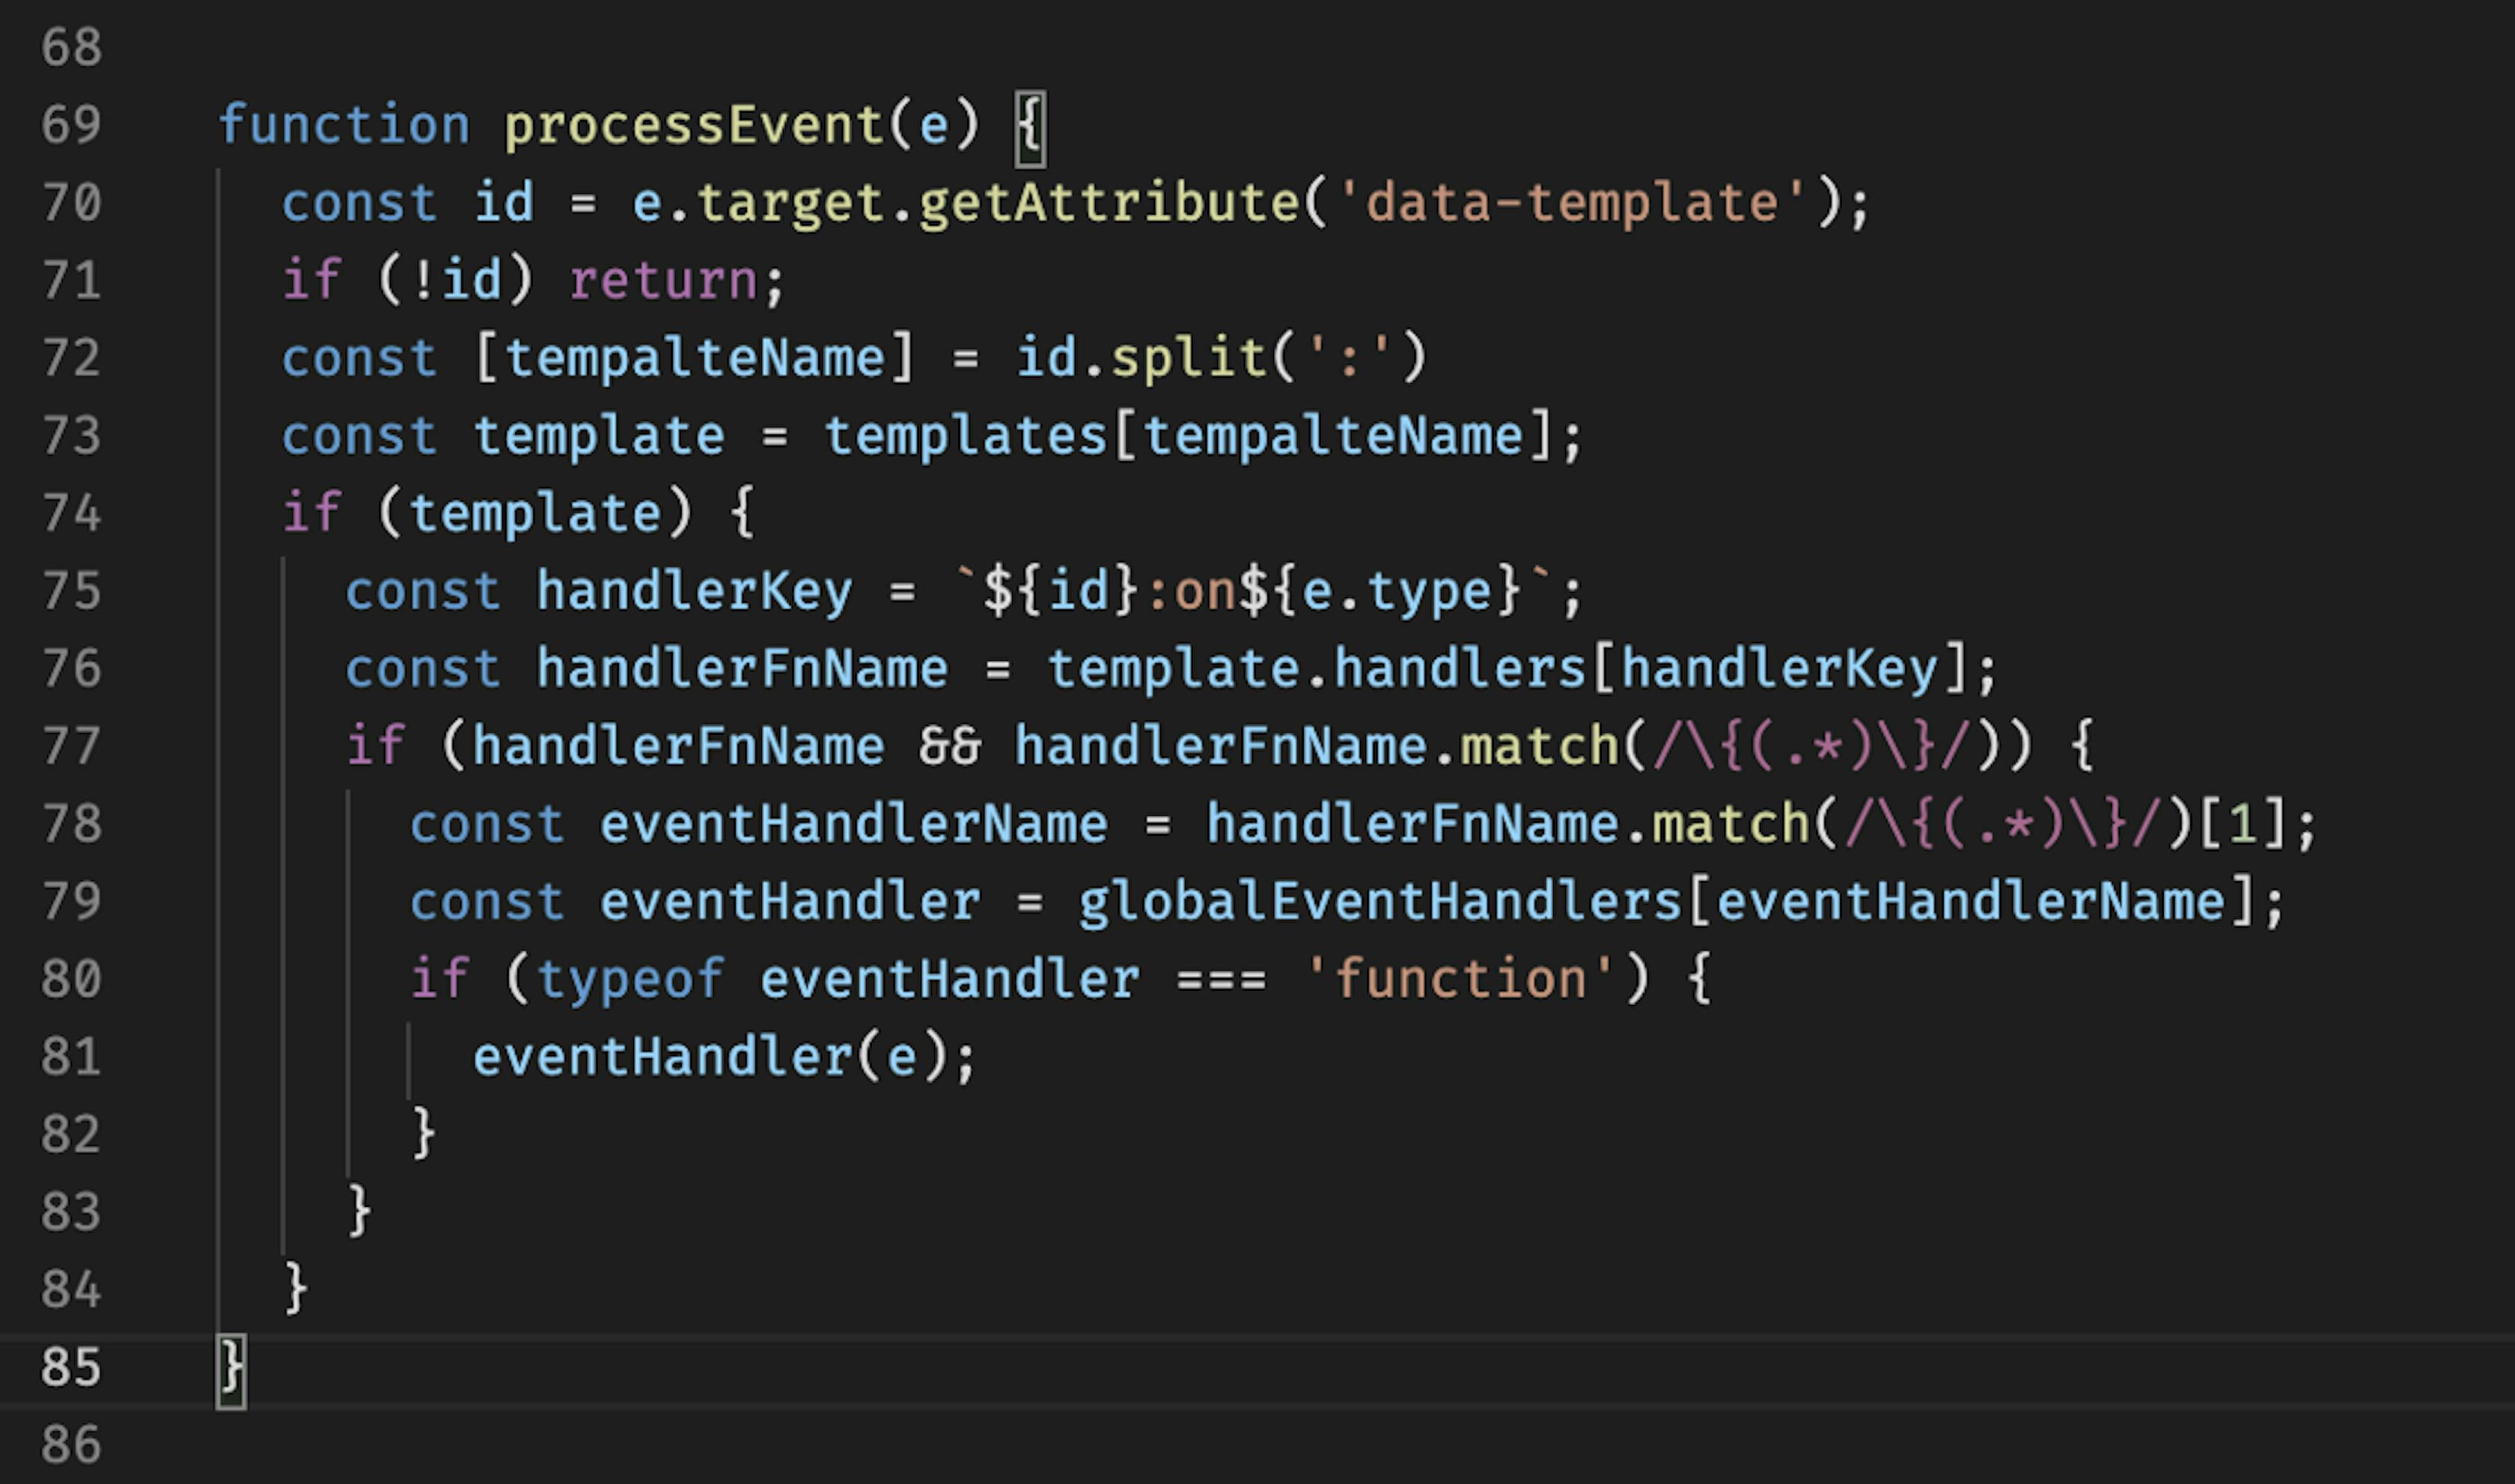
Event processor
And also, for it to work, you need to associate it with events on the document element.

Associating an event handler with global events of interest to us
Thus, we can now respond to three necessary events.
How will we distinguish for which component which handler to call? And it’s very simple, earlier we marked each element with a special data-template attribute, in which we put the necessary information. Thus, dividing the identifier string by the symbol :, we can:
- Find a registered component;
- Get the event handler by the full initial value of the
data-template+e.typeattribute; - Check if it matches our pattern
{nameOfEventHandler}; - If everything is fine, select the name
nameOfEventHandlerfrom{nameOfEventHandler}and find the handler function in theglobalEventHandlerscollection using this key; - And finally, execute the handler, passing it the event object.
This part of the work phase of our simple version of React consists of two methods:
- phase Two;
- apply Template.
phase Two — passes through the collection of custom elements detected in the previous phase and using the Node.replaceChild method replaces the node with the component template.

Phase 2 Procedure
applyTemplate— inserts data from the passed options object into the element template HTMLin accordance with textVars and returns the processed HTML node, ready for insertion into the DOM.

The function of filling the template with data
Entry point
This is a piece of code that will breathe life into our simple application that uses Event Delegation.

The entry point to our simple React
After the runApp procedure is launched, the phased execution of Phase 1 and then Phase 2 will immediately begin. As well as the availability setting for the Add button, given the state of the text field.
Results analysis
First, let’s see how our HTML “Before” and “After” changes.
Here is the original HTML:
HTML source before processing with our simple React
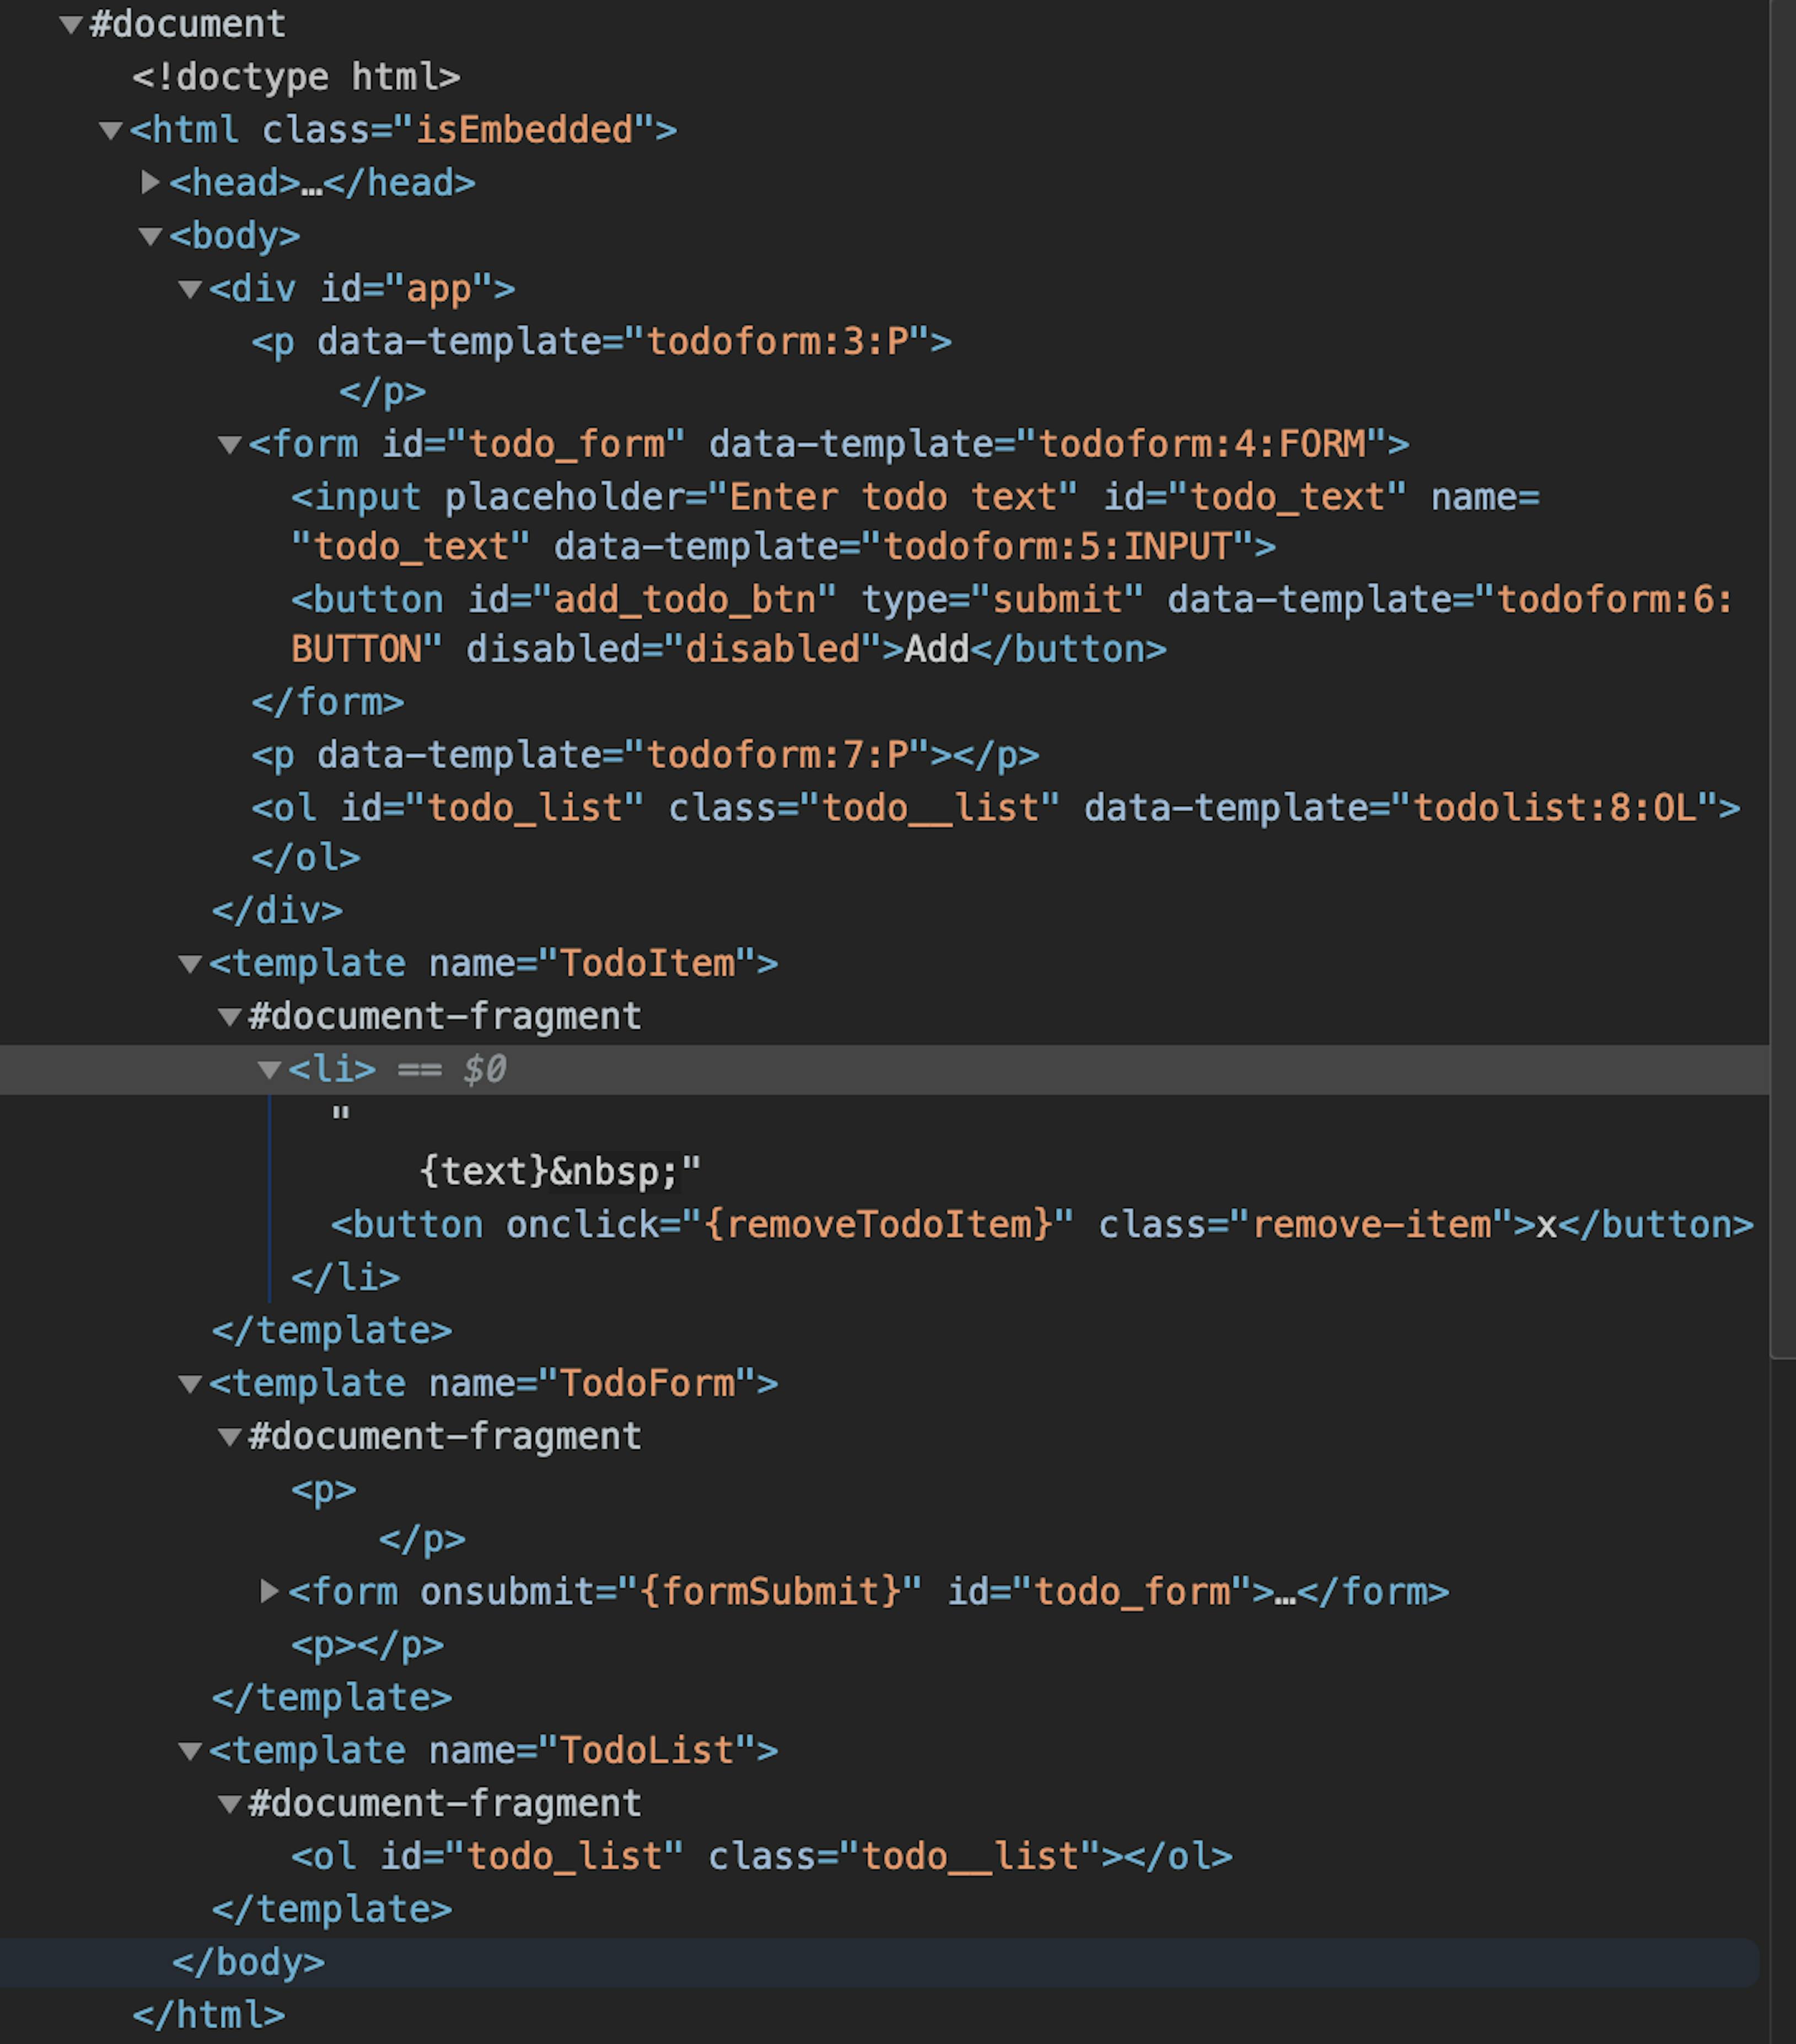
And this is what we get as a result of the work of our simple React
- As you can see, inside the
div#appinstead of custom elements, elements from specific templates are displayed. You can also notice the abundance ofdata-templatewith identifiers for each template node. - You may also notice the absence of
onclickand other events outside the<template>tags. - Inside the
<template>tags, allHTMLnodes remain as they are. So you can definitely check which events with which handlers you specified.
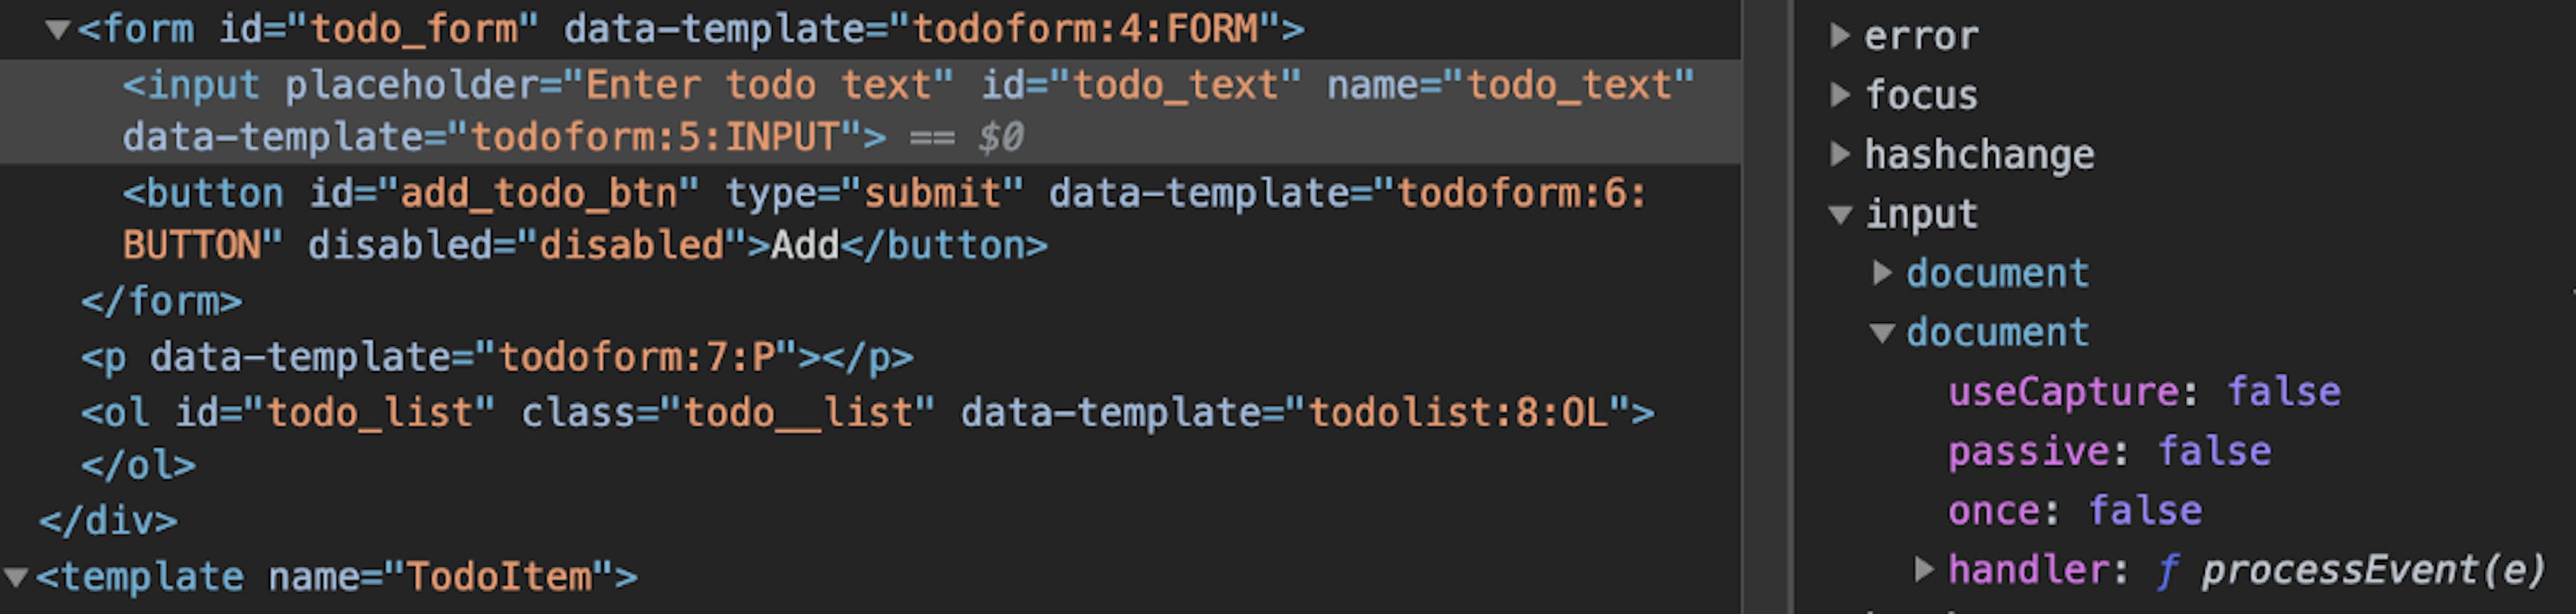
Let’s check now if we really use Event Delegation.
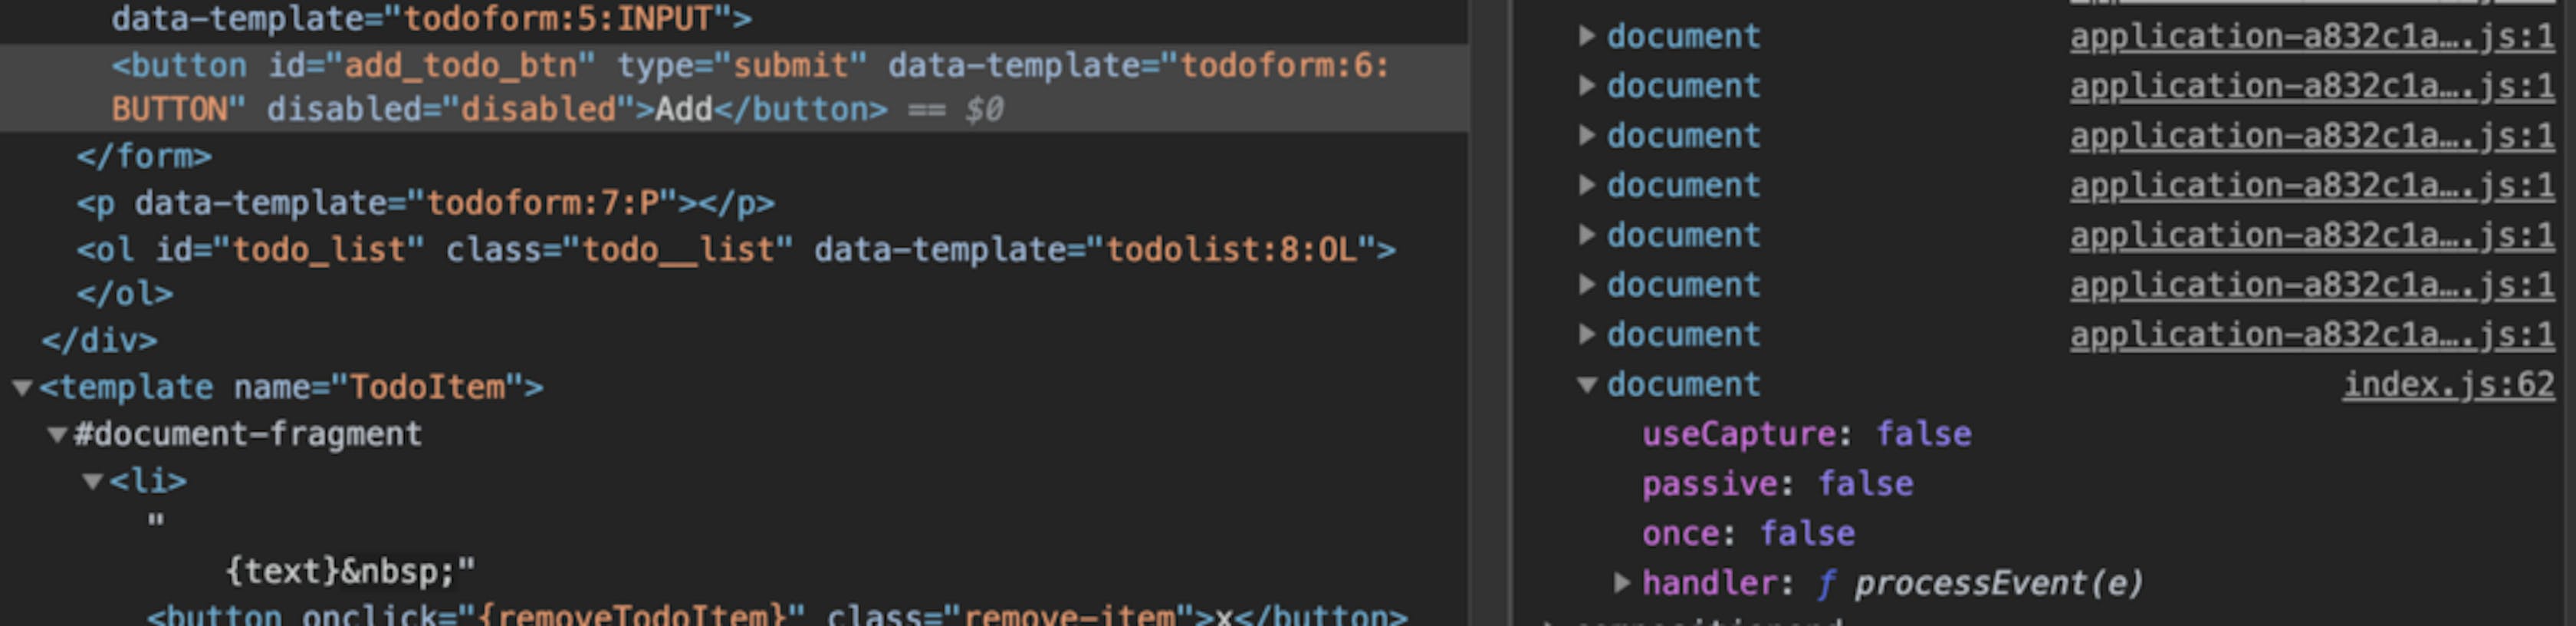
Testing the use of processEvent function as an event processor based on the principles of Event Delegation
- We observe the presence of the
processEventhandler for the click event at the document level, there are no local handlers, there is no element level handlers.
Now check the text box
Testing the use of processEvent as an event processor based on the principles of Event Delegation
And for the text field, the input event, we also observe the presence of a global processEvent handler.
Add a few todos and then inspect event handlers:

We look at the event handlers for the click event of a button to remove a todo from the list
And again we see from the long list, the absence of local event handlers. Only global!
The application perfectly displays todo and allows you to remove the todos from the list!
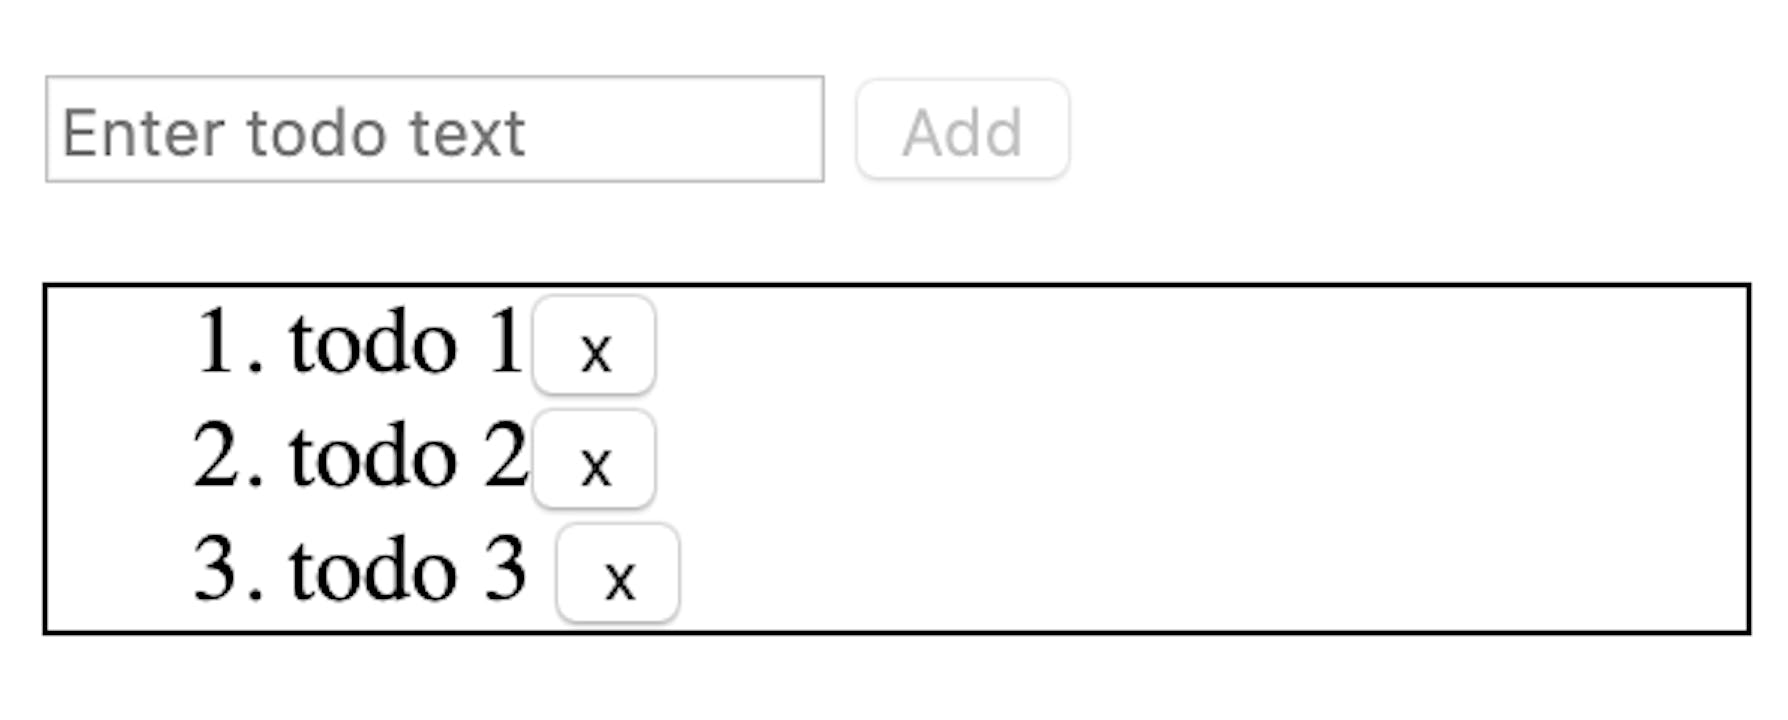
So simple and tasteful
You could see in action here.
Conclusion
From the above, we can conclude that we have successfully applied the principles and capabilities of Event Delegation, and also implemented the simplest version of “React” for educational and research purposes.
Most importantly, now if you decide to write your application in pure JS, then the Event Delegation approach can:
- save you from having to worry about clearing events on an element before deleting it.
- help organize centralized event processing.
- help to concentrate all the code in one place, with the possibility of dividing the logic into modules.
- rid of hell event handlers.
- eliminate the need to insert pieces of JS code in templates.
Thank you very much for reading! I hope you enjoyed it!