
[Guide: How to Create and Run Your First Performance Test With Locust]
Analyze with AI
Get AI-powered insights from this Mad Devs tech article:
Intro
Locust is an open-source performance/load testing tool for HTTP and other protocols. Its developer-friendly approach lets you define your tests in regular Python code.
Locust tests can be run from the command prompt or using its web-based UI. Throughput, response times, and errors can be viewed in real time and/or exported for later analysis.
In this article, we are going to have a look at how to set up Locust in your local environment and create your very first basic load test.
Acronyms and definitions
- Gevent. Gevent is a coroutine-based Python networking library that uses greenlet to provide a high-level synchronous API on top of the libev or libuv event loop.
- Greenlet. In Locust, greenlet is a lightweight concurrent execution unit that is used to simulate users (virtual users) in a load test.
Updates for 2026
The examples in this article are compatible with the current Locust API. A few updates for 2025-2026:
- Python 3.13+ is now recommended for running Locust. The between() and constant() wait time helpers, HttpUser and @task decorator API described in this guide are unchanged in recent Locust releases.
- Headless mode with pass/fail thresholds: for CI/CD pipelines, Locust now supports exiting with a non-zero code when performance thresholds are exceeded. Use the @events.quitting.add_listener hook to check P95 response time, failure rate, and RPS against defined thresholds, and set environment.process_exit_code = 1 on failure – this integrates naturally with GitHub Actions and GitLab CI.
- Locust for AI service testing: if your FastAPI service wraps an LLM or ML model, the Locust AI pattern is increasingly common. Set --users conservatively (5-20) and --run-time to 120s+ to account for longer inference response times, and use catch_response=True to validate not just status codes but also response payloads.
Installation
Install Python as per the official documentation steps:
- UNIX: 2. Using Python on Unix platforms
- Windows: 4. Using Python on Windows
- Or make sure you have it installed already. In our case, we already have Python 3.11.4:
PS C:\Locust> python -V
Python 3.11.4
Install the Locust package.
PS C:\Locust> pip3 install locustValidate your installation.
PS C:\Locust> locust -V
locust 2.23.1 from C:\Locust\venv\Lib\site-packages\locust (python 3.11.4)
Start testing
Prerequisites
In order to start testing, you need three things:
- A server to be tested. For learning purposes, we can use the Pet Store playground: Swagger UI
- Python file with the steps we want to be executed during the test. By default, Locust expects it to be named locustfile.py (however, you can use whatever name you want).
- OPTIONALLY: A configuration file. You can use it to pass parameters into Locust when using it via the command prompt. At the same, time all the parameters can be passed as command prompt arguments. We will see it in action later in this article.
Writing your first load test with Locust
First we need to define the locust file. A locust file is just a normal Python module, it can import code from other files or packages. Let's start by importing HttpUser and task from Locust:
from locust import HttpUser, taskFor a file to be a valid locustfile, it must contain at least one class inheriting from the User or the HttpUser classes. When a test starts, Locust will create an instance of this class for every user (so classes mean users) that it simulates, and each of these users will start running within their own green gevent thread. Let's start describing our user behavior.
class MyTestUser(HttpUser):Here we define a class for the users that we will be simulating. It inherits from HttpUser which gives each user a client attribute, which is an instance of HttpSession that can be used to make HTTP requests to the target system that we want to load test.
Methods decorated with @task are the core of your locust file. For every running user, Locust creates a greenlet (a lightweight process/coroutine), that will call those methods.
@task
def get_store_inventory(self):
    self.client.get("https://petstore.swagger.io/v2/store/inventory")
Please note, only those methods that are decorated with @task will be picked by Locust for execution. Methods not having a @task decorator are considered your own custom helper methods.
Let’s have a look at the final locustfile we got:
from locust import HttpUser, task

class MyTestUser(HttpUser):
    @task
    def get_store_inventory(self):
        self.client.get("https://petstore.swagger.io/v2/store/inventory")
Here we are. We are ready to run our first load test with Locust.
But remember that a basic Locust test proves that requests can run. A useful load test demonstrates whether the system can handle realistic traffic, user flows, data, wait times, and production bottlenecks.
Does your load test cover the real bottlenecks?
A first Locust test is a start. Before your next release, send us your critical flow and target traffic, and we'll review whether the test reflects real production load.
Review my load testHow to run Locust tests
Locuts's web interface
Running Locust tests via a web interface is very simple. Open up your directory with locustfile.py in the command prompt and execute the locust command:
PS C:\Locust> locust
[2024-02-15 11:43:44,095] LAPTOP-8C13GC3L/INFO/locust.main: Starting web interface at http://localhost:8089 (accepting connections from all network interfaces)
[2024-02-15 11:43:44,112] LAPTOP-8C13GC3L/INFO/locust.main: Starting Locust 2.23.1
When a command is executed the command prompt will publish a web interface address Starting web interface at http://localhost:8089. Put it into any browser you like in order to observe it. That is what the starting page will look like:
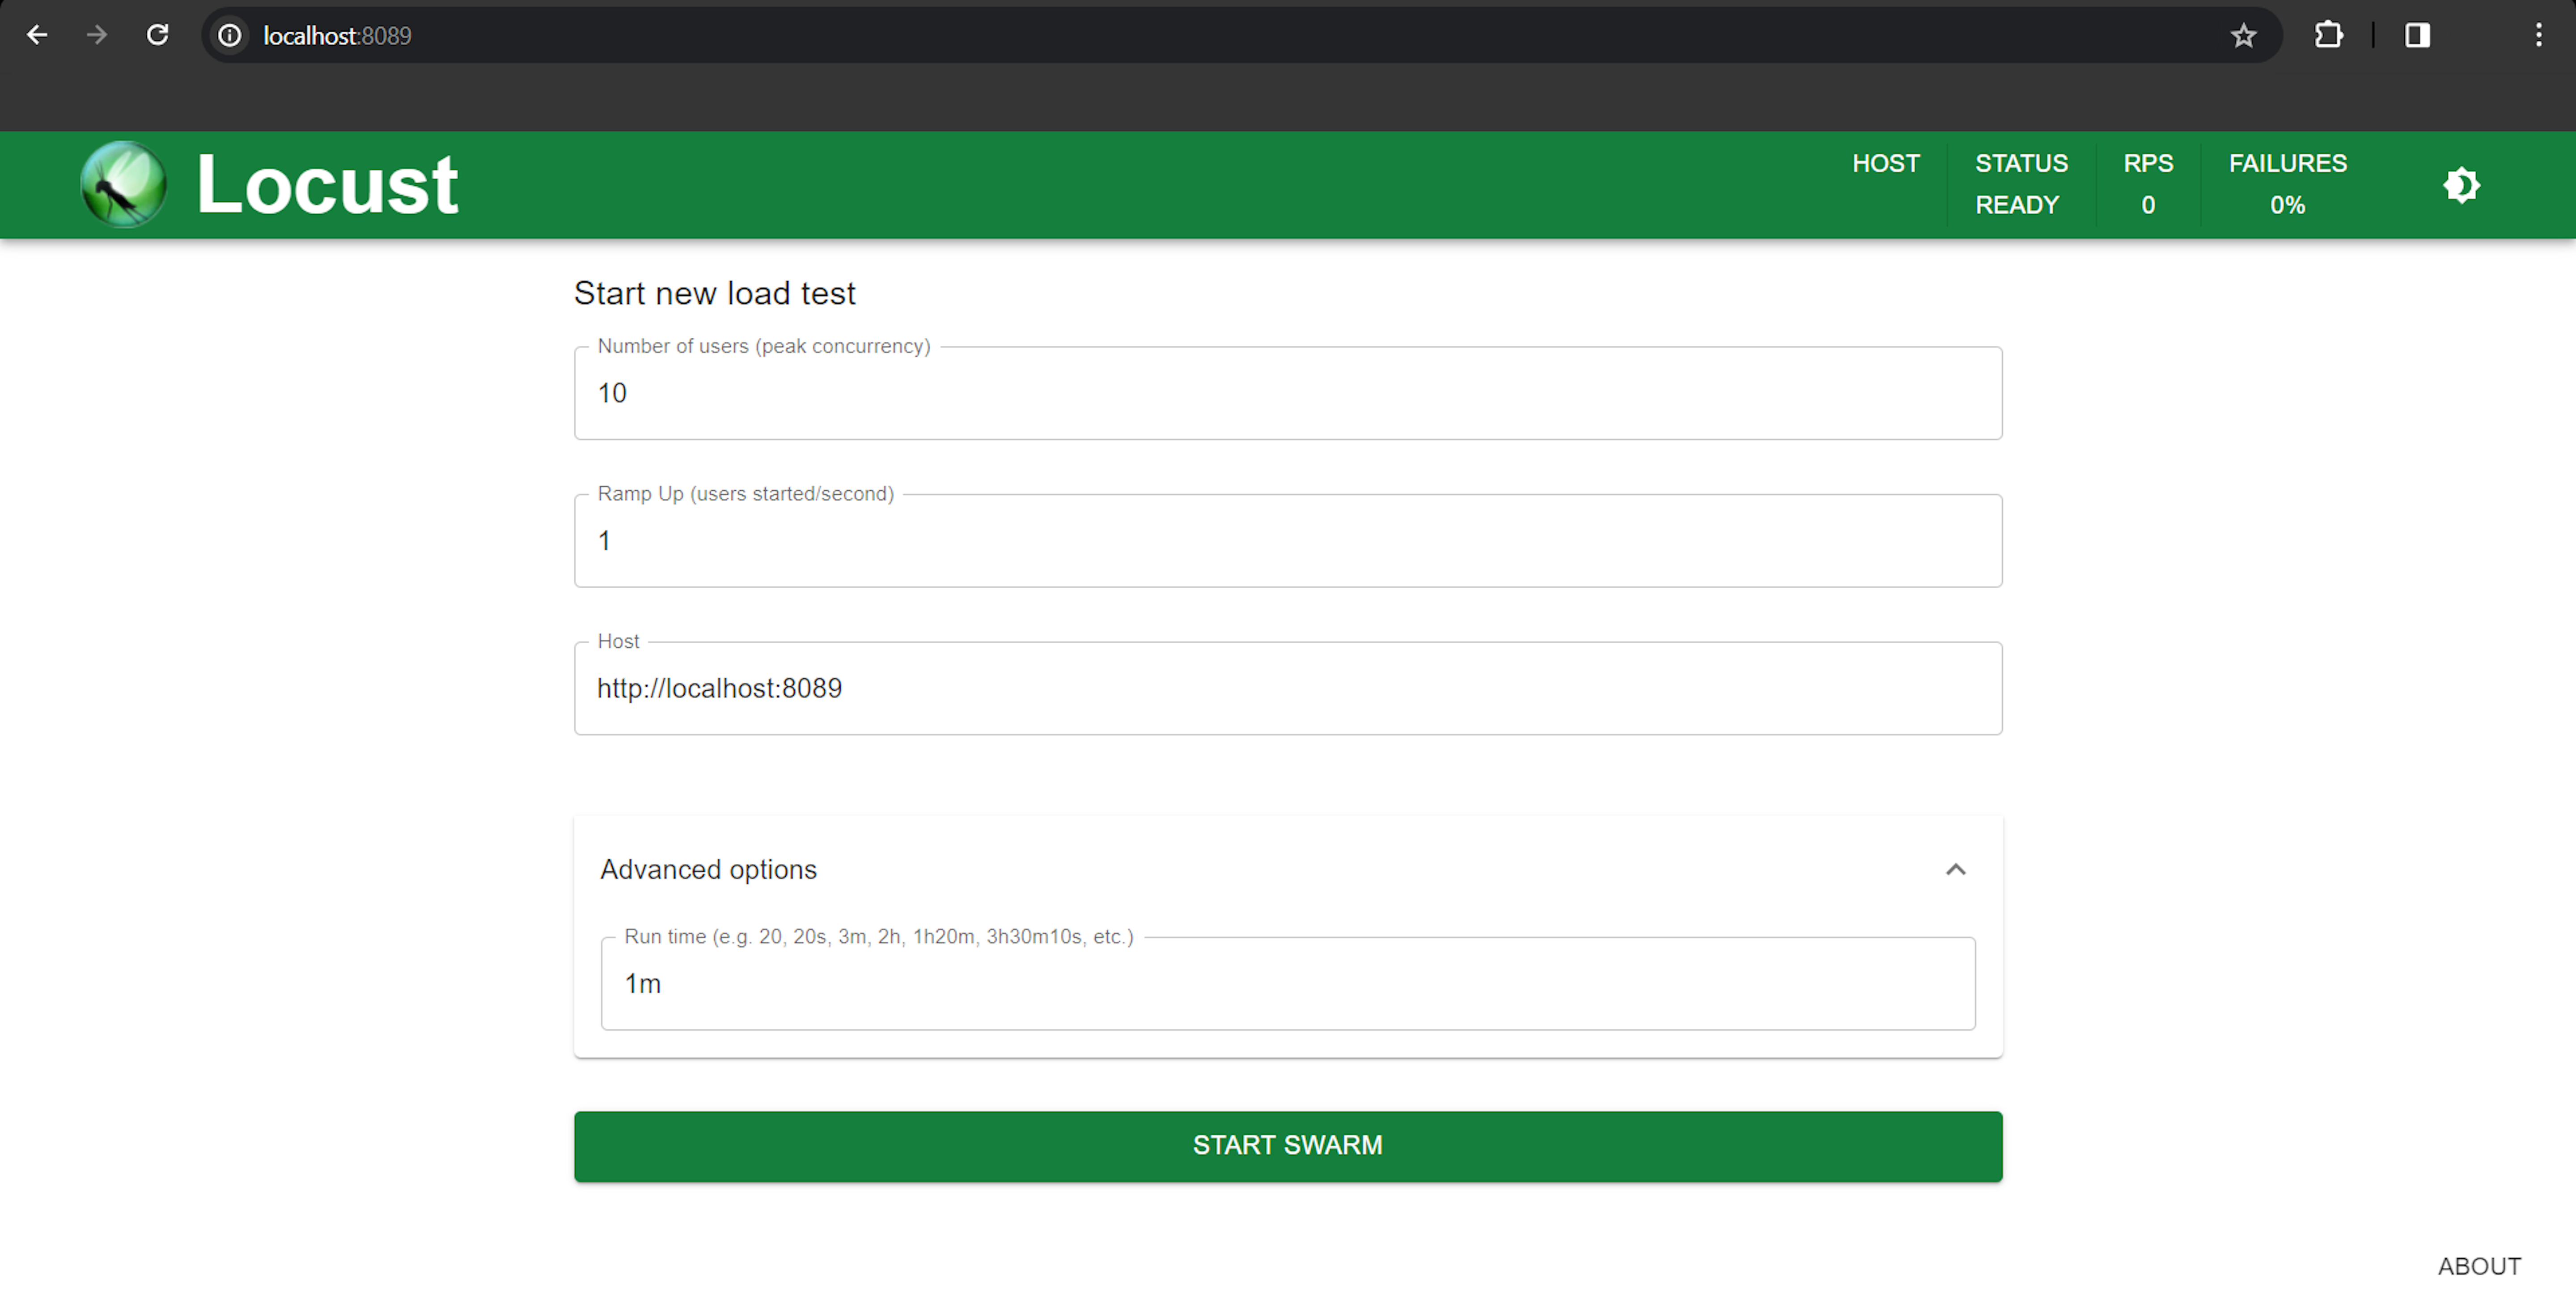
Choose any Number of users you would like to be used in the test and the required Ramp Up rate. The Host field should be populated with the host address for the tests, we are going to use the same address provided by the command prompt. Also, we have opened the Advanced options dropdown menu and filled Run time with 1m. Now we can be sure our load will last exactly one minute. After pressing the START SWARM button the test will begin.
The Locust test is in progress:
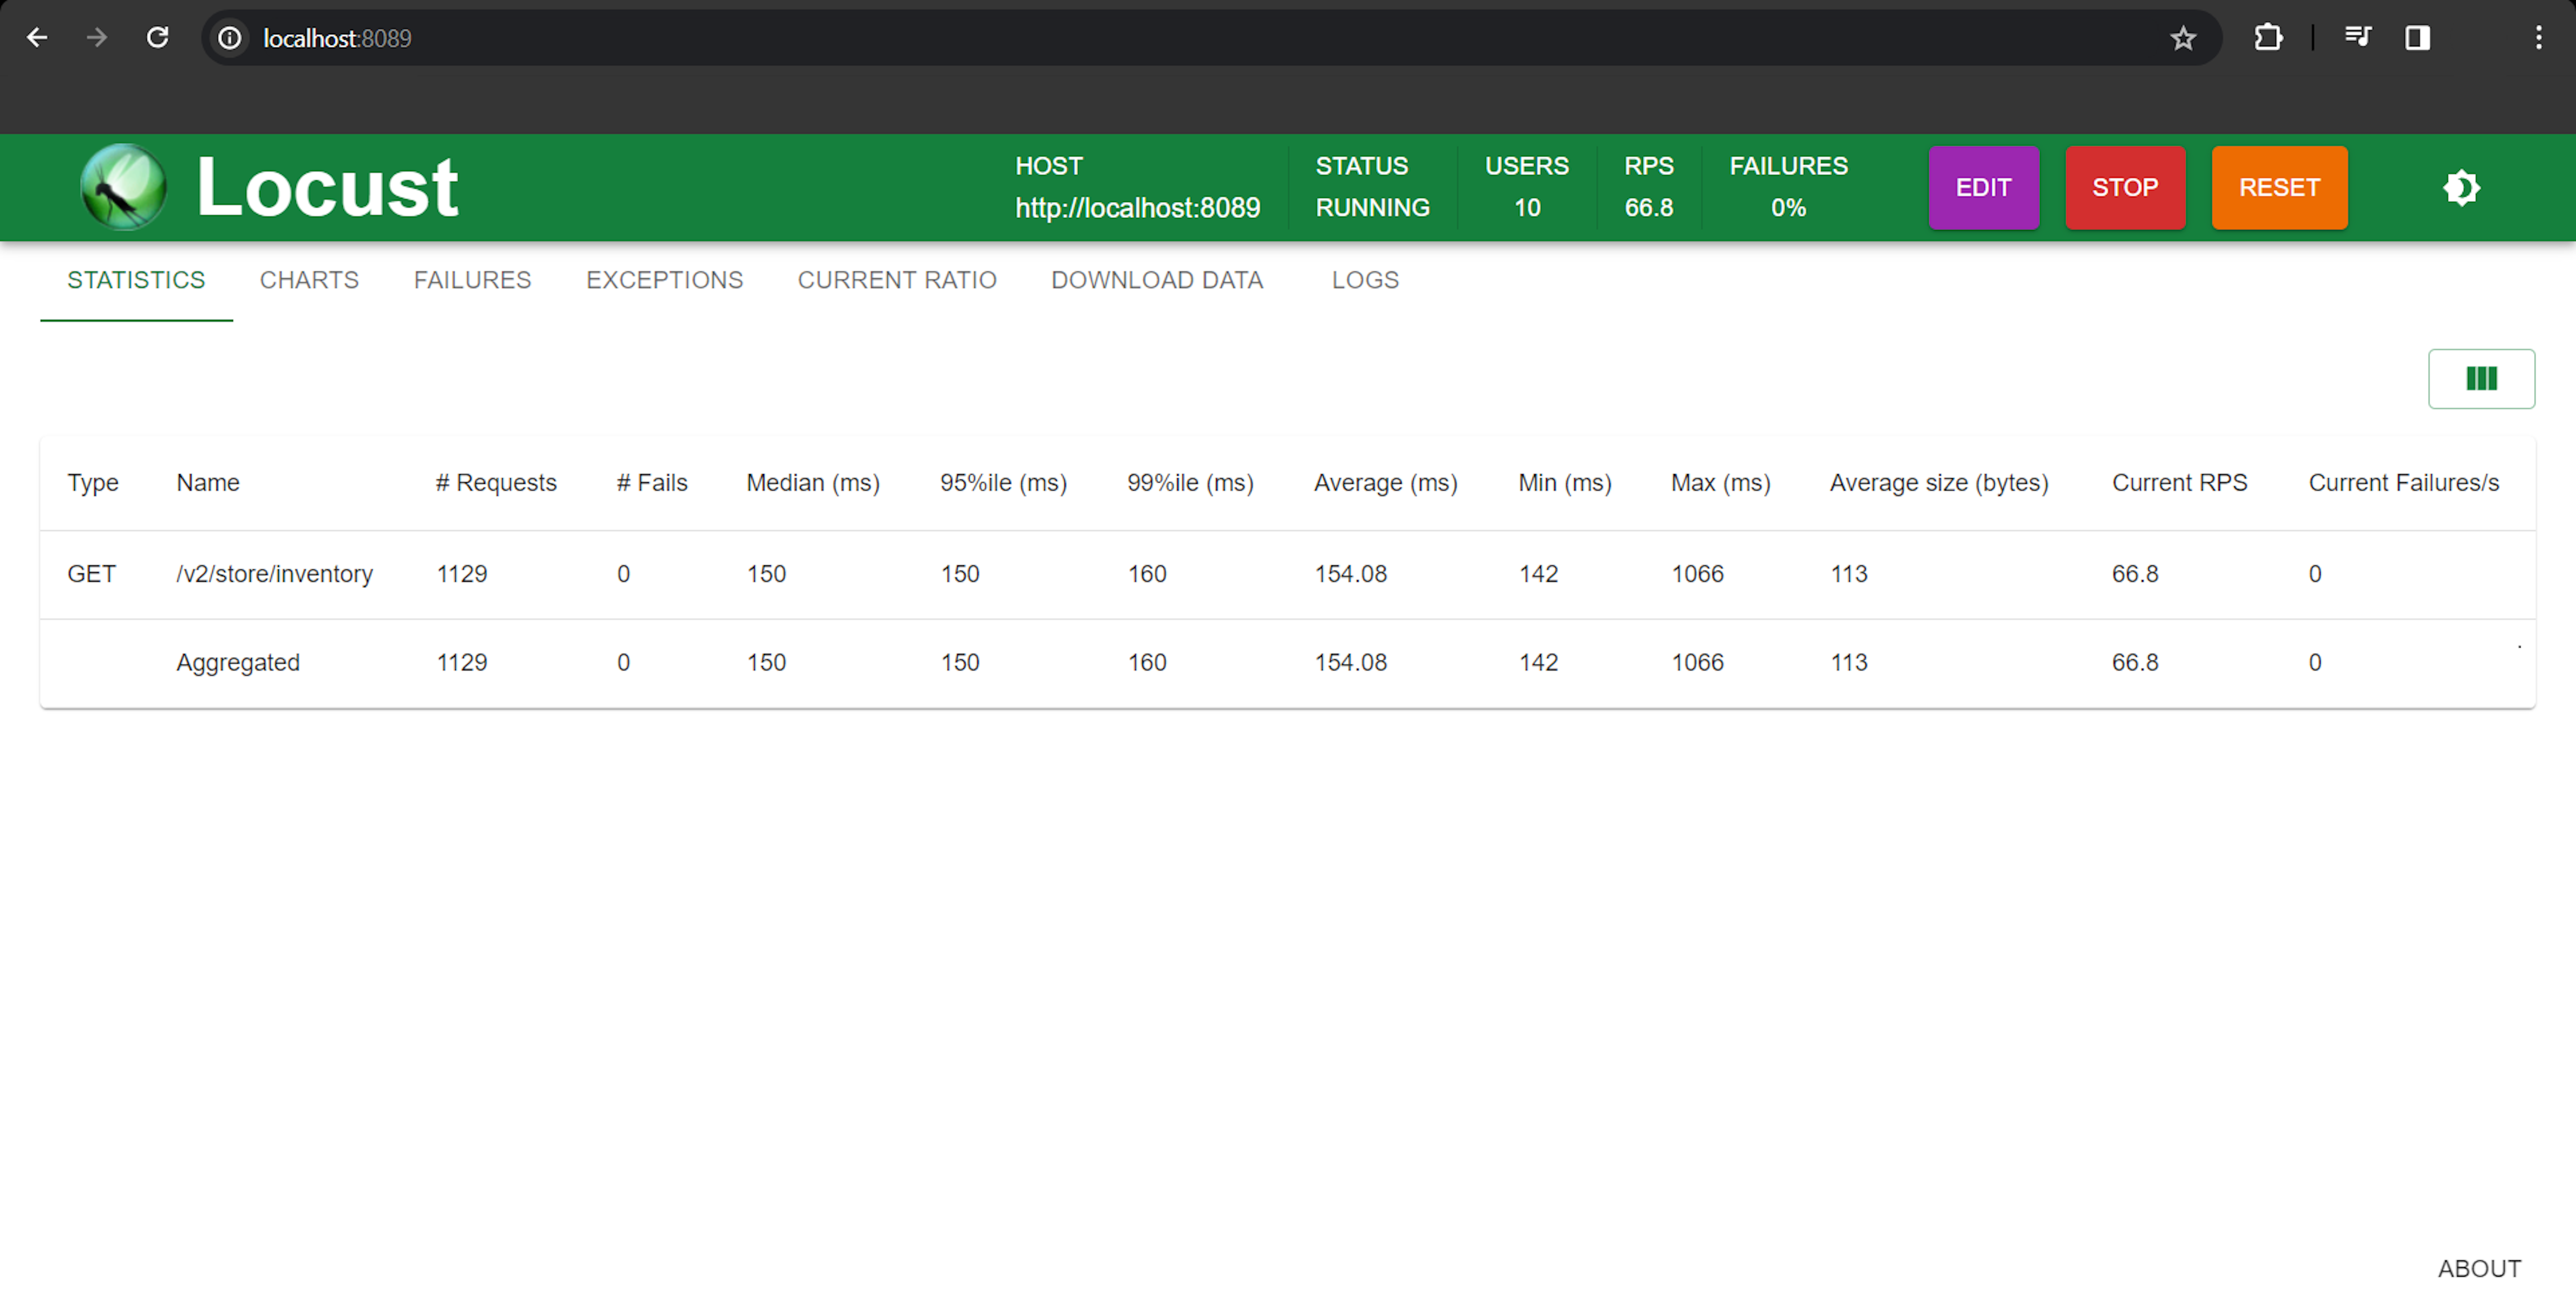
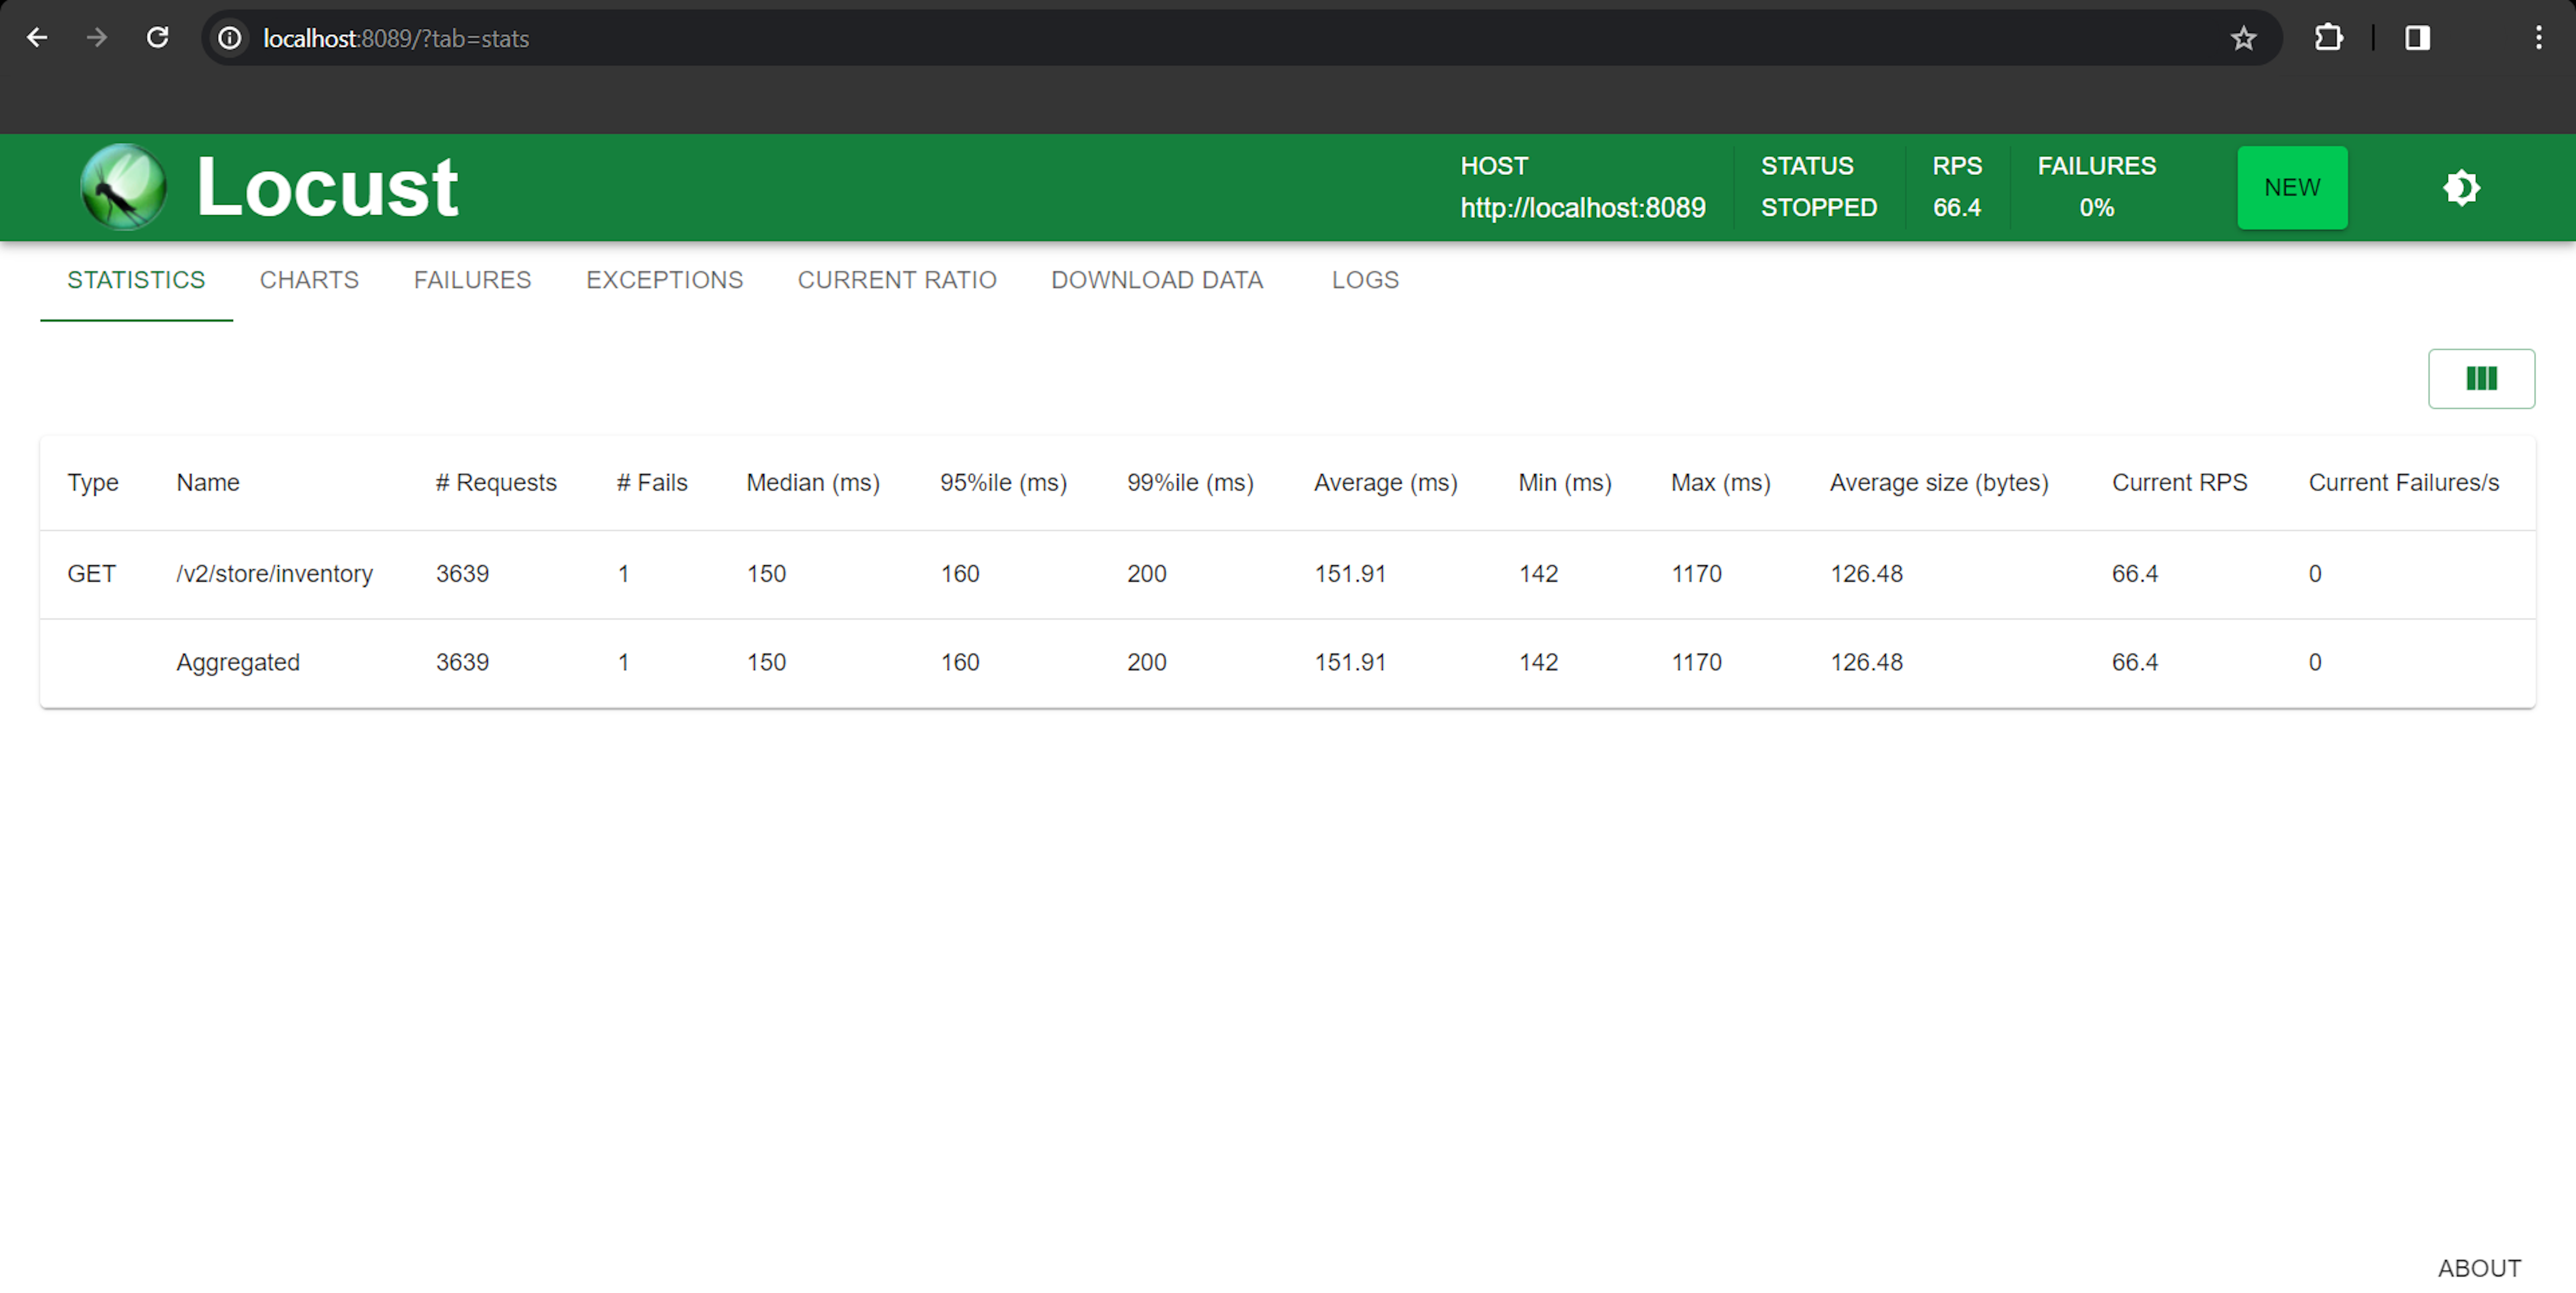
The next screenshot shows you the resulting stats of the test:
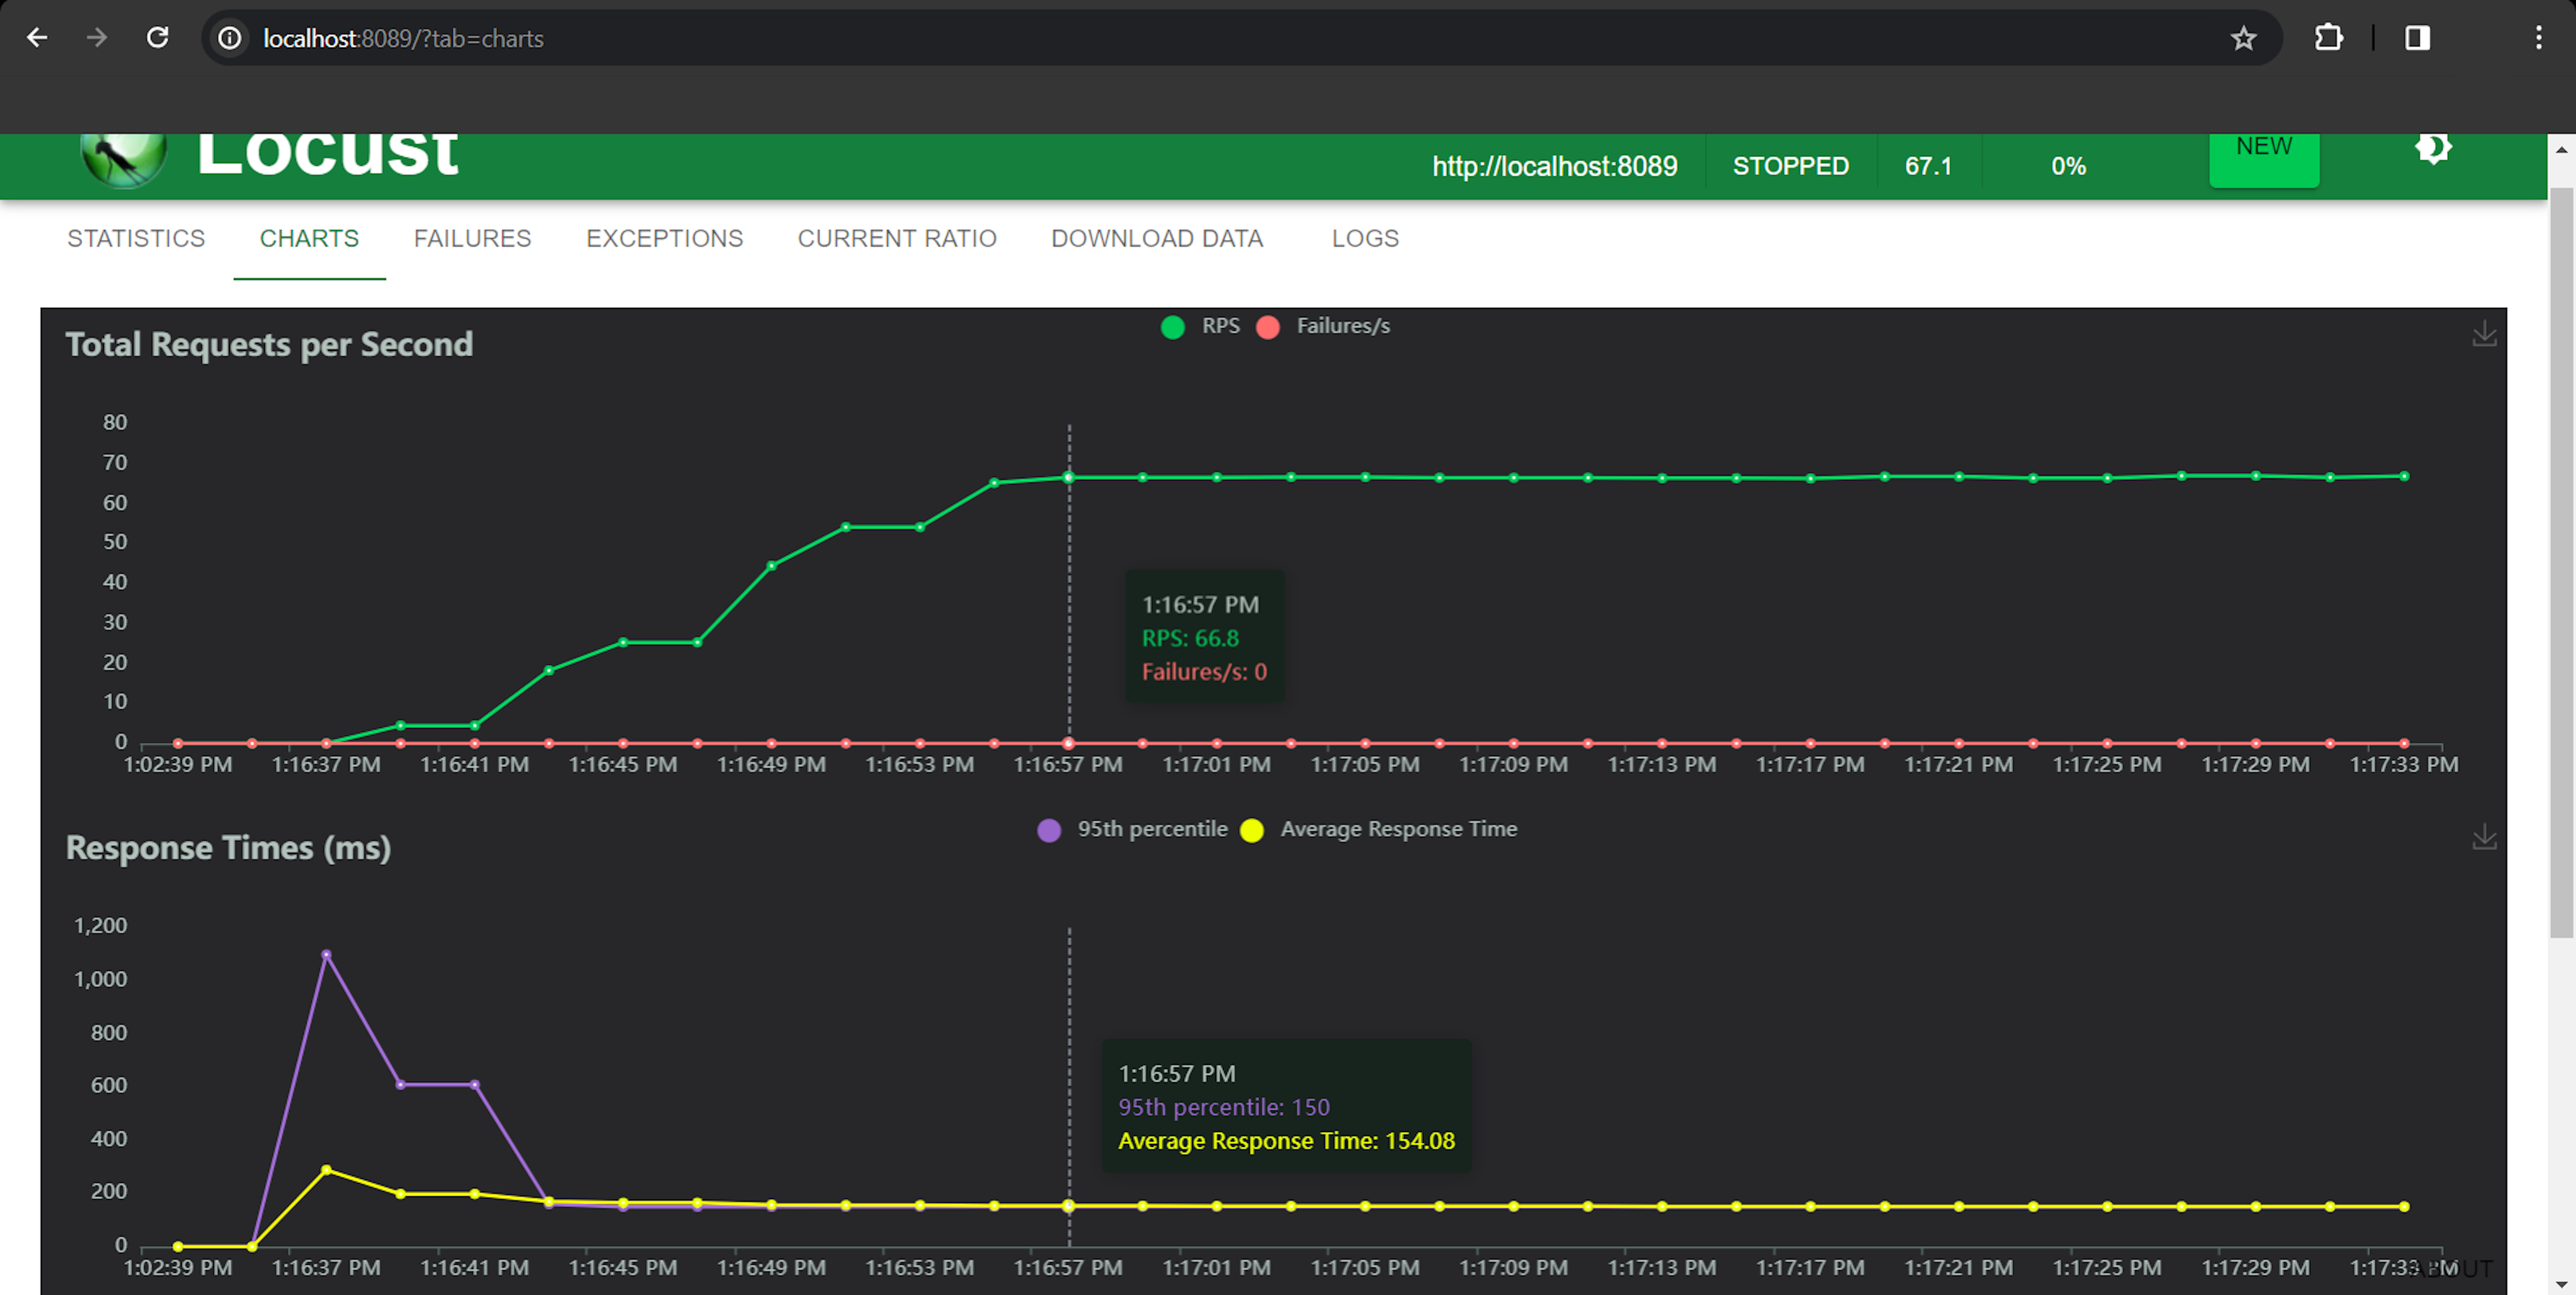
Also, there are several interactive charts available under the CHARTS tab. These are "Total Requests per Second," "Response Times (ms)" and "Number of Users":
Command prompt without the configuration file (headless)
Running locust tests via the command prompt is also easy. It is especially useful when you want to run Locust as part of a CI pipeline. Open up your directory with locustfile.py again and execute the following command:
PS C:\Locust> locust --headless --users 10 --spawn-rate 1 --host http://localhost:8089 --run-time 1mLet's describe the arguments we used:
- -- headless: Disable the web interface and start the test immediately in the command prompt.
- --users: Peak number of concurrent Locust users.
- --spawn-rate: Rate to spawn users at (users per second). Please note that --spawn-rate is a float number, so you can pass something like 0.5 meaning to bring up 1 user per 2 seconds.
- --host: Host to load tests.
- --run-time: Stop after the specified amount of time, e.g. 300s, 20m, 3h, 1h30m, etc. Defaults to run forever.
With the same shorter options your command may also look like this:
PS C:\Locust> locust --headless -u 10 -r 1 -H http://localhost:8089 -t 1mLocust will start populating metrics into your command prompt and finish with the following:
[2024-02-15 16:35:24,721] LAPTOP-8C13GC3L/INFO/locust.main: --run-time limit reached, shutting down
[2024-02-15 16:35:24,842] LAPTOP-8C13GC3L/INFO/locust.main: Shutting down (exit code 0)
Type     Name                                                                      # reqs      # fails |    Avg     Min     Max    Med |   req/s  failures/s
--------|------------------------------------------------------------------------|-------|-------------|-------|-------|-------|-------|--------|-----------
GET      /v2/store/inventory                                                         3579     0(0.00%) |    153     141     744    150 |   59.80        0.00
--------|------------------------------------------------------------------------|-------|-------------|-------|-------|-------|-------|--------|-----------
         Aggregated                                                                  3579     0(0.00%) |    153     141     744    150 |   59.80        0.00

Response time percentiles (approximated)
Type     Name                                                                              50%    66%    75%    80%    90%    95%    98%    99%  99.9% 99.99%   100% # reqs
--------|----------------------------------------------------------------------------|--------|------|------|------|------|------|------|------|------|------|------|------
GET      /v2/store/inventory                                                               150    150    150    160    160    160    170    190    690    740    740   3579
--------|----------------------------------------------------------------------------|--------|------|------|------|------|------|------|------|------|------|------|------
         Aggregated                                                                        150    150    150    160    160    160    170    190    690    740    740   3579
Exit code 0 also confirms that the test was successful. By the way, exit codes can be fine-tuned inside the locust file for various situations, but describing this feature is not a part of this guide.
Command prompt with the configuration file (headless)
In case you don't want to write long commands with a lot of arguments inside your command prompt and you don't need to change your test settings quite often, options can also be set in a configuration file using the config file format.
Locust will look for ~/.locust.conf and ./locust.conf by default, and you can specify an additional file using the --config flag.
Let's create a ./locust.conf file inside our working directory and try to put there all the arguments we used in the command prompt with their values. Finally, we will get the following:
headless = true
users = 10
spawn-rate = 1
host = http://localhost:8089
run-time = 1m
Now very simple command:
PS C:\Locust> locustWill do exactly what we did on the previous step without running Locust's web interface as someone may expect, because of the config inside the ./locust.conf file.